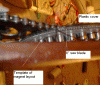
Continue to Site

Welcome to our site!

Electro Tech is an online community (with over 170,000 members) who enjoy talking about and building electronic circuits, projects and gadgets. To participate you need to register. Registration is free. Click here to register now.

  • Welcome to our site! Electro Tech is an online community (with over 170,000 members) who enjoy talking about and building electronic circuits, projects and gadgets. To participate you need to register. Registration is free. Click here to register now.

DIY Generator

Status
Not open for further replies.
JimB said:
Willie,
What are the magnets mounted on? I cannot tell.
JimB
they are mounted on an 8 '' saw blade..
i realize it is hard to see from the pics, but they are mounted on steel.
the rotor, from the magnets outward , is composed of a sheet of paper with the magnet layout, necessary.! then the saw blade approx 1/8 '' thick, sorry Bryan not 3/8.. i am working on a shoe string here guys..then there is a plastic cover , which serves two purposes , it acts as a chain guide and prevents the chain from sticking to the magnets. :lol:
yes! the chain would stick to the other side of the rotor , right through the steel..
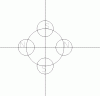
The rather odd ratio of magnets and coils, I would have expected a ratio of 1:1 or 2:1, but I am not an expert on 3 phase genrators.
its correct..
For single phase you need two magnets passing over each coil at the same time..
But for three phase the coil to magnet ratio has to be a multiple of 3/4.
which means that ,at the very least ,you could have three coils and four magnets , both evenly spaced on their respective platforms..
You could also have 6/8 , 9/12 , 12/16 , 15/20, or 18/24
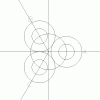
On your question of a magnetic circuit , any ferrus metal near the magnets ,causes cogging..
none of the axial wind generators on otherpopwer.com have any..but i did try it a while ago , i had strips of steel under the coils, there are probably pics of it in my earlier workings..
one more thing that i've found out , when working with cylinder magnets, the coil should be twice the width of the magnet , with the center of the coil equal to the magnet diameter..
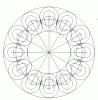
if you are interrested i will post some pics of a 3 coil 4 magnet generator seperatly so you could print them out and you'll see that as thr rotor turns each phase is 120 degrees apart..
 

Attachments

  • saw_blade.gif
    saw_blade.gif
    69.8 KB · Views: 1,764
i believe these are the same size ..
if you print the magnet one out on clear plastic transparency and put a pin through the center , youll see that as the rotor ( magnets) turns each phase goes through a maximum magnetic field.. i've done it..
note this is just an example , as the number of coils and magnets increases there is less and less wasted space between the coils..
 

Attachments

  • 34magnet.gif
    34magnet.gif
    5.6 KB · Views: 1,519
  • 34coil.gif
    34coil.gif
    8.8 KB · Views: 1,583
eh bryan , i got a little design here for ya..
with those magnets of yours this little baby should kick ass..
i apologize for the look of pic 2, but the program wouldnt let me make an arc of 2''or more ..but pic three is a blown up view of one of the coils..
the outermost dia. is 12.266 inches..the center of the magnets pass through an 8.922 dia. circle..
the coils are drawn , starting with a 1'' line , make a 1'' dia. arc on the left , across from that make a 1.5'' dia. arc with the center on the other end of the one inch line..
increase the radius by .5'' on either end and viola..
so your coils would have a half inch of wire around the perimeter..
 

Attachments

  • bcoil.gif
    bcoil.gif
    6.6 KB · Views: 1,538
  • b_gen.gif
    b_gen.gif
    21.5 KB · Views: 1,607
  • b_gen_mag.gif
    b_gen_mag.gif
    13.6 KB · Views: 1,575
Hiya Willi,
For my design I'll be using a 14" mild stell disc's 1/2' thick for the magnets and I'm making up a dual sided genny, so I'll be using 12 neo's on each disk. The stator will be cast in fiberglass and untill I get the wire and magnets the project has stalled at present. I wish I dug the anchor points for the genny tower when I cemented the genny base as it was 15 degrees cooler then and I'm going thru solid rock in some of the holes. As usual every project comes down to avaible funds and this one has already blown da budget. But my solar will handle everything over summer so the wind genny isn't a real prioity now, but my final design will come down to the winding wire I get as I'm going for a 1Kw wind genny in high winds. When time allows I'll get that dc motor wind genny up and flying and see what output I get but with fire season round da corner most my time is clearing around the house :(
Cheers Bryan :D
 
i'm happy to report that the new wire arrived today , so i wound up another coil ..
With the two coilsl of twenty gage i allready had , i hooked all three of them up to the genny and gave it a spin ( by itself , not on the cycle) , i got 16 V p-p just from the three coils , that means i can get 32 V p-p from one phase , which is 16V peak , which should give me at least 19 V , three phase rectified voltage ..
since available current was never a problem ,with the 17 gage wire, i think using the slightly thinner 20 gage should be perfect..
 
well i was right about the # 20 gage wire working better, because today was able to charge a 12V seald lead acid battery, with 14V !!..
and i still have one phase to make and install !!
granted charging 12 v is at the upper range of the speed i can generate by hand..but it still worked..
 
I worked fevorishly last night and finished the # 20 gage coils.. the results are outstanding..
Voc is the open circuit rectified three phase voltage.
Isc is the rectified current going right into my GB GDT-190A meter on the 10A scale
Voc is 22.5V at max cranking speed..
Isc is 5.34A @ approx 2.10 V
 

Attachments

  • picture_117.jpg
    picture_117.jpg
    130.1 KB · Views: 1,716
I've been thinking about testing this version of my generator. as i might soon change it again..and i am going to need some data for comparison.
Since alot depends on the speed of rotation , ie 100 RPM vs. 200 RPM , i suppose i am going to need some way to gage the rotation speed ..
I have a 4 channel A/D converter from microchip , but the pc that i have used in the past for this, and my pic programming is kaput.. but i have another , which also just beeps when i turn it on :?: , no video ..nothing..
i am thinking power supply problems ?? Just long beeps ,all the same .
 
this is the program that i just got done with, it could probably be adapted to work with the parallel port and basic , but i'm not sure..
if you notice some of the procedure names are the signals to a pic, thats because i took everything above Main, from my pic programmer..so there are a lot of varibles not used..and the array isnt really used properly in this version.
This version is used just to test the mcp3004, sort of a real time test..as i turned the pot the output changed on the screen..
But later on i'm going to use the array to store data from the generator..
https://www.electro-tech-online.com/custompdfs/2005/11/21295b-1.pdf
Code:
program newtest(indata,outdata,input ,output);
uses crt,dos;

Type
Arraytype = Array[0..1000,1..10] of integer;
Var

J:arraytype;
Ch,current:char;
indata,outdata: text;
some,dely:longint;
ad,xi,xii,data,yo1,coun,x11,count,value,temp1,index,step,Rb7I,X2,
counter,z,b,x1,y1,d1,Row,s,Col,x,y:integer;
flag:boolean;


procedure Delay;
begin
  for dely:=0 to 100 do
   begin
   end;
  end;

Procedure chipselL;
   begin delay; Port[$379]:=B;delay; end;
Procedure chipselH;
   begin delay; Port[$378]:=B;delay; end;
Procedure clockH;
   begin delay; Port[$37C]:=B;{ write(' 6H');} delay; end;
Procedure clockL;
   begin delay; port[$37D]:=B;{ write(' 6L');} delay; end;
procedure RB7H;
   begin delay; port[$37B]:=B;{ Write(' 7H ');}delay; end;
procedure RB7L;
   begin delay; port[$37A]:=B;{Write(' 7L ');}delay; end;
Procedure ToRB7;
   Begin port[$37E]:=B;delay;delay; end;
Procedure FromRB7;
   Begin Port[$37F]:=B;delay;delay; end;


{--------------------------- Main ------------------------}
Begin
toRB7; clockL; {initial conditions}
repeat
Y:=1; ChipselH;
chipselL; {conversion start}
Rb7H;
clockH;   {start bit,clk1}
clockL;
clockH;   {single/diff}
clockL;
rb7l;
clockH;   {D2}
clockL;
clockH;  { D1}
clockL;

clockH;  {D0}
clockL;

clockH; {t Sample}
clockL;
clockH; {null bit,clk7}
clockL;
fromRB7;
clockH;           {Bit9,clk8}
J[Y,1]:= Port[$37F];
clockL;
clockH;           {bit8,clk9}
J[Y,2]:= port[$37F];
clockL;
clockH;           {bit7,clk10}
J[Y,3]:= Port[$37F];
clockL;
clockH;           {bit6,clk11}
J[Y,4]:= port[$37F];
clockL;
clockH;           {bit5,clk12}
J[Y,5]:= Port[$37F];
clockL;
clockH;          {bit4,clk13}
J[Y,6]:= Port[$37F];
clockL;
clockH; {bit3         ,clk14}
J[Y,7]:= Port[$37F];
clockL;
clockH;  {bit2       ,clk15  }
J[Y,8]:= Port[$37F];
clockL;
clockH; {bit1        ,clk16}
J[Y,9]:= Port[$37F];
clockL;
clockH; {bit0        clk17}
J[Y,10]:= Port[$37F];
clockL;
toRB7;
clockH;     {        clk18}
clockL;

for y:=1 to 10 do begin
write(J[1,y]);
end;
writeln;
Until keypressed;
{end;}


for Y:=1 to 1 do begin
For x:= 1 to 10 do begin
Write(J[y,x]);end;
writeln;
end;

end.
 
JimB said:
Willie,
You have a serious problem here, there is no magnetic circuit!
Have a look at (say) a simple permanent magnet motor. There will be two iron poles from the magnet. The poles are very close to the rotor, a very small air gap, and the rotor is its self made of iron.
Lots of magnetic material to make a magnetic circuit.

What is in your magnetic circuit? several inches of air and wood. Not good.

JimB
Ya know , you were right!!
To effectivly make use of the magnets i would need two rotors that would compleat the magnatic circuit , right !

The two rotors would have 24 magnets each, with oposite poles attracting each other, thats what you ment ??
the only reason i havnt done it yet , is it makes construction much more difficult because the coils would have to be suspended between the two rotors , not impossible ,with some fibergalss resin , just more difficult. :)
 
Why not use a car alternator ,if you want a.c. just take out the diodes and the regulator. The stator is in star and the three ends normaly go to the diodes so you will have 3phase and a voltage depending on the speed of rotation and rotor current.
 
huh...
i was surprised to see this in here ..
man have i come a long way since then,
twards the previous end of this thread , i was just begining to get a grasp on three phase power generation.

built 3 sets of blades ,one small about 24" dia , one set is 3.5 feet dia, one is 8 feet dia.
i've built a mini gen out of a old 5 1/4" HD , complete with a 9 coil stator ,and dual 12 pole rotors using , 1/2" dia x 1/2" magnets .
i've also become proficient at winding coils
i have a dual rotor test bed with 24 poles of - 7/8"dia x 1" neodymium magnets
 
the reason not to use an auto alternator is that they are optimized for higher RPMs (800? rpm and up). You'll get poor performance at moderate to low wind speed. Some of the wind generators are designed to switch their coil configurations for the wind speed (parallel vs serial). squeezing efficiency out of a wind generator seems a pretty high priority.
 
Hiya WilliB,
Yea mate I was surprised to see your old thread popup in the new forum :eek: . Anyway it's good to see ya back here as I haven't seen ya post in this forum for ages. But I have noticed your wrapped with the otherpower forum and I've been keeping upto date on there with your projects. Anyway mate I finally got a wind genny up:D It's an old tape drive motor from a mainframe puter with a 2 blade 7 foot prop on it. But bloody Murphy struck and since I put it up well over a month ago I've only seen the genny make some decent power twice. The peak voltage I've seen todate is 28 volts and 6 amps so that equates to about 168 watts:D .
Anyway as time is a premuim these days my F&P genny is slowly getting together but I've made an 8 foot 3 blade prop for it and I'm going to set it up with a 2:1 ratio so I can get some decent power in low winds. Anyway when I can get me hands on another digi camera I'll make up a new thread for it.

Cheers Bryan:cool:
 
I read on some sight somewhere a bloke used a car alternator and took out the regulator and diodes. He had to feed part of the output into the rotor via the brushes which the diodes and regulator normaly do and he got quite a bit of three phase a.c. Obviously he had his bike in a stand.
 
With Neo magnets, and a 1725 rpm single phase motor (thirty six slots i believe), a fairly nice output can be had .
guys have used up to a 7.5 HP baldor motor , with a skewed stator to prevent cogging.
by skewing the stator you dont have to skew the rotor and the rotor magnets can be in a strait line.
of course no skewing is needed for an axial flux alternator/generator
 
Hi all,
This is my first post on Electrotech. I am about to build a dual rotor axial flux alternator, and I am in need of an online calculator for # of winding turns, air gap distances, wire size etc. Anyone know of such a site, or steps for manual calculations would be fine. Should I start a different thread???
Thanks
 
testing a single coil

I'm building a turbine generator and this would be very helpful for me. How did you test a "Single" coil? Additionally do you know if there's a problem utilizing 27 coils? or any odd number for that matter?
 
Hi Bryan1,

I notice you relied heavily on Hugh Piggott's work. I was curious as to your progress and if you built the unit he outline. It would appear as if you did not make your own genny?

I am about to buy the magnets he suggests and before I lay out the money would be keen for a little dialogue on the issue.

Cheers
Andrew
 
Status
Not open for further replies.

Latest threads

New Articles From Microcontroller Tips

Back
Top