Continue to Site

Welcome to our site!

Electro Tech is an online community (with over 170,000 members) who enjoy talking about and building electronic circuits, projects and gadgets. To participate you need to register. Registration is free. Click here to register now.

  • Welcome to our site! Electro Tech is an online community (with over 170,000 members) who enjoy talking about and building electronic circuits, projects and gadgets. To participate you need to register. Registration is free. Click here to register now.

Need LED assistance...

Status
Not open for further replies.

Maxer

New Member
Hey i am New here and exicted to learn more about electronics..
here is my project, i am tring to make some custom LED rear indicators using 6 LED's.. my bike has a 12v battery so when the key is in its at 12v with lights on and when engine is turning its at 12v - 14.5v
so maximum supply is 12v to 14.5v
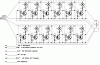
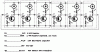
my goal is to have an LED squencer rather then just blink so whhen i hit the indicator button power is supplied to the LED's i want them to flash in a sequence... i found a circuit diagram, i am just checking with you guys if it would work.. here is it.
https://www.redcircuits.com/Page72.htm
I won't have the switch there (p1) just a direct connection and the pos and neg supply from bike as shown on the left hand side...
since i will have 6 led's does that mean i will have 6 Transistor, 6 capacitors, and 12 resistors on one board?

Also on the Notes section is says:

You can use several LEDs per module. They must be wired in series and supply voltage must be related to their number. (how do i wire them in series correctly? and i am going to be using hyper white LED's 2.2v each)

Using 24V supply (the maximum permitted voltage), about 10 LEDs wired in series can be connected to each module, about 7 at 15V and no more than 5 at 12V. (using 6 LED's would that be a problem?)

The right number of LEDs can vary, as it is depending by their color and brightness required. (color is white and maximum brightness is about 11000 MCD)
please help me out in this, if some one can draw me a new schematic for my situation that be cool if not i can try to edit it my self with some help.
thank you
Max
also i am very new to electronics my career feild is in criminal justice and stuff like that.
 
that is a neat little circuit...
when the switch is activated the first stage charges up the RC combination and base one in the process turning on transistor one.
ect .. ect..
won't have the switch there (p1) just a direct connection and the pos and neg supply from bike as shown on the left hand side...
no you need the switch otherwise they will go on one at a time ..when power is first applied..and they will all stay on..
since i will have 6 led's does that mean i will have 6 Transistor, 6 capacitors, and 12 resistors on one board.
yes ...
Using 24V supply (the maximum permitted voltage),
of what..?
V=IR
 
williB said:
that is a neat little circuit...
when the switch is activated the first stage charges up the RC combination and base one in the process turning on transistor one.
ect .. ect..
won't have the switch there (p1) just a direct connection and the pos and neg supply from bike as shown on the left hand side...
no you need the switch otherwise they will go on one at a time ..when power is first applied..and they will all stay on..
since i will have 6 led's does that mean i will have 6 Transistor, 6 capacitors, and 12 resistors on one board.
yes ...
Using 24V supply (the maximum permitted voltage),
of what..?
V=IR
well 24v that just came of that site i don't know of what..
well the thing is i don't need a switch because then this would be no good if i have to press 2 button to make my indicators go off.. is there any way around this? where i only have to hit the button that supply power to pos and neg wire and then my LED's flash in a sequence.. ?
thank you
max
 
Maxer said:
williB said:
that is a neat little circuit...
when the switch is activated the first stage charges up the RC combination and base one in the process turning on transistor one.
ect .. ect..
won't have the switch there (p1) just a direct connection and the pos and neg supply from bike as shown on the left hand side...
no you need the switch otherwise they will go on one at a time ..when power is first applied..and they will all stay on..
since i will have 6 led's does that mean i will have 6 Transistor, 6 capacitors, and 12 resistors on one board.
yes ...
Using 24V supply (the maximum permitted voltage),
of what..?
V=IR
well 24v that just came of that site i don't know of what..
well the thing is i don't need a switch because then this would be no good if i have to press 2 button to make my indicators go off.. is there any way around this? where i only have to hit the button that supply power to pos and neg wire and then my LED's flash in a sequence.. ?
thank you
max
I must say again that is a very neat circuit.. :)
no need to press two buttons to make them go off...
just press another one

it would work like this..
the ON/OFF button , closeest to your thumb..on the handelbar..this turns them all on or off..period..
the other button starts the sequener .. only...
 
williB said:
Maxer said:
williB said:
that is a neat little circuit...
when the switch is activated the first stage charges up the RC combination and base one in the process turning on transistor one.
ect .. ect..
won't have the switch there (p1) just a direct connection and the pos and neg supply from bike as shown on the left hand side...
no you need the switch otherwise they will go on one at a time ..when power is first applied..and they will all stay on..
since i will have 6 led's does that mean i will have 6 Transistor, 6 capacitors, and 12 resistors on one board.
yes ...
Using 24V supply (the maximum permitted voltage),
of what..?
V=IR
well 24v that just came of that site i don't know of what..
well the thing is i don't need a switch because then this would be no good if i have to press 2 button to make my indicators go off.. is there any way around this? where i only have to hit the button that supply power to pos and neg wire and then my LED's flash in a sequence.. ?
thank you
max
I must say again that is a very neat circuit.. :)
no need to press two buttons to make them go off...
just press another one

it would work like this..
the ON/OFF button , closeest to your thumb..on the handelbar..this turns them all on or off..period..
the other button starts the sequener .. only...
oh okay sweet thats awwsome so wouldn't that interpt the sequencer if the power is going ON and OFF once the indicators are on because they blink and i am guesing they blink because power is being cut on and off... also on the diagram does the dotted lines mean anything? i am going to try this my self, thank you agian for your help
max
 
Thats a pretty neat circuit you found.

The dotted lines look like they are sectioning off each 'module'. They are not wires.
~Mike
 
as MrMikey said..it sections them off..
when the switch is activated the first stage charges up the RC combination and base one in the process turning on transistor one.this starts transistor two's base charging up..turning on transistor two ....
meanwhile trans 1 goes out because the power is no longer applied to its base...
 
williB said:
hold please
Okay cool, here is the circuit i drew or created on the computer is this correct? i am going to make this if everything looks good..... thanks
max
 

Attachments

  • ledloop.gif
    ledloop.gif
    9 KB · Views: 856
Maxer said:
williB said:
as MrMikey said..it sections them off..
when the switch is activated the first stage charges up the RC combination and base one in the process turning on transistor one.this starts transistor two's base charging up..turning on transistor two ....
meanwhile trans 1 goes out because the power is no longer applied to its base...
Okay cool, here is the circuit i drew or created on the computer is this correct? i am going to make this if everything looks good..... thanks
max
looks good to me ..just hook up an on /off switch ..and maybe a fuse (for Protection ) and your good to go..
 
williB said:
Maxer said:
williB said:
as MrMikey said..it sections them off..
when the switch is activated the first stage charges up the RC combination and base one in the process turning on transistor one.this starts transistor two's base charging up..turning on transistor two ....
meanwhile trans 1 goes out because the power is no longer applied to its base...
Okay cool, here is the circuit i drew or created on the computer is this correct? i am going to make this if everything looks good..... thanks
max
looks good to me ..just hook up an on /off switch ..and maybe a fuse (for Protection ) and your good to go..
Hey i want 1 sequence button 1 left button 1 right button if i do it that way i will have 1 left 1 right 1 left sequence and 1 right sequence that will be messed up i want to just stick 1 sequence button in the middle of L and R buttons on the handle bar. so i drew up this schematic..
the battery is like a switch its only powering on circuit at a time and i didn't know how to draw that..
will that do or do i need to change that up? thanks max
 

Attachments

  • ledloop_188.gif
    ledloop_188.gif
    17.6 KB · Views: 835
ok take the plus from the battery connect that to rocker switch--center tap ,then to turn left. connect left side LED's...to turn right connect right side by pressing the right side of switch
 
williB said:
ok take the plus from the battery connect that to rocker switch--center tap ,then to turn left. connect left side LED's...to turn right connect right side by pressing the right side of switch
yes i am making turn signals i think ima do it first way with 2 seqence buttons i found these small tiny buttons 2 can be pressed with my Thumb will just have those right next to each other and it will be like pressing one button :) thanks or helping
Max
 
Hi Guys,
I think that you missed the point of that simple circuit requiring a reset button:
When power is applied, any LED or combination of LEDs will light!
You'll need a 2nd person to hold the reset button and watch the LEDs until they all go off except the last one. Then that other person releases the reset button and the sequence begins. No good for a turn-signal.

You need to have a digital stepper, like a CD4017 with an oscillator. The CD4017 has built-in "smarts" (disallowed states eliminator) to ensure that only one LED will light when power is applied. You will need 2 circuits, one for the left LEDs and the other for the right.
 
audioguru said:
Hi Guys,
I think that you missed the point of that simple circuit requiring a reset button:
When power is applied, any LED or combination of LEDs will light!
You'll need a 2nd person to hold the reset button and watch the LEDs until they all go off except the last one. Then that other person releases the reset button and the sequence begins. No good for a turn-signal.

You need to have a digital stepper, like a CD4017 with an oscillator. The CD4017 has built-in "smarts" (disallowed states eliminator) to ensure that only one LED will light when power is applied. You will need 2 circuits, one for the left LEDs and the other for the right.
crap that sucks i thought i finally had it well can you help me fix this diagram so i can start over? please thanks
max
 
okay here is the new schematic, you think this will work? it has no switch
thanks
max
 

Attachments

  • ledloop_301.gif
    ledloop_301.gif
    8.6 KB · Views: 404
this auto turn indicator ... if connected properly to the front of your circuit
should /could .. blink the LED's in the right sequence from the get go..
audioguru had a good point

**broken link removed**
 
what would happen if we were to connect the wire comming from the relay..+12V on ...+12V off ....to the base of the first transistor and the 12V supply to your circuit..just trying out ideas here..
 
williB said:
this auto turn indicator ... if connected properly to the front of your circuit
should /could .. blink the LED's in the right sequence from the get go..
audioguru had a good point

**broken link removed**
i really don't know how to get to the front relay i don't wanna undo the wiring loom, thats why i was looking for a simple curcuit instead. I seen it done but he rode off and i forgot to ask the dude how he did it or got it done.
max
 
Status
Not open for further replies.

Latest threads

Back
Top