Continue to Site

Welcome to our site!

Electro Tech is an online community (with over 170,000 members) who enjoy talking about and building electronic circuits, projects and gadgets. To participate you need to register. Registration is free. Click here to register now.

  • Welcome to our site! Electro Tech is an online community (with over 170,000 members) who enjoy talking about and building electronic circuits, projects and gadgets. To participate you need to register. Registration is free. Click here to register now.

computer Christmas lights

MrDEB

Well-Known Member
years ago I assembled a Compurterized Christmas light display but since sold the entire setup.
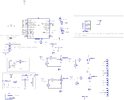
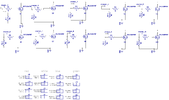
I recall the SSR or triac boards used an opti-isolator, couple resistors but instead of using a computer, I want to just use a PIC to drive the opti_isolator. Just started looking for leftover plans and parts but figure would ask first.
 
TAKE THE BULL BY THE HORNS
while configuring the LED matrix it dawned on me to just cycle through the anodes and not worry about the cathodes since I removed the 4 MOSFETs and connected the rows directly to the desired port (B.2 - B.5)
seems to work just fine. Hopefully connect the mass of wires to the PCB today. My only concern is the 7805 getting hot. Estimating less than 500ma when all the LEDs are enabled.
Code:
{
*****************************************************************************
*  Name    : UNTITLED.BAS                                                   *
*  Author  : [select VIEW...EDITOR OPTIONS]                                 *
*  Notice  : Copyright (c) 2022 [select VIEW...EDITOR OPTIONS]              *
*          : All Rights Reserved                                            *
*  Date    : 11/10/2022                                                     *
*  Version : 1.0                                                            *
*  Notes   :  RYDERWOOD SIGN START 11/10/22                                                              *
*          :                                                                *
*****************************************************************************
}
Device = 18F2221
Clock = 8

Include "intosc.bas"   
#option SWORDFISH_SE = true
Include "setdigitalio.bas"//Include "SetDigitalIO.bas"
Include "utils.bas"
Include "Convert.bas"


//12 VOLT LED STRIPS
Dim R As PORTA.0
Dim Y As PORTA.1
Dim D As PORTA.2
Dim E As PORTA.3
Dim R_1 As PORTA.4
Dim W As PORTA.5
Dim O As PORTA.6
Dim D_1 As PORTA.7
Dim Red_Candle_STRIPS As PORTB.0  //turn on mosfet Q10
Dim nc_2 As PORTB.1  //not  used

//CAKE SPRINKLES CATHODES USING MOSFETS    mosfets ar? cycle through the COLUM (SPRINKLES)  not the  ROWS
Dim Row_4 As PORTB.2
Dim Row_3 As PORTB.3
Dim Row_2 As PORTB.4
Dim Row_1 As PORTB.5

//HEADLIGHT ON TRAIN ENGINE
Dim Head_light As PORTC.7

//CANDLE FLAMES
Dim Flame1 As PORTC.0
Dim Flame2 As PORTC.1
Dim Flame3 As PORTC.2

// SPRINKLES ANODES
Dim RED As PORTC.3
Dim WHITE As PORTC.4
Dim BLUE As PORTC.5
Dim GREEN As PORTC.6

// before enabling the outputs, init all LAT registers low
LATA = 0
LATB = 0
LATC = 0


//ENABLE OUTPUTS  port A, B, C
TRISA = 0   
TRISB = 0
TRISC = 0

//SPRINKLES COLUMS
RED = 0
WHITE=0
BLUE = 0
GREEN = 0
 
// MAKE ALL THE CATHODES LOW
Row_1 = 0 
Row_2 = 0
Row_3 = 0
Row_4 = 0
Head_light = 0

 While true

 
 //ALL LED STRIPS ON VIA MOSFETS Q1-Q8
 R = 1
 Y = 1
 D = 1
 E = 1
 R_1 = 1
 W = 1
 O = 1
 D_1 = 1
 Red_Candle_STRIPS = 1  //the 100 symbols on top f cake
 nc_1 = 1
      
       Red_Candle_STRIPS= 1   //TURN ON MOSFET ON B.1   TESTING 11/11/22
       DelayMS(500)
       Red_Candle_STRIPS = 0
       DelayMS(500)           //turn off Red_Candle_STRIPS
 // CYCLE THROUGH ENABLING THE ANODES     
 //RED
    red = 1
    WHITE=0
    BLUE = 0
    GREEN = 0
  
       DELAYMS(100)
       //WHITE
        red = 0
        WHITE =1
        BLUE = 0
        GREEN = 0
      
           DELAYMS(100)
           //BLUE
            red = 0
            WHITE=0
            BLUE = 1
            GREEN = 0
          
                DELAYMS(100)
                //GREEN
                red = 0
                WHITE=0
                BLUE = 0
                GREEN = 1
              DELAYMS(100)


      Head_light = 1
      DelayMS(100)
      Toggle(Head_light)
      DelayMS(100)
      
 Wend
 
Until you can draw and post a clear, readable schematic (showing all connections) that accurately represents the actual pcb, I think the pool of people willing to help you is zero.

Endlessly posting random code with comments of "it didn't work but now it does" without any explanation and changing directions so rapidly that it's a total mystery what you're doing doesn't help either.

Schematic_ESP Christmas Village V1_2022-08-04.png
 
The schematic is readable but maybe I need to post it differently than a screen shot

No, it is not. It's impossible to tell what's connected where without extraordinary effort. Take my comments above as helpful advice or ignore them.
 
this project w/ headlights etc. is not about Christmas stars. It's about Ryderwoods town centennial come July 2023
I will post a pic of the completed project.
 
using SF is it possible to enable a weak pull-up on one portB.1
I need to reconfigure portb.1 as an input.
if not then I need to add a jumper wire to port B.1 along with a pull-up resistor
 
Gee, I wonder if the datasheet has any info on this?

Each of the PORTB pins has a weak internal pull-up.
A single control bit can turn on all the pull-ups.
This is performed by clearing bit, RBPU(INTCON2<7>).
The weak pull-up is automatically turned off when the port
pin is configured as an output. The pull-ups are
disabled on a Power-on Reset.

So, on the 18F2221 when you turn on the PORTB pullups it's on for
the entire port, not just PORTB.1
Code:
// turn on 18F2221 PORTB pullups
INTCON2.7 = 0
 
is there a specific order to set the outputs and inputs?
portB.1 (flames) has a pull-up resistor (verified) but portB.1 acts like its always HIGH (VERIFIED )
THINKING the order the LATB setting or the TRISB setting. Using the RED, GREEN and Rows to indicate when portB goes LOW.
Code:
// before enabling the outputs, init all LAT registers low
LATA = 0
LATB = 0
LATC = 0


//ENABLE OUTPUTS  port A, B, C
TRISA = 0   
TRISB = 0
TRISC = 0

//SPRINKLES COLUMS
RED = 0
WHITE=0
BLUE = 0
GREEN = 0
Input(Flames)
// MAKE ALL THE CATHODES LOW
Row_1 = 1 
Row_2 = 1
Row_3 = 1
Row_4 = 1
Head_light = 0     //TOGGLETO  SIMULATE MOVEMENT
Flames = 1
//TURN OFF THE LETTERING
R = 0
Y = 0
D = 0
E = 0
R_1 = 0
W = 0
O = 0
D_1 = 0

//TURN OFF THE RED STRIPS
  Red_Candle_STRIPS = 0
 
// TURN OFF FLAMES
Flame1 = 0
Flame2 = 0
Flame3 = 0
Input(Flames)     //connects to ground via toggle switch connected to portb.1 (flames)
Flames = 1        //HIGH  until switch is on (grounded)

 While true
 RED =1           //colums
 green = 1
   If Flames = 1 Then   //toggle switch off
   Row_1= 1
   EndIf
  
   If Flames = 0 Then   //toggle switch on
       Row_3 = 0
       delayms(500)
       row_3=1
       delayms(500)
      
   EndIf
   Wend
 
Here is my revised code but will redo the TRIS REGISTER NOTE have started adding more descriptions as I found I get lost when looking at code that was written 6 months ago.
Code:
}
Device = 18F2221
Clock = 8

Include "intosc.bas"   
#option SWORDFISH_SE = true
Include "setdigitalio.bas"//Include "SetDigitalIO.bas"
Include "utils.bas"
Include "Convert.bas"


//12 VOLT LED STRIPS
Dim R As PORTA.0
Dim Y As PORTA.1
Dim D As PORTA.2
Dim E As PORTA.3
Dim R_1 As PORTA.4
Dim W As PORTA.5
Dim O As PORTA.6
Dim D_1 As PORTA.7
Dim Red_Candle_STRIPS As PORTB.0  //turn on mosfet Q10
Dim Flames As PORTB.1  //TOGGLE SWITCH PORT

//CAKE SPRINKLES CATHODES USING MOSFETS    mosfets ar? cycle through the COLUM (SPRINKLES)  not the  ROWS
Dim Row_4 As PORTB.2
Dim Row_3 As PORTB.3
Dim Row_2 As PORTB.4
Dim Row_1 As PORTB.5

//HEADLIGHT ON TRAIN ENGINE
Dim Head_light As PORTC.7

//CANDLE FLAMES
Dim Flame1 As PORTC.0
Dim Flame2 As PORTC.1
Dim Flame3 As PORTC.2

// SPRINKLES ANODES
Dim RED As PORTC.3
Dim WHITE As PORTC.4
Dim BLUE As PORTC.5
Dim GREEN As PORTC.6


Sub Sprinkles()
     // CYCLE THROUGH ENABLING THE ANODES and rows
     // LIGHT CANDLES
 //CANDLE FLAMES  ON SEQUENCLY
          Flame1 = 1
          DelayMS(2000)
          Flame2 = 1
          DelayMS(2000)
          Flame3 = 1   
          
//Row_1
    RED = 1
    WHITE=0
    BLUE = 0
    GREEN = 0
    Row_1 = 0
    Row_2 = 1
    Row_3 = 1
    Row_4 = 1
    DelayMS(10)
    Row_1 = 1
    Row_2 = 0
    Row_3 = 1
    Row_4 = 1
    DelayMS(10)
    Row_1 = 1
    Row_2 = 1
    Row_3 = 0
    Row_4 = 1
    DelayMS(10)
    Row_1 = 1
    Row_2 = 1
    Row_3 = 1
    Row_4 = 0
    DelayMS(10)
    
//ROW_2   
        
        RED = 0
        WHITE=0
        BLUE = 1
        GREEN = 0
        Row_1 = 0
        Row_2 = 1
        Row_3 = 1
        Row_4 = 1
        DelayMS(10)
        Row_1 = 1
        Row_2 = 0
        Row_3 = 1
        Row_4 = 1
        DelayMS(10)
        Row_1 = 1
        Row_2 = 1
        Row_3 = 0
        Row_4 = 1
        DelayMS(10)
        Row_1 = 1
        Row_2 = 1
        Row_3 = 1
        Row_4 = 0
        DelayMS(10)
        
      
//ROW_3                 
            RED = 0
            WHITE=0
            BLUE = 1
            GREEN = 0
            Row_1 = 0
            Row_2 = 1
            Row_3 = 1
            Row_4 = 1
            DelayMS(10)
            Row_1 = 1
            Row_2 = 0
            Row_3 = 1
            Row_4 = 1
            DelayMS(10)
            Row_1 = 1
            Row_2 = 1
            Row_3 = 0
            Row_4 = 1
            DelayMS(10)
            Row_1 = 1
            Row_2 = 1
            Row_3 = 1
            Row_4 = 0
            DelayMS(10)
            
//ROW_4               
                    RED = 0
                    WHITE=0
                    BLUE = 0
                    GREEN = 1
                    Row_1 = 0
                    Row_2 = 1
                    Row_3 = 1
                    Row_4 = 1
                    DelayMS(10)
                    Row_1 = 1
                    Row_2 = 0
                    Row_3 = 1
                    Row_4 = 1
                    DelayMS(10)
                    Row_1 = 1
                    Row_2 = 1
                    Row_3 = 0
                    Row_4 = 1
                    DelayMS(10)
                    Row_1 = 1
                    Row_2 = 1
                    Row_3 = 1
                    Row_4 = 0
                    DelayMS(10)
           End Sub


// before enabling the outputs, init all LAT registers low
LATA = 0
LATB.0 = 0
LATB.1 = 1
LATB.2 = 0
LATB.3 = 0
LATB.4 = 0
LATB.5 = 0
LATB.6 = 0
LATB.7 = 0
LATC = 0


//ENABLE OUTPUTS  port A, B, C
TRISA = 0   
TRISB.0 = 0
TRISB.1 = 1    //input
TRISB.2 = 0
TRISB.3 = 0
TRISB.4 = 0
TRISB.5 = 0
TRISB.6 = 0
TRISB.7 = 0
TRISC = 0

//SPRINKLES COLUMS
RED = 0
WHITE=0
BLUE = 0
GREEN = 0
Input(Flames)
// MAKE ALL THE CATHODES LOW
Row_1 = 1 
Row_2 = 1
Row_3 = 1
Row_4 = 1
Head_light = 0     //TOGGLETO  SIMULATE MOVEMENT
Flames = 1
//TURN OFF THE LETTERING
R = 0
Y = 0
D = 0
E = 0
R_1 = 0
W = 0
O = 0
D_1 = 0

//TURN OFF THE RED STRIPS
  Red_Candle_STRIPS = 0
 
// TURN OFF FLAMES
Flame1 = 0
Flame2 = 0
Flame3 = 0
Input(Flames)     //connects to ground via toggle switch connected to portb.1 (flames)
'Flames = 1        //HIGH  until switch is on (grounded)

 While true
 RED =1           //colums
 green = 1
   If Flames = 1 Then   //toggle switch off
   Row_1= 1
   EndIf
  
   If Flames = 0 Then   //toggle switch on
       Row_3 = 0
       delayms(500)
       row_3=1
       delayms(500)
      
   EndIf
   Wend
 
You need to set the port IO mode to digital since they default to analog. If they are left in analog mode then a port will always read as a '0'.

To do this you have two choices:
- include "setdigitalio.bas" and add a call to SetAllDigital() at the start of your program, like
Code:
include "setdigitalio.bas"

SetAllDigital()       // set ports to digital mode

or let the compiler do it for you automatically by setting the #option, which must appear before the 'include' statement
Code:
#option DIGITALIO_INIT = true     // tell compiler to automatically call SetAllDigital
include "setdigitalio.bas"

Unlike the intosc.bas module, SF doesn't do this automatically when you include setdigitalio as this feature was added later and it would change the way existing programs worked.
 
Tumbleweed, do you ever get the feeling like you're living in Groundhog Day? Like you've said the same thing many times before, but here you are again?

Or maybe it's more a Star Trek temporal loop? You don't remember time repeating but there's a vague notion you're living through the same loop again and again?
 
Thanks I do have in the header

Include "intosc.bas"
#option SWORDFISH_SE = true
Include "setdigitalio.bas"//Include "SetDigitalIO.bas"
Include "utils.bas"
Include "Convert.bas"


but did not include at start of program
 
well it still does not recognize a LOW on portb.1 going to recheck all again.
Code:
{
*****************************************************************************
*  Name    : UNTITLED.BAS                                                   *
*  Author  : [select VIEW...EDITOR OPTIONS]                                 *
*  Notice  : Copyright (c) 2022 [select VIEW...EDITOR OPTIONS]              *
*          : All Rights Reserved                                            *
*  Date    : 11/26/2022                                                     *
*  Version : 1.0                                                            *
*  Notes   :  short version                                                              *
*          :                                                                *
*****************************************************************************
}
Device = 18F2221
Clock = 8
#option DIGITALIO_INIT = true     // tell compiler to automatically call SetAllDigital
#option SWORDFISH_SE = true
Include "setdigitalio.bas"
Include "intosc.bas"   

'Include "setdigitalio.bas"//Include "SetDigitalIO.bas"
Include "utils.bas"
Include "Convert.bas"
Dim Flame_enable As PORTB.1
//CANDLE FLAMES
Dim flame1 As PORTC.0
Dim Flame2 As PORTC.1
Dim Flame3 As PORTC.2
dim Row_3 as portb.4
dim red as portc.3


 // before enabling the outputs, init all LAT registers low
LATA = 0
LATB.0 = 0
LATB.1 = 1
LATB.2 = 0
LATB.3 = 0
LATB.4 = 0
LATB.5 = 0
LATB.6 = 0
LATB.7 = 0
LATC = 0


//ENABLE OUTPUTS  port A, B, C
TRISA = 0   
TRISB.0 = 0
TRISB.1 = 1    //input
TRISB.2 = 0
TRISB.3 = 0
TRISB.4 = 0
TRISB.5 = 0
TRISB.6 = 0
TRISB.7 = 0
TRISC = 0


// TURN OFF FLAMES
Flame1 = 0
Flame2 = 0
Flame3 = 0
Input(Flame_enable)     //connects to ground via toggle switch connected to portb.1 (flames)
'Flames = 1        //HIGH  until switch is on (grounded)
SetAllDigital()

 While true
   red = 1
   If Flame_enable = 0 Then   //toggle switch off
   Flame1 = 1
   Flame2 = 1
   Flame3 = 1
   DelayMS(500)
   EndIf
 
   If Flame_enable = 1 Then   //toggle switch on
       Row_3 = 0
       DelayMS(500)
       Row_3=1
       DelayMS(500)
      
   EndIf
   Wend
a LOW on portb.1
 

Latest threads

New Articles From Microcontroller Tips

Back
Top