Continue to Site

Welcome to our site!

Electro Tech is an online community (with over 170,000 members) who enjoy talking about and building electronic circuits, projects and gadgets. To participate you need to register. Registration is free. Click here to register now.

  • Welcome to our site! Electro Tech is an online community (with over 170,000 members) who enjoy talking about and building electronic circuits, projects and gadgets. To participate you need to register. Registration is free. Click here to register now.

Trying to fix remote for Sony TV

Status
Not open for further replies.

starLED

Member
I have tried to determine why is my remote for Sony TV broken, but I can't quite figure it out.
I have tested almost every component with multimeter, they seem to be ok.
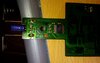
I suspect that chip 34286g2 could be faulty, I tested all leads and they show 700 ohms resistance, but maybe something else is broken.
Can someone help me to determine what is wrong with it?
 

Attachments

  • 1.jpg
    1.jpg
    741.7 KB · Views: 426
  • 2.jpg
    2.jpg
    867.4 KB · Views: 355
  • 3.jpg
    3.jpg
    1,006 KB · Views: 335
There's very little you can test with a multimeter - common failures in remotes are the IR LED, the ceramic resonator, and the large capacitor (although this causes usually just causes very short battery life). Don't worry about the IC, they aren't available.

However, Sony remotes are freely available at quite modest cost.
I don't need new remote, I just want to find out what's wrong with this one.

1. IR LED is working.
2. I don't know how to test ceramic resonator, I have frequency testing feature on multimeter.
3. Capacitor is charging, voltage exists, and I have tested with LED diode, it discharges and LED blinked.

I have tested connections, and they all are conducting, but I am not sure if this is ok:
From 2nd IC PIN to resistor R2 I don't have connection, it's 1 on multimeter, is that ok?
4.jpg
 
Try a good set of alkaline batteries in the remote and point it at a CCD camera like a camcorder. Press each of the buttons. Do you see the IR LED blinking?
 
Has any liquid such as fizzy drinks spilled on the remote? There is some residue around Q1 and R2. Try cleaning those spots with some IPA. That might help you find out if the track from pin 19 on U1 does actually go to R2.

Also have a read of this to learn how IC numbering works:

https://www.electronicsclub.info/ics.htm
 
carbon makes a low-cost remote. They can wear the conductive elastomer on the keys.

One failure mode you don't see to often is where a salt water atmosphere (living on the ocean) destroys the traces.

Yours has a capcitor, an IC, a a LED driver Q1, R1, R2). Drinks spille don the remote causing corrosion is a failure mode,

For troubleshooting, temporarily replace the IR LED with a visible one.
 
Has any liquid such as fizzy drinks spilled on the remote? There is some residue around Q1 and R2. Try cleaning those spots with some IPA. That might help you find out if the track from pin 19 on U1 does actually go to R2.
When I opened remote there were sillicon oil all over PCB, I have cleaned it up.
 
carbon makes a low-cost remote. They can wear the conductive elastomer on the keys.

One failure mode you don't see to often is where a salt water atmosphere (living on the ocean) destroys the traces.

Yours has a capcitor, an IC, a a LED driver Q1, R1, R2). Drinks spille don the remote causing corrosion is a failure mode,

For troubleshooting, temporarily replace the IR LED with a visible one.
I don't live near the ocean, unfortunately. :(
Nothing was spilled on the remote ever.
 
When I opened remote there were sillicon oil all over PCB, I have cleaned it up.

That could be the problem, they don't have silicon oil inside remote controls - but it commonly appears from 'some where', often a sign that the remote is past it. 'Some times' you can clean it up, and the remote works again, other times it doesn't - I 'suspect' it comes off the rubber keypad?.
 
That could be the problem, they don't have silicon oil inside remote controls - but it commonly appears from 'some where', often a sign that the remote is past it. 'Some times' you can clean it up, and the remote works again, other times it doesn't - I 'suspect' it comes off the rubber keypad?.
Yes, it's from keypad.
Still, I want to know where exact failure is, right now suspicious is that connection from PIN2 to R2. Is it supose to go directly from PIN2->R2 or is it going around through IC?
 
Yes, it's from keypad.
Still, I want to know where exact failure is, right now suspicious is that connection from PIN2 to R2. Is it supose to go directly from PIN2->R2 or is it going around through IC?

That appears to be the drive from the IC, through the resistor R2, to Q1 that drives the LED, so it should read - it's unlikely to be faulty (although not impossible), most likely you're not making correct contact with your meter - resoldering the connections should give you a clean contact point.
 
That appears to be the drive from the IC, through the resistor R2, to Q1 that drives the LED, so it should read - it's unlikely to be faulty (although not impossible), most likely you're not making correct contact with your meter - resoldering the connections should give you a clean contact point.
I am sure that I am making correct contact, for example testing IC pin with PIN2 give me reading of 700 ohms.
Also R2 with HDV4 transistor is reading contact.
 
You can try this "trick". Take the batteries out and short the battery terminals overnight. Rarely, it needs a week. Sometimes, minutes is enough,

The method has fixed some stuff for me:
a) An HP calculator that was using commas instead of decimal points,
b) An expensive house thermostat that would keep it's backlight on. For this one, I powered down the furnace for a month. The stat uses backup supercaps, I think. The permanent fix was to surge suppress the 24VAC with a TVS diode.
c) A bike computer that was dragged across a car rug.
d) An automotive OEM car clock. Symptom was no display, The clock died when the car was jumped. That one was harder.

There is a physical reason why this works and it's applicable to CMOS parts.
OK, that's interesting, I will try it.
 
I have connected PIN19 (CARRIER PIN) and resistor R2 with wire and remote worked on a pressed key! :happy:
Now, how to repair this?
How to solder wire onto these small components, I never done so small joints.
Maybe somewhere track is damaged, can I repair track, for example with little bit of solder?
 
Clean that residue off the PCB particularly near the resistor and solder a short wire link from the resistor to the track. You might need to scrape some of the solder resist off the track. If you have enamelled copper wire, that would work best otherwise thin insulated wire.

Clean the carbon pads on the buttons with a cotton tip. With the residue, don't expect the remote to keep working for very long.
I don't know if track is damaged or component leads. Track could be damaged somewhere half way.
 
Status
Not open for further replies.

Latest threads

New Articles From Microcontroller Tips

Back
Top