Hello Mike & all -
Thank you for your help with this error message - the instructions were so helpful and, for now, seem to have solved the problem as it has for so many others.
My printer is the Samsung Xpress C1860FW and I got the error message: error #A1-4111
Wanted to share my own experience in case it helps others - I did the steps Mike described for the error message. Then after I turned everything on again, I got a second error message #A1-4112.
Googling led me to this youtube video which is addressing error message #A1-4112, but for a slightly different printer - Samsung CLX-6260
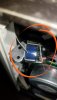
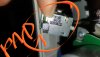
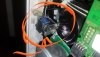
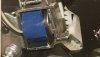
The interior of that printer seems similar to the Samsung Xpress C1860FW - and the helpful person who made the video points out the process of removing the solenoid unit and putting a thicker pad onto the connector lever.
In my case, I took the solenoid unit out and rotated the existing pad because one part of it was worn out but the other surrounding part was thicker.
For now it is working again.
Thank you everyone for sharing your experience.

")