Continue to Site

Welcome to our site!

Electro Tech is an online community (with over 170,000 members) who enjoy talking about and building electronic circuits, projects and gadgets. To participate you need to register. Registration is free. Click here to register now.

  • Welcome to our site! Electro Tech is an online community (with over 170,000 members) who enjoy talking about and building electronic circuits, projects and gadgets. To participate you need to register. Registration is free. Click here to register now.

LM2917 Tachometer for V12

Status
Not open for further replies.
Hi

Perform this measurement on the bench:
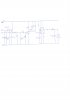
Take a 10k resistor and connect it across the tacho input terminal and ground ( - ) terminal of the tachometer.
Then connect a 0-10vdc supply and connect it across the resistor. Make sure supply is set to minimum or 0V before connecting or it may burn up the tach movement! Connect DC+ to the tach input terminal and DC- to tach (-) terminal.
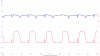
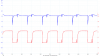
Slowly increase the DC input voltage while measuring the voltage across the resistor until the tachometer reads 7000 RPM.
Report back with the voltage reading at 7000 RPM.

eT
 
Thanks eT, I've already done that in a slightly different way - I don't have a variable dc supply, it's 12v or nothing! I put a variable resistor in series with the tacho and at 7000RPM it reads approximatelty 2.2v - I was expecting it to be more so I checked again and that is correct.
 
Thanks eT, I've already done that in a slightly different way - I don't have a variable dc supply, it's 12v or nothing! I put a variable resistor in series with the tacho and at 7000RPM it reads approximatelty 2.2v - I was expecting it to be more so I checked again and that is correct.

Hi

So is the meter a current driven meter?

eT
 
Forgive me for sounding a bit daft here but I have assumed it is a voltage driven device. The resistance of the meter is approximately 80Ω, which is fixed and cannot be changed, therefore increasing the voltage should also give a proportional increase in current and needle deflection. I was able to do this by connecting a variable resistor in series with the meter to a 12v supply, and by adjusting the pot was able to set the needle at 7000RPM (full scale deflection) to take the voltage reading across the meter. That's the 2.2v which says the current would have been 27.5mA - although I did not actually measure that.

Have I got that right?

Also, the LM2917 is wired as a voltage driven device and once calibrated gives a fairly accurate reading up to 4000RPM, (but it does progressively read lower as it goes above that point (10% error at 7000RPM))
 
Also, the LM2917 is wired as a voltage driven device and once calibrated gives a fairly accurate reading up to 4000RPM, (but it does progressively read lower as it goes above that point (10% error at 7000RPM))

Maybe that was a typo, but I think your SPEEDO is wired as a voltage driven device -- Your LM2917 is a frequency to voltage converter.
I tried messing with one several years ago and found it to be very inaccurate.
 
Maybe that was a typo, but I think your SPEEDO is wired as a voltage driven device -- Your LM2917 is a frequency to voltage converter.
I tried messing with one several years ago and found it to be very inaccurate.

The tachometer input is voltage driven, meaning it's input is direct wired to sense ignition pulses as input. what I was curious about was the meter itself. Is it configured for current sensing or Voltage sensing? in the smith documents I've seen, the meter is connected in a current sensing fashion.

The 27ma mentioned by the TS seems somewhat high, so I'm wondering about the way it was tested.
 
Right. The LM2917 input senses ignition pulses -- ie, frequency -- not voltage. You originally said "the LM2917 is...voltage driven."
 
Sorry chaps, I said "the LM2917 is wired as a voltage driven device" - what I was trying to say is that I've configured my circuit as a voltage driven one - see the circuit I attached to thread #12.

The 27ma mentioned by the TS seems somewhat high, so I'm wondering about the way it was tested.
As I said earlier I tested it by wiring a variable pot in series with the meter and connecting it to a 12v source. At fsd I measured 2.2v across the meter. The resistance across the meter is approximately 80Ω. Then using Ohm's law I calculated the current to be 27.5mA.

eT, I tried the LM2907 with all the tweaks that you suggested but it still breaks down above 7500 or so RPM (I didn't have a 18μ cap so I tried a 47μ instead - I could see the ripple totally disappeared on the scope but it was way too slow to respond to any changes). I can live with that as I don't need anything over 7000RPM - I think my engine will let me know it isn't happy with a very loud BANG...!!! And I still have that 'sticky' needle at around 1500RPM.

in the smith documents I've seen, the meter is connected in a current sensing fashion.
And, if you have any of the Smiths documents you mentioned I would like to see them if it's not too much trouble.

I've now gone back to the 555 to see if I can work with that circuit. I realised earlier that it was getting unpredictable because of the ignition signal and coil oscillations, some of which were re-triggering the monostable. Using the input circuit that I used for the LM2917, and adding an edge trigger (because the off-time was longer than the monostable time) I was able to get it to work satifactorily. One strange phenomonon that I still can't understand is that at first it wouldn't work on the car till the RPM got to above 2500, (worked perfectly on the bench with a square wave oscillator). The BC547 was not switching off sharply enough and the edge trigger output into the 555 was not going low enough to trigger the monostable. I tried playing with different value resistors and caps for the edge trigger but couldn't get it to work. It was only after I added a diode on the input line (in series) that it improved, so I added a second one and now it's perfect. It may be something to do with the 1.4v drop, and the transistor is now switching off sharply. And as a bonus, there is no more hesitation at 1500RPM that I had with the LM2917 and 2907.
 
Hi

The LM2917 should work fine this application.
However, the circuit we should be using is the "Current Meter Driven" version shown in Figure 22 on the TI datasheet.
I have a similar circuit on the bench and it works like you want (I'm using an 80 ohm resistor for the meter). I will post the circuit later today.

Just so I'm clear....did you remove the internal electronics from the tachometer so just the meter circuit remains?
 
Sorry chaps, I said "the LM2917 is wired as a voltage driven device" - what I was trying to say is that I've configured my circuit as a voltage driven one - see the circuit I attached to thread #12.


As I said earlier I tested it by wiring a variable pot in series with the meter and connecting it to a 12v source. At fsd I measured 2.2v across the meter. The resistance across the meter is approximately 80Ω. Then using Ohm's law I calculated the current to be 27.5mA.

eT, I tried the LM2907 with all the tweaks that you suggested but it still breaks down above 7500 or so RPM (I didn't have a 18μ cap so I tried a 47μ instead - I could see the ripple totally disappeared on the scope but it was way too slow to respond to any changes). I can live with that as I don't need anything over 7000RPM - I think my engine will let me know it isn't happy with a very loud BANG...!!! And I still have that 'sticky' needle at around 1500RPM.


And, if you have any of the Smiths documents you mentioned I would like to see them if it's not too much trouble.

I've now gone back to the 555 to see if I can work with that circuit. I realised earlier that it was getting unpredictable because of the ignition signal and coil oscillations, some of which were re-triggering the monostable. Using the input circuit that I used for the LM2917, and adding an edge trigger (because the off-time was longer than the monostable time) I was able to get it to work satifactorily. One strange phenomonon that I still can't understand is that at first it wouldn't work on the car till the RPM got to above 2500, (worked perfectly on the bench with a square wave oscillator). The BC547 was not switching off sharply enough and the edge trigger output into the 555 was not going low enough to trigger the monostable. I tried playing with different value resistors and caps for the edge trigger but couldn't get it to work. It was only after I added a diode on the input line (in series) that it improved, so I added a second one and now it's perfect. It may be something to do with the 1.4v drop, and the transistor is now switching off sharply. And as a bonus, there is no more hesitation at 1500RPM that I had with the LM2917 and 2907.

Oh....so your circuit is working as intended? Cool..nice work.
Do you mind posting the schematic?
 
Hi

However, the circuit we should be using is the "Current Meter Driven" version shown in Figure 22 on the TI datasheet.
No, I'm using the circuit in figure 21 - see my attachment on post #12 and your reply in #13. I first tried figure 22 circuit but I couldn't get it to work (can't remember what the problem was now) so I then tried figure 21.

Just so I'm clear....did you remove the internal electronics from the tachometer so just the meter circuit remains?
Of course - the only thing I am using from the original instrument is the meter itself. (Not sure what you mean by the "meter circuit" - I am only using the meter). I did try some of the original electronics used to smooth the ignition signal but that didn't work with either the LM2917 or the 555.

Oh....so your circuit is working as intended? Cool..nice work.
Do you mind posting the schematic?
Yes, the 555 circuit appears to be working, schematic attached. Unfortunately I didn't save the scope images showing the issues I had that I talked about on post #29. I've still got both circuits on my breadboard that is in the car running the tach - I'll try swapping from one to the other when I use it (which is not very often) before I decide which one to go for. I actually have two tachos, neither working so I may put one circuit in each.
 

Attachments

  • scan.jpg
    scan.jpg
    66.5 KB · Views: 302
Hi

Here's the circuit that I tested on the bench. It uses the LM2917. I swept the input from 100-700 Hz and the meter output current tracked the input frequency nicely.
4mA = 100 Hz, full scale = 28mA at 700 Hz. I also change the input signal from +2v, -0v to +2v, -0.2v to see if it affected the input but it still worked.

eT
 

Attachments

  • LM2917-V12-TachometerTested.png
    LM2917-V12-TachometerTested.png
    52.4 KB · Views: 342
That looks interesting - I'll give it a try when I free up some space on my bread board.

However, I've taken some scope images of the signals at the pin 2 input of the 555, and the collector output on the BC547 to show the effect of adding the two diodes in the inout line (refer to my schematic on post #32). Blue is the 555 pin 2 input and red is the BC547 collector. The image without the diodes shows how slow the transistor is switching off, and consequently that affects the edge trigger output into the 555 which does not work until the RPM increases to over 2500. The other image with the diodes (I needed two to make the switching sharp enough to work at idle RPM) shows the transistor switching off sharply and the curcuit then works fine at all RPM. I don't understand why the diodes have that effect - I discoverd this purely by accident when I was trying to do something else.
 

Attachments

  • Without Diodes in Input Line.png
    Without Diodes in Input Line.png
    45.6 KB · Views: 308
  • With Diodes in Input Line.png
    With Diodes in Input Line.png
    46.7 KB · Views: 315
That looks interesting - I'll give it a try when I free up some space on my bread board.

However, I've taken some scope images of the signals at the pin 2 input of the 555, and the collector output on the BC547 to show the effect of adding the two diodes in the inout line (refer to my schematic on post #32). Blue is the 555 pin 2 input and red is the BC547 collector. The image without the diodes shows how slow the transistor is switching off, and consequently that affects the edge trigger output into the 555 which does not work until the RPM increases to over 2500. The other image with the diodes (I needed two to make the switching sharp enough to work at idle RPM) shows the transistor switching off sharply and the curcuit then works fine at all RPM. I don't understand why the diodes have that effect - I discoverd this purely by accident when I was trying to do something else.

Interesting images.
The transistor is acting like a switch and functions as a level shifter. It switches the 9v supply at the same frequency as the input signal to provide a "conditioned" signal to the 555. Although its not apparent from the images, I think maybe the diodes, in addition to dropping the input signal about 1.2v, are blocking any reverse voltage from entering the input circuit. It would be nice to get an image of the input signal before and after the diodes.

eT
 
Actually I made a mistake - the image shows the transistor switching on sharply - not off as I said in the previous post. I will try to get that image for you but I've put the car away now so it may not be for a few days. An interesting thing when watching the live images is that the 'off' spikes from the edge trigger, that are only just visible in the image without the diodes, gradually get lower as the engine revs increase - only when it gets to around 2500RPM do they get low enough to trigger the monostable (at around 4v). At the same time I can see the transistor switching on more sharply as the revs increase.
 
Hi eT,

Here is the image of the input signal before and after diodes you asked for. The first one shows both traces taken simultaneously but did not look right to me, so I then took them one at a time. Blue is before diodes and red after diodes.

Attached files removed as they are incorrect. See post #42
 
Last edited:
Hi eT,

Here is the image of the input signal before and after diodes you asked for. The first one shows both traces taken simultaneously but did not look right to me, so I then took them one at a time. Blue is before diodes and red after diodes.

Its a little unclear which image you're referring to...please clarify.

Which is first?
 
0002 was the first I took with both before and after diodes - but I think the red may not have been connected properly - I didn't think it looked right, so then I took them both individually. 0004 is the signal after diodes (red) - blue was not connected. 0006 (blue) is the signal before diodes - red was not connected.
 
0002 was the first I took with both before and after diodes - but I think the red may not have been connected properly - I didn't think it looked right, so then I took them both individually. 0004 is the signal after diodes (red) - blue was not connected. 0006 (blue) is the signal before diodes - red was not connected.

Hi

So the engine is idling at about 500 RPM right?
Does the input signal (before diodes) decrease significantly at higher RPM's?

I'm wondering if the images 0004 and 0006 are reversed? Blue is after diodes and Red is before diodes?

eT
 
Status
Not open for further replies.

Latest threads

New Articles From Microcontroller Tips

Back
Top