Continue to Site

Welcome to our site!

Electro Tech is an online community (with over 170,000 members) who enjoy talking about and building electronic circuits, projects and gadgets. To participate you need to register. Registration is free. Click here to register now.

  • Welcome to our site! Electro Tech is an online community (with over 170,000 members) who enjoy talking about and building electronic circuits, projects and gadgets. To participate you need to register. Registration is free. Click here to register now.

Hard Drive Failure *Cries* - Engineers to the rescue?

Status
Not open for further replies.
Interesting results. Maybe the first corruption was due to a micrometeorite. :D The rest of your results are encouraging.

I have no data to support these comments, but I think your data indicate that the clean room would be over kill.

I would focus on preventing contamination from loose body hair, flaky skin, and stuff like that. A bunny suit, cap, mask, gloves might help. I would find a clean area as dust free as possible. When doing fine paint finishes, it helps to wet the floor -- like if you are in a garage. Damp towels to walk on might help indoors. I would scrap the balloon and try to find an antistatic brush (Are they still based on Californium?) to borrow. And finally, be really careful with chips and stuff on your tools. If you can find non-magnetic tools or demagnetize your tools, I would do that.

One might argue that a magnetic tool might pick up junk, but they can also leave junk. If I were to use any tool that was magnetic, it would be the screwdriver. The forceps should not be magnetic. The stainless alloy used in many of then can become magnetic.

John

Edit: BTW, I don't mean to imply that you would brush anything that was supposed to be dust free with the anti-static brush. Just hold it near the object(s) to remove static.
 
Last edited:
Megamox,

I must say, I admire you're perserverance and technical ability. I've often described an accomplished technician as one who can take something apart, put it back together and have it be, essentially, no worse (ot at least not terribly worse) for the effort.

As to platter removal and replacement, I do not know, for sure, how the platter assembly is constructed but I suspect it is a unit, i.e., all the platters are mounted, as a set, to a single spindle.

There is probably one screw/bolt on top of the platter unit holding it to the motor drive shaft. Once removed, the platters could be lifted off. Obviously, you don't want to touch any part of any platter but you might be able to grasp the very outer edge(s) with some sort of very stiff, flat plastic grippers and lift the assembly up and out. Note that he spindle may be keyed, but I can't imagine why. And for sure, NO magnetic nothing in the vicinity.

Circular orientation should not be an issue, unless the spindle is keyed.

I encourage you to keep going (although, since it's your data, that's easy for me to suggest... :rolleyes:).

I am, for one, learning a great deal from your very well thought out and documented efforts.

Thank you.
 
Spindle
The "spindle" is a sub assembly of platters, separation rings, motor, and bearing. It is very very precisely assembled. But then again, the arm is pretty freaking precise too. The spindle usually is a whole unit removable unit, but may have the contacts for the motor glued to the case.

Here are some pictures of just the motor and rings, no disks/platters.
0127031836.jpg0127031836a.jpg0127031837.jpg
[SUB](Fun fact: The black burn line etched into my work bench on the bottom right of these pictures was caused by HV electricity... for science.)[/SUB]

I couldn't say what would be best to try and replace. On the one hand, the platter is more solid metal through and through. It would be hard to imagine how accidentally bending or warping something while taking it apart. The bearing would be the most questionable, so long as you never touched the platters. On the other hand, it is much larger than the arm is and will require you to take out more screws and use more force to remove it. The screws may also be torqued down to a particular spec, and you will have to get all of them right, it probably can't be warped even a small tiny amount. And a fingerprint smudge on any machined mating surface would probably be disastrous.

Arm Head
Then there is the changing the arm, which is beyond delicate. The head springs are a very very very precise pressure and resting distance, very critical parameter. I would not use anything other than a certified head comb to restrain them during removal. You're likely to cause serious misalignment otherwise, which will result in 100% data loss.

Dust
The dust issue is going to be about longevity and statistical damage. You really only need a clean room if you want your drive repaired back to 100% working order. If we are just recovering data, we really only need it to read correctly once honestly. That being said, I don't mean you should just jump in and maybe it works, maybe it doesn't. There is real danger of doing some action you may not even be aware of that totally ruins the thing. *THAT* is the big issue, and I think it will mostly come down to technique. Dust will be a lesser problem in comparison to that. If you do the job right, then even if some dust gets on it, you should be able to recover almost all of your data still.

The biggest problem with dust is if something particularly big lands on the platter, sticks to it, and causes a full blown head crash. Then you're probably completely f-ed. And, "particularly big" can STILL be microscopic particles, that you would never know are in the air until it was too late.
 
Hi all,

Thanks for your really kind words of encouragement and advice as usual! Still getting things ready for the next experiment (regarding how much head contact results in total head failure) but in the meantime, a little fun.

Head comb made out of a dental pick, seriously! :)
Results: 6.2% data loss - not bad!
If I can get my hands on a proper professional tool, I'm sure this can be improved upon.

Snip the end off the pick, use pliers to squeeze the two ends down until they're about 2mm apart. Slide the 'comb' between the arms of the head and then remove. Timed the whole process to take 48 seconds.

Hope you like the design, and remember to floss!

Regards,
Megamox
 

Attachments

  • crest.JPG
    crest.JPG
    39.6 KB · Views: 260
  • Pick.JPG
    Pick.JPG
    50.6 KB · Views: 263
  • headcombpick.JPG
    headcombpick.JPG
    66 KB · Views: 258
Hi All,

The good news is I've found a way to open up the 320GB hard drive, swap the head and only lose 3% of the data. Ten times less than the the experiment previously performed. Method, templates and diagrams below.

Firstly again do please practise on a test hard drive before you open up your own in case some or all of these methods apply. For example, I've heard for some models of western digital hard drives, opening the case will ruin the head alignment and this can only be fixed with a very expensive tool Luckily my seagate does not seem to have this issue.

Anywho the technique below is performed on a brand new working 320GB seagate hard drive (bought another one on ebay), exactly the same model as my own dead one. The reason for this is I wanted a clean bench mark result from this procedure. The experiment is designed to test how much better data integrity is preserved for opening up your hard drive in a non clean-room environment, when you make an effort to shield the platters. We're going to build a platter "shield", using no special tools or equipment except house hold items. Here's how I did it:

Step 1: Filled brand new working hard drive full of 197GB (Just copied large folders across and it came to this amount) of various media, ebooks, mp3s, movies etc
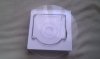
Step 2: When you buy a spindle of CD's or DVD's or any disc, you should get what looks like a plastic spacer disc that usually sits on top of the spindle. This will be our platter shield.
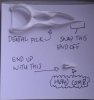
Step 3: Used a permanent marker to draw an outline of how I wanted my shield design. I wanted it so it protected the platter but gave me adequate access for a head replacement. Template enclosed below.
Step 4: This plastic is far too brittle and so decided not to saw it, so scored the outline with a stanley knife blade and just snapped the pieces off. This is far from the best technique and I nearly snapped through the shield a few times, but it's quick. Made two shields, they took 10 minutes to make in total.
Step 5: Clean the underside of the shield by polishing it. I used a cloth that came with my camera. I'm not sure what it's called but it doesnt seem to leave any fibres behind and it feels quite silky.
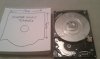
Step 6: Opened up the brand new hard drive and covered the platter with the shield immediately. If you do this quickly, the platter is exposed for about a second. From this point onward, the platter is then only exposed to the underside of your shield which hopefully is cleaner than the surrounding air. Optionally you can also drill mounting holes onto your shield so that you can allow it to sit just right. The reason I used the Plastic CD instead of a complete layer of plastic (like say the plastic cover of a CD Jewel case) is because I wanted to make sure once I placed the shield on top of the platter (which if you made it correctly should not touch it, but be about 1mm above it) it would still turn. So once I placed the shield over the platter, I placed a paperclip into the spindle holes to check the underlying platters were still rotating. This is the kind of freedom you want, dont let the platter shield touch the platter. I also used cellotape wrapped over the top of the shield and down behind the hard drive (on to the PCB) to hold it in place.
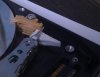
Step 7: Left the hard drive exposed like this, for 6 minutes. A time I think is more than respectable for any internal maintenance. During this time, personally, I removed the head carefully and put it back, as practice for when I do the real thing on my own hard drive again in future. Picture below taken with the platter shield in place and the head removed.
Step 8: Removed the cellotape on the shield, lifted it off and covered with reattached the hard drive lid (which had been kept on a dry clean surface face down). Again be quick, do not expose the platters for any longer than you have to.
Step 9: Reconnected hard drive back up to windows and performed data integrity test. I made sure the hard drive was upside down for this, as any debris which might have made it on the platter hopefully would have been shaken loose and due to gravity would have been swept away internally into one of the filters, thereby reducing the effects of those debris.

Results: 192GB recovered, 5GB lost in CRC check errors. Result = 97% DIY recovery!

So again, had this particular hard drive suffered from a failure which resulted in a damaged head (symptoms: clicking, beeping, clunking), I would have been able to recover all but 5GB of data from this drive (obviously assuming the head in this case had not caused damage to the platter). This is in a non clean room environment in which the hard drive lid was off for 6 minutes. The conclusion here is if you decide to take your hard drive lid off to repair it, the best thing you can do is take some measure to protect the platter from airbourne debris. The last time I performed this experiment with no such protection, I lost about 35% of data. Compare this to the 2% lost this time around with a simple shield.

Anyway, enclosed are the diagrams and templates you need if you decide to do this yourself! I'll be going in to depth with a head swap procedure next which I've done about 30-40 times now on the practise drive. Ultimately then I'll finally go ahead and do it on my own dead drive and we'll see if this fixes my particular hard drive's problem or if I need to go one step further and transfer the adaptive memory on the logic board to a new PCB donor. In the end the whole experiment might end up being an epic fail, but at least the data here if anyone wishes to try (or improve upon) my shoddy methods :)

Regards,
Megamox
 

Attachments

  • IMAG0105.jpg
    IMAG0105.jpg
    443.4 KB · Views: 259
  • IMAG0110.jpg
    IMAG0110.jpg
    819.2 KB · Views: 263
Lookin' good, Megamox...

What's the plan for protecting the platters during their removal/replacement?
 
Morning Cowboybob!

Hopefully as my drive spins up (but obviously clicks), I'm hoping the head replacement will fix the problem. If that doesnt work then I'll try swapping the Adaptive memory from the memory IC from my PCB to another PCB of the same model to see if that works. By the end of this I really hope I've been able to recover some data. If my spindle was broken, that would be a good reason to perform a platter swap. However by the time I'm finished with the drive, I'd be happy to try swapping the platter from one working drive to another if you'd like to see the results and data (I'd have to swap the PCB boards too). I don't know if im capable of making a tool to do this at home, with my limited practical experience and this will probably end up in the platters being misaligned, but it would be interesting at least! I get the feeling though this is something that should really be left to the professionals and not an oaf like me :) I did get some kind advice from CPR tools who mentioned that they used to perform platter swaps with scotch tape!

Speaking of tools, I have requested samples of the head comb used by professionals as I hope this will provide a good comparison in my next head swap experiment. If any are kind enough to send one my way, I'll be able to post some more data :)

If there any experiments that anyone would like to see, please let me know. I'm happy to sacrifice the two drives I've got for testing, if it helps anybody else :) Also by the time I'm finished if anyone wants my home made shields and other tools, let me know I'd be happy to send them over for free as I hope to have a good back up routine in place in the near future and so won't need them:)

Kind regards,
Megamox
 
Megamox, I have some issues with your working beliefs that I think should be addressed before you attempt to actually recover your HDD data.

(1) You seem to be operation on the premise that all damage is created equal. In other words, you seem to think that if you try something on a drive, record the damaging effects, and then try something new on that same drive, then the information you have collected accurately represents what the same task would do to an unopened drive. The problem with this is if you have already damaged something because of the fine tolerances of the drive, any farther tests are going to be biased. I think you will find that if you redo some of your older tests again with the same drive, your numbers will be different from what they were at first. This will validate my point. Though if the tests prove inconclusive, it doesn't necessarily disprove my point.

(2) You seem to have a misunderstanding of exactly how and why contaminants can get into and damage the drive. You seem to believe that gravity is going to have a large effect on how the dust gets on the platters. This is wrong because the majority of the particles that are in the air that can cause damage are so small that they are virtually a homogeneous mixture with the air. Air currents and viscosity play pretty much the only deciding role in how they are deposited, gravity has little effect. You're thinking of it like you would household dust, but you need to think of it more like water. If you clean all your frying pans before anything else, then all your water becomes filthy and that crap sticks to your finer dishes. Open a box at the bottom of a lake, and the currents caused by opening the lid kick up dust and crap and then partly suck it on to the box. The same thing happens with a harddrive when you open it in a non clean room. It sucks in dirty air and then the damage is already done. Of course, you can always do it again and again and do other crap that gets even more dust in the drive, and the results will be worse and worse.


Finally, for all of the critical nature and extreme measures they take when making hard drives, it is all really only done so that when the hard drive is closed it will fully function for the length of the drives expected life. However, you are only interested in recovering the data, which really only requires that you are able to read it one time. Even moderate contamination could possibly allow you to achieve victory. And some times CRC errors and such are 100% recoverable. So you do have some slight breathing room when compared to the people that actually make drives.

It's up to you to decide what the best angle of attack is going to be on this.
 
Hi Oblivion!

Really very good points here. You're absolutely correct that repeated experiments on a drive will have cumulative effects which are difficult to account for. I hopefully highlighted this point in an earlier post, when I couldnt account for previously degraded data. It would be terrific to try each new experiment on a brand new drive but unless Seagate decide to sponsor me, I'm afraid I'm on my own with my limited budget :) Hopefully though, the way in which I've designed the tests and the order in which I have performed them has highlighted useful trends, if not terribly accurate. These poor drives have suffered but hopefully for the benefit of us all :)

I like your analogy explaining how the contaminants should be viewed. What I know about this process is far far less than what I don't know, absolutely. When I mention tailoring my experiments in order to allow gravity to help, I usually don't rely upon this technique as being pivotal. However I may as well add it to the process in case it does contribute to limiting the effect of other variables on the result. At best it may have a small contributing effect in the way that I hope, at worst, it will not make any difference at all :)

The nice thing about the journey so far is that at each experiment I do honestly expect the drive to fall apart. The genuine surprise is that they have not (yet) and with each successive experiment I'm able to take the general advice given to people when their hard drives fail, 'Never open your hard drives, or you will corrupt your data', and give this statement a little more depth and meaning. At least this is my intention :)

If CRC errors are recoverable, that would certainly be useful, if anyone knows how to do this, or what software to recommend (Trial ones please!) I'd happily test it out and post results. The interesting thing is data which is marked as un-copyable by windows, is still accessible on the original test drive. It views just fine, but you just cant copy it to another place. Perhaps drive imaging techniques such as Ghost or Acronis may be a better way to preserve the overall data but it's been a really long time since I've used them. Any advice would be appreciated!

I also do appreciate all the points and corrections, they serve to keep the information and data much more balanced which I think is fantastic :)

Kind regards,
Megamox
 
In '08, I had a drive fail and lost the file allocation table. Used Data Rescue PC from Prosoft Engineering. It worked easily. Nothing that I know of was lost. Since it also recovered deleted files, like old e-mails, the biggest time waster was sorting through what I didn't want, not finding files I wanted. I don't know how applicable that program may be to your situation, but I thought I would share my experience with that particular vendor.

Although my machine was Windows, Data Rescue operated in DOS or something at that level, as I recall. Windows was not even started.

John
 
The interesting thing is data which is marked as un-copyable by windows, is still accessible on the original test drive. It views just fine, but you just cant copy it to another place.

I'm not exactly sure if this is your issue or not. But I know that the icons you see are just indicators that the FAT has that file listed, but seeing the icon has nothing to do with the integrity of the file. It is only an index listing the file, the file itself can be completely damaged and still be in the list. Obviously, you can't copy a damaged file, icon or no.

As for recovering a file that fails CRC, I only mean that sometimes just because a file fails a CRC, does not mean it is a lost cause. A file can fail a CRC if even on bit is flipped. For things like a text document, pictures, movies, music... this is a trivial amount of damage, you probably wouldn't even notice it. For software or other data that needs to be exactly a particular way to function, this is a much worse problem. Even so, almost any software that is damaged can be replaced if you know it's name. So in truth, all of the data in a modern PC has a significant degree of survivability, beyond what fear mongers would have you believe.

Hello,

Well not necessarily. For example, JPG files use an elaborate compression stream, which if even one bit in the whole 250k file is flipped, will render the data from that point on almost worthless. Files like this often show up as 1/2 a picture or 1/2 a picture with the remaining half badly distorted. Some JPG's use restarts, which helps get back on track after some number of bits have been read, but unfortunately not all JPG's are compressed using that feature.
Zip files would have the same problem but might be more manageable if at least most of the file could be read ok.
 
Hi All,

After practising swapping heads for the best part of yesterday, I decided it was time to go ahead and do it live on the real thing! I'd like to introduce you all to my faulty hard drive head :)

**broken link removed**

No wonder my hard drive was clicking, the head is all bent out of shape! The little black square is one of the heads which should be aligned directly underneath the pointed metal ends. Each platter has two heads, one to read the top, the other to read the bottom. The platter looked fine from the top, not sure how the drive managed to do that to itself.

It's got a brand new head in it now and sounds fine. Unfortunately windows never detected it but when I opened up my Acronis Disk Software which I use to view partitions, it recognised it and let me explore it. However it kept throwing up read errors and was obviously having trouble reading the contents.

Then suddenly the drive disappeared from the software view window and I've been unable to get it back. Very strange indeed. Not sure how acronis detected it but windows didnt...Not sure where to go next, recovery software like the kind John suggested, or swap the ROM on the PCB? Incidentally drive sounds fine, spins up fine, just seems to spin quietly and constantly with no sounds of head movement.

By the way, as you can see from the picture, in the end I decided to go with a head comb just made up from a tiny bit of rolled up paper with a needle through it, to use to handle it. Worked pretty well and the head swap went off like a charm. Just take a small strip of paper (4cm x 1.5cm) and keep rolling/folding it up. Then bend it like a V and stick a needle through it to hold and manipulate it :)

The good news is in the few minutes it was working, I managed to copy 3-4 of the most important files I needed so at least that makes up for some of this ordeal.

What a major repair this is turning into :)

EDIT: Just noticed it actually shows up fine in Device Manager as a USB Device. Strange!

Regards,
Megamox
 
Last edited:
Personally I'd put it directly onto the SATA controller of a PC, boot with Hirens or PartitionMagic (on the Hirens disk) and grab as much as possible off it if it's recognised.

You can also use some software called photorec (on the Hirens / Partmagic disc) which will recover data from a disk that's been corrupted or formatted to some extent.
 
MrAl said:
Hello,

Well not necessarily. For example, JPG files use an elaborate compression stream, which if even one bit in the whole 250k file is flipped, will render the data from that point on almost worthless. Files like this often show up as 1/2 a picture or 1/2 a picture with the remaining half badly distorted. Some JPG's use restarts, which helps get back on track after some number of bits have been read, but unfortunately not all JPG's are compressed using that feature.
Zip files would have the same problem but might be more manageable if at least most of the file could be read ok.

Oh yeah. I forgot about those kinds of things. You can throw in some video standards too like MPEG. Some of them also have interrelated data compression schemes and so on. I think they are more tolerant than JPG, but the point is that a single bit could in fact cause a cascade failure in some data structures.

Consider my previous statements about the issue half retracted.
 
Hi Guys,

I've been unable to get any more useful data from the hard drive at this point and I wanted on your opinions on whether it's more than just a partition table or format problem. I took picbits advice and hooked the drive up to the motherboard (I presume this means just put it back in the laptop?). Used Hirens Boot CD to run diagnostics on it (This CD is amazing, it's chocked full of useful programs, definitely going to keep that handy!).

Strangely while inside the computer in the hard drive bay it was not detected by both windows or device manager. So I took it out and hooked it up via USB again and this time, at least it was back being recognised by the device manager. Strange. The internal hard drive bay is working, as I have put my usual hard drive back into it and it detects it fine without a problem, so the problem must be related to my dead hard drive itself... ROM issue?

Anyway the drive is 320GB but the results of various diagnostic tools report it is either unreadable, unaccessible or some of the time, not even present. Even Seagate's boot diagnostic tool failed to notice it was hooked up. Anything that does recognise it usually reports its size incorrectly at 2TB (and not 320GB) - I wish!

I'm not sure if a dead PCB/ROM causes these kinds of symptoms or if it is data corruption in the partition tables but to be honest it's the only thing left in the hard drive that hasn't been replaced. I'm happy to swap over the ROM from one board to another, but it looks too fiddly to do with a soldering Iron. I've found a really cheap rework station below and if anyone thinks it's a particularly bad choice, let me know. It's got a really small foot print and seems quite simple.

New ATTEN AT 858D+ 858D SMD Hot Rework Digital Station Air Solder Blower Gun - £45 delivered
https://www.amazon.co.uk/858D-Rewor...HM28/ref=sr_1_1?ie=UTF8&qid=1359721730&sr=8-1

The only issue now is that this recovery is becoming slightly more advanced than someone at home without experience or tools might be able to do and so if you do believe you have a problem with your ROM chip, you can obviously have someone remove it for you and exchange it. If you know someone who can do this, you can ask if they have the tools. You just need to find out where the ROM chip is on your board and have another board which is a close match to the relevant part numbers. I've enclosed a picture of where the firmware/ROM is on my board, from an earlier picture I took of it. Maybe your individual one may have similarities in place and form.

Finally I believe if you want to send the board off to be swapped with another, there are companies that will copy over your firmware over to the new board and send it back to you. I've found three so far that do this, there are probably more, but the companies are called DonorDrives.com, onepcbsolution.com and hdd-parts.com. I've never used their services so cant comment unfortunately. The first two I believe are based in the US, the last in Canada.

So what do we think, should I give this a go myself? Or leave it to the pros. I've got pretty much zero SMD soldering/desoldering experience but I understand you run the gun over the IC until it's plyable, lift it off with tweezers and then pop the replacement on. I guess the solder moves with the IC as it's transplanted (as in the video below) or maybe I'll have to buy some special solder paste. I dont know if my usual solder (which I use with the Iron) would work? Have no idea what temperature is too high either, don't wanna fry this chip after all the effort I've gone through!

Here's a video of what I'll be hoping to do (Looks Uber simple when the pros do it :))
https://www.youtube.com/watch?v=X2hgiDHiXKM&list=UL

Regards,
Megamox
 

Attachments

  • rom.jpg
    rom.jpg
    428.6 KB · Views: 241
8-pin SOIC is not hard to do by hand, then again I have been soldering for as long as my brain has been able to form memory's.

This is the process I use when I'm being fairly lazy...

1) Using a normal iron, add solder to all the pins, until they are all bridged together.
2) Heat all the pins on one side evenly with a sliding back and forth motion.
3) While heating, put a toothpick or similar under an edge of the IC that has no pins. Apply a gentle upward pressure.
4) Lift each side of the IC a little bit at a time, shift over to the other side, the IC will "walk" up away from the board.

When the IC is off, you'll need to add the new one...

1) Heat, flux, and solder wick the pads of the board and pins of the IC to remove old solder.
2) Clean off the pads really well with rubbing alcohol. Let it dry well.
3) Place the IC on the PCB, align it, solder down one corner pin.
4) If the alignment is off, reheat the pin and move the IC, otherwise, finish soldering.
 
...Anyway the drive is 320GB but the results of various diagnostic tools report it is either unreadable, unaccessible or some of the time, not even present. Even Seagate's boot diagnostic tool failed to notice it was hooked up. Anything that does recognise it usually reports its size incorrectly at 2TB (and not 320GB) - I wish!...

Megamox,

Given the condition of the failed drive heads, I'm mightly concerned the they may have touched the disc(s) (the "clicking" noise you heard, especially after the disc started spinning again) and quite likely the outer most cylinder where the partition data is located.

That being the case, that data is toast. And I say that because you mention that when the drive was recognized, the report claimed 2T. I had a similar drive do the same trick, i.e., enormously inflating the total size and number of partitions on the drive because the partition table data had been totally dorked and the garbled hex code read added up to that ridiculous amount.

And with a partition table essentially unreadable, there's no getting to (that I know of) anything else on the drive. I don't believe that even a sector editor could get to it since the BIOS has no earthly idea where to start reading the data.

Could be wrong, of course.
 
Last edited:
As I understand it, a lot of lost file recovery software relies on the fact that when files are deleted, they are never actually removed from where they reside on the disk. Rather, they are only removed from the file listing. A lot of people don't realize this, and thus believe that when they empty the recycle bin their data is erased at that moment. The fact is, it was only marked such that that area can be used to store other data. The actual data will still be there until something over writes it.

In any case, the problems being described by the OP sound to me like a failed board. Namely that it is acting flaky even while being enumerated. I would do the board swap if it were my problem. Possibly swapping the EEPROM as well if it proved necessary. Easy enough to do both and it would virtually guaranty a working board if all was done right. Then again, I may also try using the manufacturers flash upgrade software and rip a backup if I could. Then simply dump that back to a working board. Or get more extreme and take out the chip then directly read it with a I2C/SPI serial EEPROM reader. Then I could have it backed up for all eternity.
 
Thanks guys... I think you're both right! I suppose it could mean either scenario. The interesting thing is I explained what was happening to Kevin at OnePCBSolution.com, one of the companies who do the board + ROM swaps and he kindly replied with "To be honest, I don't think your drive has a circuit board problem. It may be better to seek a data recovery professional." Oh well, I thought that's the end of that.

Then just browsing the Datacent website, it's got some really helpful and comprehensive information, and a whole page on why Seagate drives go wrong (https://datacent.com/datarecovery/hdd/seagate). The part that perked me up was:

"Seagate drives operate under special firmware microcode that could also fail sometimes. Typically hard drives with corrupted firmware spin up normally, do not click but still fail to initialize. Such drives could have one of the following symptoms:

HDD is not found in BIOS at all - Just like mine! :)
shows up with wrong S/N or capacity, - Just like mine! :)
fails to read any data or boot up operating system. - Just like mine! :)"

That's describing pretty much what's happening to mine at the moment! It mentions the fix is to correct the firmware on the board but then goes on to say "it is impossible to repair such drives without special equipment capable of accessing and repairing firmware modules in the hard drive firmware zone."

I couldn't find a Seagate firmware flashing tool, but perhaps a solution may be to re-flash the PCB with it's original firmware (DE05). Equivalently, move the ROM to a new board which also has the same firmware, which is obviously the route I've been considering. Hopefully the experts might be able to shed light on the best course next.

Doesn't it just feel like, when you solve a problem, three more appear in its place? :)

Regards,
Megamox
 
Status
Not open for further replies.

Latest threads

New Articles From Microcontroller Tips

Back
Top