Electro Tech is an online community (with over 170,000 members) who enjoy talking about and building electronic circuits, projects and gadgets. To participate you need to register. Registration is free. Click here to register now.
Welcome to our site! Electro Tech is an online community (with over 170,000 members) who enjoy talking about and building electronic circuits, projects and gadgets. To participate you need to register. Registration is free. Click here to register now.
MM Yes Thanks.. not quite Zero yet . been keeping up with most posts , have to limit my comments to one a day
Perhaps I can hijack your thread and wish all ETO members a Happy and prosperous New Year. GD
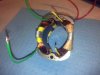
A bit of an update on the motor rewind ... .. .. ..
Yesterday, I managed to get the leads soldered and insulated for the winding ends and then wrapped and refitted the coil to the stator. I had some difficulty getting the coil to maintain the shape required to clear the commutator but the coil eventually decided that of the two of us I was the more stubborn, and I then got to soak the new half of the stator in a plastic tray full of air drying xylene varnish. After an hour or so, I removed the coil from the tray and suspended it to drain off and drip dry overnight.
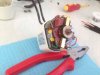
Today, I re-assembled the motor and plugged it in .. .. to my amazement it didn't explode, but it didn't turn either, just emitted a very loud hum. I reversed the brush connections on the new coil, re-assembled and it all leapt into life.
I've now re-assembled the machine and it all works, including the speed control, which my tacho measures between 3500 and 8000 rpm.
As Hannibal once said ' I love it when a plan comes together ! ' I'm chuffed to bits at having achieved this repair ... .. Thanks for all your help.
Congratulations, it sounds like you had the field polarity both connected for the same pole, we used to power the windings with low voltage DC and confirm the polarity with a compass.
Max.
I wanted to round off this thread with a little information some members might find useful.
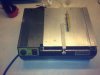
It was always my intention to use this circular saw for PCB cutting to size. It is very small .. .. 240mm x 200mm and uses 50mm blades which are available in a variety of metals and tpi's. I was, however a bit concerned when some members voiced concern over 'flying swarf ' when cutting PCB's.
I waited to be sure of a successful repair before buying a 24 tpi, Tungsten Carbide blade which arrived yesterday and was fitted to the saw last night.
I have to report a fine, clean cut and the debris is mostly fine dust that collects in the dust trap, under the blade quite nicely. Of course, there is a possible health risk related to inhaling the FR 4 dust, so a face mask in addition to the obligatory safety spec's is essential equipment, but on the whole the results are great.
This site uses cookies to help personalise content, tailor your experience and to keep you logged in if you register.
By continuing to use this site, you are consenting to our use of cookies.

") . been keeping up with most posts , have to limit my comments to one a day
. been keeping up with most posts , have to limit my comments to one a day