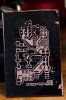
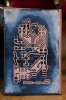
Continue to Site

Welcome to our site!

Electro Tech is an online community (with over 170,000 members) who enjoy talking about and building electronic circuits, projects and gadgets. To participate you need to register. Registration is free. Click here to register now.

  • Welcome to our site! Electro Tech is an online community (with over 170,000 members) who enjoy talking about and building electronic circuits, projects and gadgets. To participate you need to register. Registration is free. Click here to register now.

DIY Toner Transfer Paper (cheap and easy))

Status
Not open for further replies.
See attachment & match up the circles:
The paper is upside down & covering what would be shown in the orange section.
Ah, Ok. I see it now.
Rolf said:
I just made a side by side comparison, both transfered at the same time, between a magazine paper and my Elmer's treated paper.
The plain magazine paper transfer looks as good as the Elmers transfer. So ease of use aside, there doesn't appear to be any difference between using coated and uncoated mag paper.
 
There seem too be to many kinds of picture paper and for the price I would think it would make more sense to buy a commercial paper like P-n-P or Pulsar.
I my experiments I have had little success with picture paper.
If you need white paper, like for DS PCB, then I just coat copy paper with two coats of Elmer's Jell School glue. Dry thourely before applying a second coat. (And make sure it is 100% dry before sending it through the printer).
This has replaced my magazine paper but not my P-n-P.
I don't understand all this talk about toner density, mostly from folks that uses the the Pulsar system, newer had to (even if I knew how) when using P-n-P. And doing these experiments with DIY toner transfer doesn't seem to require it either.
BTW my printer is a HP 1018 with a cheap reconditioned toner cartridge.

In my book, if you can't transfer (including warm-up time) and be ready for etching in 6 minutes then something is wrong.

Well first off. 500 sheet of 8.5x11 for less than $20US is not a big deal and no labor far as the glue, although I would try it and bought the glue. I bought mine (picture paper) years ago and much less than $20US for 500 sheets.

Also, I bough a second time to try a new kind from the same company (hammermil) and I guess I have 900+ sheets of it now. Both worked the same for me. So I have a lot of sheets that work I am good for a long time.

The soaking part, I scuff the coating from the back side of it and never touch the iron directly to it as well.

I can not see how Pulsar or P-n-P are going to beat my price. Just looking to shorting the soak time and it is not that bad with what I have.

I have gone from sitting down at the computer (design in mind) to PCB, drilled in less than 1 hour many times. From when I iron to the paper is off is maybe 10 minutes.
 
{snip}
Also, I bough a second time to try a new kind from the same company (hammermil) and I guess I have 900+ sheets of it now. Both worked the same for me. So I have a lot of sheets that work I am good for a long time.

The soaking part, I scuff the coating from the back side of it and never touch the iron directly to it as well.
{snip}

The latest photo paper I tried was Kodak. The problem as I see it is that the paper is quite thick with a thick glossy coating on the back. So I proceeded to try to split the paper into two pieces, ( with the idea of printing the design on the thinner paper) with limited success; until I put it in boiling water. Then it almost fell apart in two equal rectangles!

Next time I will do a transfer and then the hot water treatment.

I had OK luck with photo paper way back, the picture paper was a thinner coat of whatever they put on it to absorb the ink and make it shine and it comes off a lot easier.

I am sure the magazine paper will work if thick enough to feed in the printer. Only attempt I made the paper was too thin and jammed up.

My test of Kodak inkjet paper is finished.
The laser toner took and transfered normally and 99.5% of the paper rolled right off after brief boiling in a little water in a disposable pie pan. The rest came right off with a little 91% isopropyl rubbing alcohol. :)

The magazine paper is not to thin, it is trimmed to size and taped to a normal sheet (tape is only fastened across the top or the top two corners) before it is printed.
 
Inkonsistency...........

My wax paper experiments has not left any visible degradation on my regular print quality.

What I have learned is that laser label backing paper is the best, by far, of the unconventional transfer papers. And it is also essentially free, if you use the labels.

Went back and did another test on that laser label backing paper, a total failure! And I don't have clue as what went wrong. Now I don't even remember what it looked like because I destroyed the evidence a few days ago. (it is hell getting old)
 
My test of Kodak inkjet paper is finished.
The laser toner took and transfered normally and 99.5% of the paper rolled right off after brief boiling in a little water in a disposable pie pan. The rest came right off with a little 91% isopropyl rubbing alcohol. :)

The magazine paper is not to thin, it is trimmed to size and taped to a normal sheet (tape is only fastened across the top or the top two corners) before it is printed.

Adds time but I have a microwave. Maybe the boil will weaken the photo goop and not melt the toner.

Will try that and maybe the gel glue on the next board.
 
Adds time but I have a microwave. Maybe the boil will weaken the photo goop and not melt the toner.

Will try that and maybe the gel glue on the next board.

I thought the rule was: "No metal in the microwave".

Not really, you will be surprised of how fast a 1/4" of water comes to a boil on the stove.
 
Last edited:
I thought the rule was: "No metal in the microwave".

Not really, you will be surprised of how fast a 1/4" of water comes to a boil on the stove.

My plan was to boil water in the microwave, "carefully" take the "glass" bowl out, drop the copper/fiber-glass in and see if the goop melts from the paper and leaves the toner. And hope the glass and copper do not twist in the heat.

I would never put anything in the microwave that I would not eat or drink myself but thanks for the warning.

And I have no time to pay the power company to heat water on a stove.

But I will try it.

I thought the rule might have been do not put anything but paper in you laser printer. :D
 
I'm still unable to get this Pulsar paper to work properly. I'm assuming it all has to do with the ironing I'm doing. They say, heat and pressure, but when I apply pressure the traces just get crushed.

I did something fairly small and detailed, so I thought I'd give the pulsar paper a try again. I didn't use that much pressure. I'm afraid if I used the method outlined on the webpage with the roller and the iron, then it would all compress into one big mass.

I had to redo it with my regular photo paper. Maybe I'll try the Pulsar paper again another time, but it's not looking good for me.

Pictures attached.
 

Attachments

  • 20090730-rf-node-pulsar-001.jpg
    20090730-rf-node-pulsar-001.jpg
    250.5 KB · Views: 453
  • 20090730-rf-node-photo-001.jpg
    20090730-rf-node-photo-001.jpg
    271.8 KB · Views: 531
Time vs Cost vs Pitch!

"... I can not see how Pulsar or P-n-P are going to beat my price. Just looking to shorting the soak time and it is not that bad with what I have.

Frank from Pulsar here.

True, you have a cheaper way of doing it for sure. The big plus with a Dextrin auto-release paper like that of what we do, is when you have very fine pitch traces. With a standard 1200dpi laser printer, you can image down to .005" without a break for a considerable distance. That's hard to do even with P-n-P product because of the forces involved in forcibly removing the Carrier or rubbing and rubbing to get the fibers out of the fused toner. I'd go head to head with the process you're speaking of on a 25x enlargement of your finest line to one made with a zero-friction release paper by our process. One will look like a hairy beach, the other will be near perfect with only micro variations on a straight line.

Having said that, what you guys are doing is commendable. The bottom-line for any hobby is, "don't spend a dime that isn't absolutely necessary." I fully understand! I guess OUR niche with our full "kit" system is a little bit askew from the pure DIY environment where the user doesn't mind screwing around with a half-dozen different techniques and a lot of time spent mastering techniques. But, it's a tough job and somebody has to do it, right? Maybe some new process will emerge out of all of the effort expended. Glad to see things are looking up for you guys to be able to meet the prime objective!
 
Regarding crushing traces...

I'm still unable to get this Pulsar paper to work properly. I'm assuming it all has to do with the ironing I'm doing. They say, heat and pressure, but when I apply pressure the traces just get crushed.

Hi Mark,

The problem is you didn't calibrate the HEAT of the iron. The objective is to never be able to reach the melting temperature of your particular toner. The more pressure (eg. entire body weight as a 'constant') the less temperature needed to achieve the "sticky" state of toner. These two properties (sticky and melting temperatures) are VERY close with just the weight of the iron and maybe a few pounds of downward force, however, crank up the pressure and you can crank down the heat, thus increasing the "spread" between fusing and melting temps. This is why calibrating the iron is so important otherwise you'll have too much temp for the pressure and total toner distortion happens. With a calibrated iron, you can leave the iron on indefinitely with max pressure and nothing will happen to the toner, It'll never get to melting temp so it can't distort... ever! It took us a long time to get all of this figured out.

Frank from Pulsar
 
  • Like
Reactions: 3v0
Good news.. i used wax paper and made a toner/powder photocopy of the circuit overlay on it..then pressing, the toner DID transferred and sticked amazingly well ! ,,& it was the very first try... the only little prob was tht print on the copper board a little light, so on next try i m going to make a darker photocopy and then try it..
 
Last edited:
Hi Mark,

The problem is you didn't calibrate the HEAT of the iron. The objective is to never be able to reach the melting temperature of your particular toner. The more pressure (eg. entire body weight as a 'constant') the less temperature needed to achieve the "sticky" state of toner. These two properties (sticky and melting temperatures) are VERY close with just the weight of the iron and maybe a few pounds of downward force, however, crank up the pressure and you can crank down the heat, thus increasing the "spread" between fusing and melting temps. This is why calibrating the iron is so important otherwise you'll have too much temp for the pressure and total toner distortion happens. With a calibrated iron, you can leave the iron on indefinitely with max pressure and nothing will happen to the toner, It'll never get to melting temp so it can't distort... ever! It took us a long time to get all of this figured out.

Frank from Pulsar

as i told above ,, on my first try the print made on copper board was good but light , so i again placed the printed wax paper and set the iron (1000W) to max heat for 10mins.

The Result : :eek: print on the copper board was just a little better than before but a small portion in the middle just swelled up(and detached form the board) & WASTED .. :eek:

Conclusion: at max temperature, using 1000w iron , only 3-4min will do the job :D
 
Last edited:
as i told above ,, on my first try the print made on copper board was good but light , so i again placed the printed wax paper and set the iron (1000W) to max heat for 10mins.

The Result : :eek: print on the copper board was just a little better than before but a small portion in the middle just swelled up(and detached form the board) & WASTED .. :eek:

Conclusion: at max temperature, using 1000w iron , only 3-4min will do the job :D

The iron I use heat up in about a minute, max temperature is likely to be to hot and the toner will bubble. It is best to check you iron temp. with a suitable thermometer. Set it to 300°F.
If you dont have a thermometer set the iron between acrylic and polyester to start with.
Remembering back to my experiments; the wax paper had a good side (and a bad), I think it was the duller of the two sides that worked best.
 
Set it to 300°F.
If you dont have a thermometer set the iron between acrylic and polyester to start with.
Actually there's no hard and fast rule: it depends on the toner's melting point.
 
Actually there's no hard and fast rule: it depends on the toner's melting point.

The different printers toners fusion temp. must be in the same ballpark, otherwise why would the P-n-P instructions state 300°F +/- 25°F.
Where are you getting your information from?
 
I run the iron all the way up and iron for 3+ minutes and it always works well. Will check temp next time and see what the iron runs.
 
Status
Not open for further replies.

Latest threads

New Articles From Microcontroller Tips

Back
Top