Continue to Site

Welcome to our site!

Electro Tech is an online community (with over 170,000 members) who enjoy talking about and building electronic circuits, projects and gadgets. To participate you need to register. Registration is free. Click here to register now.

  • Welcome to our site! Electro Tech is an online community (with over 170,000 members) who enjoy talking about and building electronic circuits, projects and gadgets. To participate you need to register. Registration is free. Click here to register now.

What's the difference controlling a 180v PMDC motor to controlling a 12v PMDC motor?

Status
Not open for further replies.
If you use that circuit from post 22, I don't think that turning the pot to zero would do the soft stop, but would do for a soft start, depending on how fast you turn the pot, I already have one built, I built it for a fan control and the found it doesn't need to be used, so I'll pull it out and test it today. IMHO, if you turn the pot from full on to zero, you basically open the FET and the motor's coasting becomes a generator with no load, so no braking,
I found a switch, & a video, I didn't know existed the would work for your control switch, https://www.nkk.com/documents/products/rocker/m/MRockersBracket.pdf
scroll down to the DP3T switch data. It's an on, on, on switch that you could wire up as forward, brake, reverse. But I think I would want it to be relay controlled so you need to dial the pot to zero every time so it always does the soft start.
 
Last edited:
Untitled.png just an idea, not a design
 
Hi Kinarfi, Hmm, looks workable but like all the designs I looked at so far without a PIC or similar there is no real soft start, which is one of the reasons I went for the DC motor. Like how the brake works though. I was thinking similar but was worried about the relay needing to be energised before the driver started giving power output and holding on until the driver had stopped giving output. Dunno why but a dead short at 180v and a good few amps scares me! ;)

Thanks, Al
 
Here is a beginning.
I made the soft start short so you could see it in the simulation, but we can make it longer by changing the 1 ufd. cap.
The 2 power supplies are so the high voltage is isolated from the pot. One concern I have is that it is important that the IGBT has plenty of voltage to drive it before the PWM starts, but I think the softs start will take care of it. Do you have a scope? If so we could look at the time it takes for the 2 supplies to turn on.
I didn't draw the brake and power on switch.
 

Attachments

  • lathe1.png
    lathe1.png
    87.1 KB · Views: 183
  • lathe.png
    lathe.png
    106.2 KB · Views: 160
Hi Ron,

Just had a look at the design and now I need to check which components I have and which I need to find. :)

I do have a scope, its an ancient Scopex 140-10v which hasn't been turned on for a few years. I got it a long time ago and repaired it with help from Eric Gibbs and others on this forum, but never got round to using it, or learning how to. If it does still work I could with guidance hopefully check things.

Anyway I will look for the parts first.

Thanks, Al
 
Ron, can you post the .asc file, please
 
Sure, Here you go. Let us know what you think.
 

Attachments

  • lathe.asc
    6.4 KB · Views: 161
Al,
Take a look at the MC33153 from Farnell.
It has under voltage protection and Schmitt trigger inputs so we could eliminate the little inverter and add safety to the design.
 
Here's my suggestion, Probably needs some improvement, maybe some safety improvements.

I ran a motor using this type of control and it did NOT provide any braking at all or any soft stop, unless coasting to a lower speed is soft stop, Naaaa, don't thin so
 

Attachments

  • Lathe.png
    Lathe.png
    49.2 KB · Views: 177
  • Lathe Control.asc
    5.3 KB · Views: 137
Last edited:
That's a slick oscillator! I like it, I like using the comparator also, allows for full on and full off.
 
Another thought just crossed my mind (could be dangerous).:rolleyes:
Maybe we could just build a little logic circuit to simulate the button push to change speed.
I don't know how many step there are, but we could make it 2, 3 or 7 steps a second if the micro is fast enough and it probably is.
 
Out of my depth here as motor control isn't my forte - but I have spent years hacking/re-purposing electronics/devices/modules. So.. my two cents.. (rant).

It does indeed seem a shame to build your own controller from scratch, using the parts given, just because of some slight application specific functions. Although many of the parts are already there you will have to wire things for relatively high current, and make your own PCB. Not *that* much work, but certainly a hassle, especially for reliability.

If you're savvy with micro-controllers then the first thing I would do is sniff those data lines from the main board to the control board ('send', 'rec') to see exactly what bytes are sent when buttons are pressed. This way you can work out if the small 18-pin micro on the main board is merely a motor driver that provides feedback or whether that has the slow start-up coded.

The control boards micro might be a bit dumb, and just drive the displays, debounce buttons, and calculate speed/calories or.. it might actually send bytes to dictate absolute speed (rather than 'faster/slower'), and delay sending those byte on start up. You may be able to simply ditch the control board, and add your own micro, with a 7-seg display, buttons, using its USART to control the main board. This way you don't have to touch 'power design' - only simplifying the control part, which can be done on strip-board as it is all low power. Again, all very 'ish', I think that the motor controller micro will have soft start built in as a safety feature, rather than risking the control board going wrong and possibly forcing the 'user' to run 40mph instantly. Plus, the detective work on the protocol would be tedious.

Failing that, it is a pity they used an SMD micro on the main board as a DIL could have been removed and pin headers put in its place, giving you access to the motor driver, analogue feedback/current sense, 5v power and all manner of goodies. The micro doesn't look like a PIC to me (I2C lines on pins I haven't seen on pic/dspic) and its a hassle to try and code for a chip you've never used. Might be able to solder 0.05" SMD headers to the foot print and use cable to board connectors as a breakout, but now its getting tricky, and possibly expensive :/

The two pots on the bottom left, I doubt they are any form of start-up, as they are surrounded by analogue (opamps) so most likely are used to tweak the current sensing of the motor, and possibly condition the back EMF for the speed control loop. Its a lovely board for re-purposing! Has 4 mounting holes, not that many cables going to it (power in, motor out, control cable), its own mounting bracket/heatsink - perfect for a small simple enclosure with a couple of switches, display, and power cable.
 
I thought I posted this earlier, but I can't find some of what I think I had. Any way, here's how I would do it. Trying to figure out how the Tread mill work may be fun, but seem more difficult to use for a lathe. Use what you need from it and make your own easy to understand controls.
LATHEJ3.png
 

Attachments

  • lathej2.asc
    7.1 KB · Views: 142
Last edited:
Hi Guys,

I must admit I am struggling with parts for the designs, some with availability and some with price. Blueteeths idea about sniffing data sounds good and if successful would save money and rescue the original board from the scrapheap. The only problem I have is actually sniffing the data, I mean knowing what sort of signals to look for and how to find them?

If all this would take is determination and time I am up for it, as I am at the moment I have much more time than cash (I hope) ;)

Anyway I will have a look at how to sniff and see if I can do it, I have a good choice of micros (pics 12s 16s and 18s) so I may have the needed bits already which would help me a lot financially, I already have SWMBO making comments about all that rubbish I mess with so buying at the moment is censored.

If I can't sniff the codes out I can always revert to plan A and bite the bullet for paying out.

Al
 
Just remembered that someone once got me a Velleman kit, the K8055N interface board which I believe deals with signals but besides building it I never actually used it. I was going to investigate the car I had then's canbus but other things as usual cropped up and that was that.

I wonder if it would be suitable for sniffing data in my case? I will try to find it and the manual.

Al
 
Hi mate, Plenty of those!

Al

BTW been tampering with the controls and the speed 3 pin connector does change the speed with ANY pot across it but only at full scale either way and then the speed goes up as it would when holding the +speed button down, and same full scale turn starts the motor slowing, so I am tending to think its just a spare connector for a different but still button controlled machine. The pot certainly seems to act like a switch anyway.

Edit: it is a switch. Touching centre pin to either side momentarily changes the speed by .1kph on the display so the pot idea is off! doh!
Also I think the brake is essential. With all the load on a treadmill it stops nearly instantly but in the outside world this beast takes about 30 seconds to spin down from full (or full on the controller anyway). double doh!! Al ;)
This is what I was talking about earlier. I think we might be able to just pulse this pin quickly to move the speed up and down.
 
If you've used micro's before, and have some PIC16F's about, then that's probably all you'll need :) 
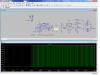
A scope is nice to sniff signals, but not always necessary - I doubt they'll be sending packets/bytes at 10MB/sec, so any logic analyzer will do, or even... the PICkit2's wonderful built in logic tool. Failing that, you could guess at the protocol used (I'm guessing opto-isolated UART-like structure..0-5V TTL) and either use your PC's serial port (USB to serial converter..) and terminal, or program a PIC that auto detects baud, and spits out that data in a known format to your PC's terminal. MikroC free version is often very easy to use for quick 'test' programs, as it has built in libraries. There are always many ways to do such things, just a question of time, money, and hassle.

A couple of links just in case you decide to go down this route (could be a bit of tangent from the actual project itself):

**broken link removed**
http://pe1grl.khds.nl/picla/picla.htm


I know what you mean about determination and time over money - many of my hobby projects are based around this as.. anyone can throw £200 at something and make it work, but its always nice when you can delve into your 'bits box' and knock up something rather clever!

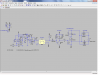
That velleman kit looks pretty cool, but I couldn't find any 'user friendly' ready-built windows apps to use with, seems it is mostly for people developing their own host software. In the modern world of open source, it is becoming harder to find just a very easy, simple 'exe' to run on windows, without having to recompile and jump through hoops.

If you don't want to fill the thread about the protocol, and keep it about hardware, then you can always pm me about PIC code.

RonV has an excellent point. A simple circuit to pulse the up/down buttons. You could even use a micro for that - read in a pot, and when it changes send a pulse every time the ADC measurement changes by a certain amount. It only changes when you're turning the pot. Its a bit of a fudge, because no doubt the micro on board will debounce the buttons, limited how quickly you can pulse it to increment/decrement - as well as how quickly the motor speed changes. With the RPM readout on the LED display, that's your feedback :)
 
bigal_scorpio, what did you come with so far? or are you still figuring out?
Thanks
 
Hi Mate, I indeed am still trying to sort a way to do this. At the moment I am trying Blueteeths suggestion and trying to work out the control protocol from one board to another. Blueteeth is experienced at this and has given me advice about what to do but I am still very much in the dark so far. His knowledge of the subject is way way beyond mine and probably beyond me altogether but I will persist for a while longer as saving the board would also mean saving things like stall and overcurrent protection and may provide more control.

I will keep you informed if I have any breakthroughs.

Al
 
Stall and over current protection may well make it worth while to figure out the original control.
My design would need an over current device or circuit added, not sure how I'd add stall detection.
 
Status
Not open for further replies.

Latest threads

New Articles From Microcontroller Tips

Back
Top