Continue to Site

Welcome to our site!

Electro Tech is an online community (with over 170,000 members) who enjoy talking about and building electronic circuits, projects and gadgets. To participate you need to register. Registration is free. Click here to register now.

  • Welcome to our site! Electro Tech is an online community (with over 170,000 members) who enjoy talking about and building electronic circuits, projects and gadgets. To participate you need to register. Registration is free. Click here to register now.

tda7240 amp project

Status
Not open for further replies.
Your speakers look like woofers. What size are they? Their foam surrounds will disintegrate in about 15 years.
Do you also have tweeters to produce high frequencies and crossover networks?
 
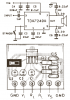
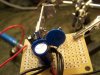
I do not have tweeters, but when I go back to that electronics shop to get some other caps, i will also check out the rest of their speakers, most of them were low quality speakers, that are meant for just tones, but then they had a few subs, 2 for $10, so i got 2. they are around 8", end to end, so a 4" radius, they had a good bass response with my ipod powering them, so I can't wait to here them hooked to an amp. Luckily they are a common size, so a re-foaming kit will be easy to find down the road.
 
You have 8" woofers. Sub-woofers are bigger.
The woofers need to be installed in an enclosure that is built according to the detailed spec's of the speaker or an enclosure recommended by the speaker manufacturer. Some speakers work best in a sealed enclosure and others work better in a ported enclosure. The correct volume of the enclosure is also important.
 
Alright, I was going for a more simple approach, because I do not have the skill for things like that, yet. But I like to experiment with acoustics. I made an lm386 amp with two older speakers, and put them in an enclosure and tried to maximized bass response, although that takes away volume.
 
Last edited:
I tried to fix the caps on the 7240, but it is still barely working, I am an a loss right now
I think you need to make the pcb that is shown on its datasheet and use the same capacitors shown.
 
I will try, I have never etched before, but Collin Cunningham has a great vid on it, so I will give it a shot. I will need to set up a station for this, I just hope I dont mess it up.
 
I made many audio IC amplifiers on Veroboard (stripboard) and they all worked perfectly. I used ceramic capacitors where they were needed.
 
Alright, I am using a protoboard from radioshack for this, I had a few spares lying around. Two of the caps are large and blue, because I could not find any of those values at my local electronics shop. Could that be a problem? They are the 2 caps in series with the output.
 
Alright, I am using a protoboard from radioshack for this, I had a few spares lying around.
proto-board from RadioShack is poor quality. It warps and breaks, its holes are too big and its copper strips are too thin and poorly glued.

Two of the caps are large and blue, because I could not find any of those values at my local electronics shop. Could that be a problem? They are the 2 caps in series with the output.
I recommend that you look at the pcb design in the datasheet. The capacitors at the output must be good at high frequencies so ceramic or film capacitors are shown. You used electrolytic capacitors that are poor at high frequencies and maybe they cause your amplifier to oscillate at a high frequency instead of amplifying audio.
 

Attachments

  • TDA7240.PNG
    TDA7240.PNG
    26.1 KB · Views: 213
Last edited:
I changed out those electrolytic caps one the output and one the power input, i will take 1 more pic of it from the top
 
223 capacitors at the output are wrong because they are 22 and three zeros which is 22000pf which is only 0.022uf. you are supposed to use values that are 10 times higher at 0.22uF.
I buy 50V and 100V ceramic capacitors that are small and inexpensive at Digikey. I think i used a huge 1000v ceramic capacitor like yours about 48 years ago.
 
Shop at Digikey or Newark for very high quality name-brand parts at low prices.
Or shop at RadioShack for "seconds" at extremely high ripoff prices.

Seconds are parts that failed normal tests. Usually RadioShack don't know who makes the parts they sell and don't have any datasheets for them. E-Bay parts are the same.
 
Thank you for the advice, Radioshack is one of the closest electronics shops, and on the way to friends houses and work, so its easy to stop there, also for parts that I want to use quickly. But as long as I get quality parts, i can wait for the shipping.
 
I scrounged for those caps and i found a few, so I tried them out,and it still did not work, so I took everything off of that little protoboard and am going to put it all on another pad-per-hole board or veroboard, to make it a little less cramped and see if that works. I also think that a problem might be the standby switch...i hope thats the problem, since I have the materials now.
 
Last edited:
I moved it too the protoboard, and it works for about a second when i flip the standby switch one way then the other, then it seems to shut off. I thought it was where i placed the spk output wires, but it is the same as it the pcb, after the resistor lead, so i am not sure what to do. It seems like it its so simple, I have no idea how I am getting this wrong.
 
The schematic and pcb layout on the datasheet of the TDA7240A shows exactly how an amplifier should be connected.
How can you connect the speaker to the wrong place??

What is a "resistor lead"?
 
I have no idea how I can be doing this wrong, i was going over the PCB with the project right in front of me, it must be a stupid mistake. The resistor lead I was talking about is the metal part coming off each end of the resistor that makes the solder connection. I feel rather stupid right now.
 
Status
Not open for further replies.

Latest threads

New Articles From Microcontroller Tips

Back
Top