Electro Tech is an online community (with over 170,000 members) who enjoy talking about and building electronic circuits, projects and gadgets. To participate you need to register. Registration is free. Click here to register now.
Welcome to our site! Electro Tech is an online community (with over 170,000 members) who enjoy talking about and building electronic circuits, projects and gadgets. To participate you need to register. Registration is free. Click here to register now.
The one that I have is the GBC H210 laminator. I'm not sure if Office Depot still carries it or not because I didn't see it on the site but I did find it here:
I can't really say what specs you should look for which is why I emailed the guy from PULSAR before I bought mine. He said this one would work and it has done pretty good for me so far. A few disclaimers and tips: This machinie works really well with 1/32" thick boards. It kind of struggles a little bit with the 1/16" boards depending on how wide they are and I have never tried any 1/64" boards yet. I use the highest heat setting. There is an LED that turns green when the machine reaches temperature but I have found it is best to wait about anouther 10 minutes or so after that before I'll run the board through. I will also do about 3-4 passes rotating the board in between each pass.
i noticed the laminator from pulsar is only $70 which isnt alot at all when compared to local prices. And then i have to worry if it doesnt work ahhh i rather buy theres which is tested and guaranteed to work right.
Ill try this guys paper tho. Ill buy the laminator soon like by friday.
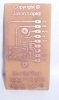
There is such a thing as too much heat. If you overdo it the traces will spread and reduce the space between them, close up the holes.
Go a bit overboard at first and back off if you have to. One of the nice things about toner transfer is that you can wipe the toner off and try it again.
As I understand it you can heat the toner to where it is sticky but not melted. In theory that is the ideal temperature point, but do not ask me to back it up with data.
There is such a thing as too much heat ... As I understand it you can heat the toner to where it is sticky but not melted. In theory that is the ideal temperature point, but do not ask me to back it up with data.
When first making boards with any unfamiliar method, write down the entire process so that you can refer back to it at a later date.
Start with the toner density and transfer process, not forgetting the time spent letting the heating apparatus reach temperature & the actual temperature attained, along with the time required to successfully transfer the print. Note all these steps.
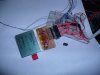
Once you have a successful transfer, start noting how the etching process steps are affected - temperature versus duration, agitation etc.
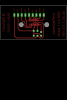
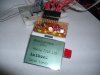
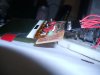
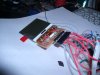
I'm trying to redo that connector. I'm thinking of cutting a hole in the PCB for that plastic connector to pass through and having pads right up to the edge, and the either soldering small wires to bridge the connectors and pads, or maybe bending the tiny connector wires over to the pads.
It's hard to explain, but I'd like to have something more solid.
i know exactly what you mean. Its like those game console mods. they have a flex ribbon that wraps around a SOLDER cups where you should solder this way its a perfect solder and right on targer
This site uses cookies to help personalise content, tailor your experience and to keep you logged in if you register.
By continuing to use this site, you are consenting to our use of cookies.


")