Continue to Site

Welcome to our site!

Electro Tech is an online community (with over 170,000 members) who enjoy talking about and building electronic circuits, projects and gadgets. To participate you need to register. Registration is free. Click here to register now.

  • Welcome to our site! Electro Tech is an online community (with over 170,000 members) who enjoy talking about and building electronic circuits, projects and gadgets. To participate you need to register. Registration is free. Click here to register now.

Need some help with wiring

Status
Not open for further replies.

Meatmod

New Member
I created a post some time ago concerning a problem with a tactile switch. I was trying to make a small LED turn on and off but unfortunately it is a momentary switch and I want it to work like a normal SPST (push to turn on, push again to turn off).
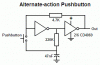
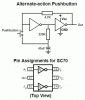
So, I was pointed in the direction of this Dual Inverter circuit.
https://www.fairchildsemi.com/ds/NC/NC7WZ14.pdf

Now the problem is wiring. I’m not too keen when it comes to circuit diagrams so I was hoping someone here could help.
Attached is a picture of all my components. What I need is a simple explanation of how they should be wired together. (Keep in mind I’m a noob)

**broken link removed**

I would be truly greatful for any help.
If any more info is needed just let me know!
 
ljcox is right on that one. I've tackled the same problem ... what I used was a D flip flop with the Q' out fed back into the D input. Use the switch as the source for the clock input; however, as the previous post suggested, you will need to debounce the switch somehow. In addition to the debounce, you will also need your schmitt triger to improve the response of the wave that will act as your clock input. There was a thread on this site a year or two ago that showed a schematic of a good circuit that works perfectly (it was from discovercircuits.com), except you need to add the schmitt triger between the debounce network and the clock in of the D flip flop.

Check out these two threads:

https://www.electro-tech-online.com/threads/latching-non-latching-momentary-switch.23871/

https://www.electro-tech-online.com/threads/problem-with-flip-flop-latching-circuit.18883/

Good luck.
 
Debouncing the switch is easy, just use a resistor in line with the switch and a capacitor to ground, it forms a low pass filter. Do you really need a schmitt trigger?
 

Attachments

  • Alternate-action.gif
    Alternate-action.gif
    3.6 KB · Views: 203
ljcox said:
You can't do it with a dual inverter. You need a Flip Flop and bounce suppression.

yes, you can do it with two inverters. Find the original post.
 
Sorry about that. You’re right Audioguru, I should have kept this in the original thread.

The goal of this project is to keep it as small as humanly possible.
The tactile switch I have now is a SPST MOMENTARY. This is the core of my problem because I could not find a switch that size that works as a normal SPST.
I want the LED to turn on with a single press of the button, and off with another press. Right now the LED simply stays on unless I physically hold the button in.
As a solution to this, it was said that I could use this Dual-Inverter (pictured above in my first post and here is the data sheet - https://www.fairchildsemi.com/ds/NC/NC7WZ14.pdf )

So now I think I have all my components (as seen in the above picture). At this point my problem is wiring. I have no idea where the Dual-Inverter goes or what leads to solder where!

Again, I apologize for the confusion and I hope that someone can help me put this all together now.
 
The circuit is simple to wire.
Pick one of the inverters and use its pins numbers for the first inverter in the circuit. Then use the other inverter's pins numbers for the second inverter in the circuit.
 

Attachments

  • Pushbutton circuit.GIF
    Pushbutton circuit.GIF
    7.5 KB · Views: 244
Something is wrong

Okay, I wired everything together but it still works like a momentary switch.
Maybe I did something wrong so here is what my circuit looks like.
**broken link removed**
 
Your wiring is missing two important resistors and an important capacitor.
Your battery is shown connected to the wrong place in the circuit and with its polarity backwards.
The IC is shown without a power supply.
The recommended inverters IC has an absolute max supply voltage of 7V then your 12v battery is blowing up it and the LED.
 
Could there be a worse possible implementation of a circuit that's already been given to someone? - lets wire it completely wrong, leave out most of the components, and use too high a power supply! (the wrong way round) - interesting technique!.
 
For goodness sake, don't ever put the cells in that position!

The bottom cell with discharge very quickly because it's being short circuited by the top cell!
**broken link removed**
 
Nigel Goodwin said:
Could there be a worse possible implementation of a circuit that's already been given to someone?
That's why blind people are not allowed to drive cars.
 
Nigel Goodwin said:
Could there be a worse possible implementation of a circuit that's already been given to someone? - lets wire it completely wrong, leave out most of the components, and use too high a power supply! (the wrong way round) - interesting technique!.

As mentioned above, I am a noob when it comes to electronics, but there’s no need to be a jerk about it. Everyone else has posted some very useful information and then you, a ‘Super Moderator’ come along and offer nothing but sarcasm.

Thank you for your help Audioguru, and thank you for the tip Hero999. I’m just going to have to find another solution because adding two resistors and a capacitor makes this project too large for my needs.
 
yeah... I was trying out Proteus ISIS demo to make the circuit diagram. First time using the program as well as the first time I have ever made a circuit diagram and I didn't know much about how to use it (such as how to change the voltage, but after playing with it more I figured it out).
I'm actually using two 1.5v button cell batteries.
 
Last edited:
Unless the LED is very dim with a low current, Two button cells will power it for only a few minutes. Two AAAA cells will power it for 31 hours, two AAA cells will power it for 62 hours and two AA cells will power it for 143 hours.
 
Status
Not open for further replies.

Latest threads

New Articles From Microcontroller Tips

Back
Top