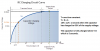
That is interesting, I never thought of that but I know that is right. Speaker construction puts the speaker coil in center of the magnet so it can move both directions. I built several push pull tube amps 45 years ago but never a transistor amp.
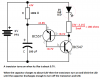
I did google search for push pull mosfet amplifiers and found this. It looks like an LM386 will drive 2 mosfets.

")