Continue to Site

Welcome to our site!

Electro Tech is an online community (with over 170,000 members) who enjoy talking about and building electronic circuits, projects and gadgets. To participate you need to register. Registration is free. Click here to register now.

  • Welcome to our site! Electro Tech is an online community (with over 170,000 members) who enjoy talking about and building electronic circuits, projects and gadgets. To participate you need to register. Registration is free. Click here to register now.

How to read digital LCR meter

Status
Not open for further replies.

gary350

Well-Known Member
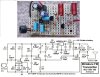
I have been looking for a 4.7pf capacitor in my parts for a while finally found .459 on the 2nf scale. This must be .459nf it will not read on the 200pf scale.

A smaller capacitor on 200pf scale reads 7.1 I think this is 7.1pf

New meter is confusing me. I need to find the variable 40pf capacitor too in my parts box.

I also need to wind the .1uh coil. I have all found all the other parts.

I don't know which side of the mic is positive or negative?

Am I correct, 4.7pf will not read on a 2nf scale?


Btv25.png
 
Last edited:
Try changing to a higher test frequency. Your meter might also not read that low.
 
Last edited:
New meter is confusing me.
What is the meter part number?
Try changing to a higher test frequency.
The parts you are testing are very small, it is hard for the meter to measure them. Some meter have a switch to measure parts at different frequencies. You are building a 100mhz transmitter and should be measuring Ls and Cs at the highest frequency your meter will read at. Your meter not have a switch or may change frequency automatically.
 
Can you get away with measuring a 100pF capacitor with and without your 4.7pF capacitor in parallel with it?
 
A 4.7pF is a very low value, and stray capacitance will probably swamp it.

When I've 'thrown together' these crude transmitters in the past I've often just made a capacitor with a couple of cm of insulated solid core wire twisted together. Depending how it's constructed there might be enough stray capacitance to make it oscillate without the cap any way.
 
On the 200pf scale a known 200pf capacitor meter should read 200. A 100pf should read 100. A 4.7pf should read 4.7

I have several very small ceramic capacitors the meter gives me goofy reading on all these little caps. Most of the time meter gives no reading at all. So far best way to get a reading is attach the capacitor to the leads with meter OFF then turn it ON and wait. Sometimes it takes 10 seconds to get a reading if it reads at all. Capacitors a bit larger gives me good readings like 107pf I assume this is probably a 5% or 10% or 20% 100pf cap. Meter is not stable on 200pf scale 107pf sometimes it changes to 109 or 106. Tiny caps are all too small to have a value marked on the side of the cap and I have no known caps this small.

If I solder a 100pf in parallel with 4.7pf meter should read that as 104.7pf that will take a lot of trial & error with all these unmarked caps and not sure how accurate that will be.

With meter on 2nf scale several very small caps that I suspect to be in the 4.7pf range all read .005pf and one reads .006pf, if I am reading this correctly i think .005 = 5.0pf
 
Last edited:
most capacitance meters have a zero adjust so you can dial the test lead capacitance out. other methods for determining capacitance would be to use an oscope and RF generator. put the cap in series with a known inductance, and measure the resonant frequency.
 
most capacitance meters have a zero adjust so you can dial the test lead capacitance out. other methods for determining capacitance would be to use an oscope and RF generator. put the cap in series with a known inductance, and measure the resonant frequency.

Your right is does have a zero adjustment. I did not notice that until you mention it. Now the cap I thought was .005pf is .002pf. LOL. I need to test more capacitors.

I have finally gotten the hang of this meter. With meter set on 200pf the capacitor has to be smaller than 200pf for the meter to read it.

I dumped my whole stash of about 5000 small capacitors on the desk and spread them out all over the desk top. I quickly spotted all the smallest capacitors and collected about 300 in a pile. 1 by 1 i touched the caps to the meter leads i found several 100pf, several 60pf and 50pf. I also found a 2pf, 10pf, 33pf, 47pf. Funny thing these tiny little caps have numbers, the 2pf has the number 2 on one side. The 10pf has the number 10. The 33pf has 33 and 37pf has 37. LOL WOW now I know this meter is accurate but no 4.7pf.

In the past when pulling parts from old boards I rarely saved many of these tiny caps now I wish I had. I only have 6 or 7 old pcs boards in the shop I will check them to for tiny caps there could be 4.7pf. If no 4.7pf then I will experiment with making a gimmick, 2 connecting wires twisted together attach them to the meter then start cutting it shorter until meter reads 4.7pf. If I heat shrink tubing that would be better than twisted wire. If this turns out to be an ugly looking thing I will probably order a 4.7pf capacitor. Problem with used parts i have no clue what the voltage rating is on unmarked ceramic caps they always work on 9V to 15V.
 
Last edited:
Old low value caps likely have strange numbers.
A 4.7pF cap might be labeled 4 or 5 but not 4.7
A 47pF might be labeled 47 or 470 (47 and no zero)
A 470pF cap might be labeled 470 or 471 (47 and 1 zero)
I also found a 2pf, 10pf, 33pf, 47pf. ................ but no 4.7pf.
Use two 10pF in series = 5pF.
 
Old low value caps likely have strange numbers.
A 4.7pF cap might be labeled 4 or 5 but not 4.7
A 47pF might be labeled 47 or 470 (47 and no zero)
A 470pF cap might be labeled 470 or 471 (47 and 1 zero)

Use two 10pF in series = 5pF.

That would work but I only have one 10pf capacitor.

I pulled about 100 caps from another board all caps are tiny about the physical size of pf caps I notice 2 caps on this board with a black spot on top so I tested them first, both are 33ph. All the others are 100pf.

All the below 50pf caps have a black spot on top. I checked my other boards found 1 board with 7 caps that have a black spot so I pulled them they are all 15pf markings on the side are 15F 250V. These are 3 times larger than the 10pf & 33pf probably because of the higher voltage rating.

None of my other boards have caps with black spots but I pulled several small caps anyway none are less than 100pf.

Black spot seems to be a code that indicates smaller than 50pf.

Three 15pf caps in series will give me 5pf.
 
I refer you to post #8 :D

I double checked everything, turns out I forgot to zero the meter when I changed selector switch, it has to be zeroed every time I change the switch. Getting my hand close enough to adjust it goofs up the reading. I have 7 caps that all say 15F 250V meter reading is 15.0

Double checking other caps 2F = 2.1 10F = 10.1 33F=33.5 47F=49.0 on the 200pf scale with meter zeroed.

three 15pf caps soldered in series meter reading is 5.2 on the 200pf scale.
 
Last edited:
I am having trouble making the .1uh coil. Should I trust online air core calculator or my meter. Meters have different readings?

My coil is, 4 turns, .280" diameter, .187" long

Online calculator says .10018uh round that off to .1uh

My LCR meter says 02.1 on the 200uh scale.

My Victor meter says .064 on the 2mh scale.

If I can find the math formula I will calculate it myself. Online search, some ask for inside radius, some ask for outside diameter, some want center line diameter. Index is missing on my 1973 Amateur radio handbook. Some want wire diameter. They all want length & number of turns.
 
Last edited:
Any 200uH scale will have a margin of error greater than 0.1uH. You cannot measure such a small inductance at a 200uH scale setting. Even with just a 1% error rate at 200uH, that gives a 2uH error in any reading. Odds are, your LCR meter is less accurate than that...
 
You are trying to make the original old FM transmitter that usually does not work, I fixed it 13 years ago.
1) Its audio preamp transistor is saturated if the battery is brand new and the hFE of the transistor is high and the transistor is cutoff if the battery is running down and the hFE of the transistor is low. I added a I added a low dropout voltage regulator to fix it.
2) The radio frequency of the transmitter changes as the battery runs down so I connected the RF oscillator to the added voltage regulator.
3) The radio frequency changes when something moves towards or away from the antenna because the antenna connected directly to the oscillator tuned LC circuit. I added an RF amplifier between the oscillator and antenna to fix it.
4) The sounds from the transmitter heard on a normal FM radio were very muffled with no high audio frequencies. I reduced the value of C3 to 1/20th to 470pF and added pre-emphasis treble boost like all FM radio stations have.
I built mine on a planned and compact stripboard layout because the very high frequency will not work on a solderless breadboard with the high stray capacitances between the rows of contacts and the wires that are all over the place.

The leads of my expensive Fluke DMM measure 0.19nF which is 190pF. Without the leads it measures 0.16nF which is 160pF.
Here is my fixed FM transmitter:
 

Attachments

  • FM tx mod4 pic and schematic.jpg
    FM tx mod4 pic and schematic.jpg
    196 KB · Views: 140
You are trying to make the original old FM transmitter that usually does not work, I fixed it 13 years ago.
1) Its audio preamp transistor is saturated if the battery is brand new and the hFE of the transistor is high and the transistor is cutoff if the battery is running down and the hFE of the transistor is low. I added a I added a low dropout voltage regulator to fix it.
2) The radio frequency of the transmitter changes as the battery runs down so I connected the RF oscillator to the added voltage regulator.
3) The radio frequency changes when something moves towards or away from the antenna because the antenna connected directly to the oscillator tuned LC circuit. I added an RF amplifier between the oscillator and antenna to fix it.
4) The sounds from the transmitter heard on a normal FM radio were very muffled with no high audio frequencies. I reduced the value of C3 to 1/20th to 470pF and added pre-emphasis treble boost like all FM radio stations have.
I built mine on a planned and compact stripboard layout because the very high frequency will not work on a solderless breadboard with the high stray capacitances between the rows of contacts and the wires that are all over the place.

The leads of my expensive Fluke DMM measure 0.19nF which is 190pF. Without the leads it measures 0.16nF which is 160pF.
Here is my fixed FM transmitter:

Lots of good information THANKS.

The circuit calls for 9V but I know from past experience 9V battery will not last long. I was planning to use AA batteries 4.5V or 6V try them both see what happens I have AA battery holders for 3 & 4 batteries. I have another circuit almost identical it uses 2N2222A transistors I was thinking about using 2N3904 transistors first then build another circuit to try the other transistors. With all the 1000s of parts that I have I only have 1 variable capacitor for this circuit, I can not build your circuit until I order more variable caps. I was wondering if stray capacitance would be a problem in this circuit. I like to build very small compact circuits I was going to build this on a board, 1" wide, 1.375" long, will that be a problem? I am planning to use gum drop caps on the audio amp section it that a problem? I can save space mounting resistors standing up on end instead of laying flat of the PC board is that a problem?
 
Status
Not open for further replies.

Latest threads

New Articles From Microcontroller Tips

Back
Top