Continue to Site

Welcome to our site!

Electro Tech is an online community (with over 170,000 members) who enjoy talking about and building electronic circuits, projects and gadgets. To participate you need to register. Registration is free. Click here to register now.

  • Welcome to our site! Electro Tech is an online community (with over 170,000 members) who enjoy talking about and building electronic circuits, projects and gadgets. To participate you need to register. Registration is free. Click here to register now.

GM to Z Converter

Status
Not open for further replies.

briguy280z

New Member
Hi all i am new to the forum and looks to be a
long time member!!! Lots of good info
here...Otherwise heres my project

Background
I am a 280Z car enthusiast and i am doing a
farly difficult convertion. I am placing a LS1 GM
Engine into a Datsun 78 280Z. The car is just about
done but for a few electronic issues. I created two
circuits so far for this car.

A PCM Vats Simulator. 5V 40Hz 50% duty cycle
square wave --Works Great!!

This is the one I need help with.

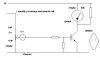
**It is a GM fuel tank sender to Datsun Fuel Guage convertion

What I have to work with is a .39V (LOW) to 2.9V (FULL)
sending voltage from the sending unit. The Guage uses
a 3V (LOW) to 6.5V (FULL) as operation voltage. What
i did sofar is designed a circuit that uses two 741 Opamp's.
The first is used as a summer and the second as a amplifier.
I have simulated it in EWB and seems to work!

First Problem!!!
I will need to supply the circuit with a +12V to -12V.
That would mean i would have to create a AC converter and
then convert to DC again....any other ideas??? Will it still work
with 12-0V????

Second Problem!!!
The guage requires 50mA I dont think the circuit can handled this!
My power supply with the regulator really gets hot when I have it
direct connected. I was told that I could use a JFET to get this kind
of current...I dont know how that works!

If a picture would help let me know and i will upload it to my
website and post it!

Thanks for any help i can get!
 
I sparked no interest

I really need some help with this. :D I am posting the
Img of the circuit to give you guys an idea on what i am trying to do.

Check it out!
**broken link removed**

I stated earlier that i needed a +12 to - 12 supply, well i dont mostly just
a +9 to -9 supply....well i guess just about anything around there. Any
ideas on how i could get that out of a car battery???

The guage requires a little more that 50mA is more to 150mA and dont
know if this circuit will beable to handle that kind of load? Does anyone
have an idea???

Thanks for any suggestions or maybe a bugger off will work!!! I hate
wasting time.
 
Hi briguy280z,

Firstly my screen is as wide as these asterisks.
*************************************************************************
I would be most grateful if you could press return at that width.

Have you considered putting a Datsun sender into the tank?
I will asume you have considered that, and decided against it.
Now, why do you want a negative 12 volt supply for the fuel gauge?
Wont it work on a positive supply?

I must be missing something here.
If the gauge is directional,
then cross the wires over.

Then it would work on positive volts.

As to the difference in sensitivity,
i suggest a power transistor such as a 2n3055,
and fiddle with the resistors till its right.

Regards, John
 
Hi briguy280z,

this is the sort of thing i would do for the fuel gauge.
Auto electrics do not generally take kindly to complex
electronics, the switches etc are usually a bit rough.

The electronics in the alternator is usually way over
12 volt breakdown, and probably well damped.
A 2N3055 is wellover 12volt rated and should easily
handle a few amps before worrying, with a heat sink it
would handle 10 Amps easily. They are fairly common and
shouldnt be expensive.

The arrangement shown is simple, the resistor divider
on the base would determine the current through the
transistor, the one across the gauge may or may not be
needed, to set minimum.

Regards, John
 

Attachments

  • Gauge.jpg
    Gauge.jpg
    14.5 KB · Views: 2,254
Sorry about the width of the message.
I am pretty high resolution and don't notice how wide my
messages are. I fixed it but cant do anything about the pic
untill i get home.

Otherwise....I needed the +12 to -12 to power the opamp but if your
solution works this will make it 200% easier...I completely agree that
complex electronics dont work well in automotive applications. Unless you
create the right enviroment.

To understand this right the first two resisters adjust the multiplier for the
voltage to the gauge. The guage does work with current flow there are
three connections to the guage Red=Power 12v Black=ground Yellow=Current to ground through the sender

But the Camaro sender sends a .3-3v to the ECM which generates a
square wave sig to the gm guage. (Unusable)

I will work through your solution.

Thanks
 
briguy280z,
What is the purpose of D4 and D3/R7 in your circuit? Is it to correct nonlinearity in the meter?

If not, then it is possible to use a simpler circuit.
 
Hi briguy,

I am still curious about why you haven't put a Datsun
sender unit in the tank.
I assume it is still the Datsun tank, in the vehicle?

Regards, John
 

Attachments

  • Camaro.jpg
    Camaro.jpg
    21.7 KB · Views: 2,210
Hey John1

Because of the OBDII laws i had to use a Camaro tank in the datsun car.
I also needed a high output fuel pump and some EVAP equipment. It was
kind of a PITA but it fit without major modifications. That is why i needed
a circuit to convert the GM sending unit Float voltage to a datsun Gauge.
I have to keep the PCM circuit because it will send a check engine light. Datsun float will not fit into the tank.

I messed around with the 2N3055 trying to simulate it and couldnt make it
work under 9v. I am going to pull guage out again and put some pots to
see if i can make it work. This is nonlinear amplification.

Here is some pics if your interested :shock: :D

**broken link removed**

pebe-What is the purpose of D4 and D3/R7 in your circuit? Is it to correct nonlinearity in the meter?

I had a little help with the circuit so bare with me. The two diodes and
resister are to control the max limit and voltage control. In a sense i dont
really need them its kind of an overkill.
 
Hi briguy,

Had a look over your pics,
you have certainly done a lot of work there,
looks pretty good.

Ive been discussing this with a mechanic friend,
and it was put forward that modifying the sender
would be more practical.

If the float arm is too long shortening it should
be ok, the take-up pipe would probably have a gauze
over it, that could be shortened a bit and the gauze
re-fitted.

I am not familiar with either tank myself, but this
is the advice i have recieved, that it would be more
practical to modify this unit, than to make the
electrical/electronic alterations described.

Best of luck with it,
John
 

Attachments

  • Egastanks.jpg
    Egastanks.jpg
    9.8 KB · Views: 2,185
Hi John

Thanks for your info...

I came across a problem when building the
circuit that is shown above. I connected the
transistor to a slide pot which gave me the
min and max Ohm setting for the full and empty
positions.

I used a cupple pots for the resistor divider and
adjusted them to see what kind of gain i can get.

I am unable to get a low enough current gain to make
it work. I wanted to know if you had any suggestions
in fixing this problem.
 
A New Idea

A single transistor in a common emitter configuration won't even
start to turn on until the base-emitter voltage reaches about 0.6 - 0.7v,
it will never go down to 0.4v :!:

If I could suggest a single op-amp circuit...
A non-inverting op amp with a gain of 1.4 (ish) with input biassing...

If the following resistors are used ...
R1 = 2k6
R2 = 9k4 (maybe a 9k1 in series with a 1k preset to set zero)
R3 = 4k0 (maybe a 3k3 in series with a 1k preset to set gain)
R4 = 1k6

... the results would be
0.39v in gives 2v6 in to pin 3, 3.6v out of the op-amp, 3v0 at the transistor emitter
2.9v in gives 4v9 in to pin 3, 6.82v out of the op-amp, 6v22 at the transistor emitter
so I have got the zero and gain close but not perfect, hence the presets.

The transistor should be OK upto 1000mA collector current, or 650mW dissipation,
but will require a small heatsink to cope with this.
It will be dissipating around half a Watt.

R5 is to help limit the dissipation of the transistor and to give some short-circuit protection.
You said the gauge takes about 150mA for full-scale?
If the resistor is calculated to drop about 3v at full-scale (leaving 2.5v across the transistor);
R5 is 20 Ohms, 1Watt
 

Attachments

  • GM-Z_Converter.gif
    GM-Z_Converter.gif
    2.7 KB · Views: 2,110
Thanks mechie

Using a 741 Opamp would be my first guess...?

I need a little help with your terminology?

R1 = 2k6
(2.6 kOhm)?

R2 = 9k4 (maybe a 9k1 in series with a 1k preset to set zero)
(9.4 kOhm)?

R3 = 4k0 (maybe a 3k3 in series with a 1k preset to set gain)
(4.0 kOhm)? 5KOhm Pot so i could adjust the gain if nessary!

R4 = 1k6
(1.6 kOhm)?

Sounds like a good plan though... I agree on the single transistor idea. I couldnt get anything to register under .7v

Thanks for your help
Briguy
 
A 741 should be good.
Maybe you will need some filtering for the power supply.

Resistor values are as you guessed - it is common to use the multiplier in place of the decimal point, it uses one less character and is easier to spot when printed 8)

For R3 you could use a 5k pot but that would make setting the gain a bit fiddly, a 3k3 resistor in series with a 1k pot would make setting an exact gain much easier, up to you I guess :wink:

For R2 you may want to try the same trick, a 9k1 (9.1k) resistor in series with a 1k pot to make setting zero as easy as possible.
 
This suggestion was excellent it works the way i wanted it.

I got a problem though!

I was an idiot when figuring out what needs to vary and its not
the voltage. When i pulled out the guage again i found that there
is 3 wires feeding the guage.

Black = Ground
Red = 12v power
Yellow = current to ground through the fuel float

In the beginning i though the float varied the voltage
going to the guage. I was wrong :oops:

I can use the circuit you designed by connecting the yellow
to ground and varing the power to the guage. Although
i would be nice to design it around the original purpose.
Current! :roll:

What would i have to do to your circuit to change it to
adjust the current instead of voltage?

When i measure the current with a Pot i get

200mA with 10 ohms High
100mA with 80 ohms Low

When measuring the amps they were in pulses so this is the best i can get was the peak pulse at the resistant.

I am not sure what to do next i am running into
unexplored teritory for me. :?:
 
Just to clarify ...

So the gauge needs a current sink (to ground) to work, and
200mA gives a 'FULL' indication
100mA gives an 'EMPTY' indication
Are we OK with the float- end of the buiness?

You said
What I have to work with is a .39V (LOW) to 2.9V (FULL)
sending voltage from the sending unit. The Guage uses
a 3V (LOW) to 6.5V (FULL) as operation voltage.
So are the gauge voltages a red herring or is there 3v across the gauge
(giving 9v from it to ground) for empty?

If I redesign the existing circuit to use the same 0.39v to 2.9v (measured from ground)
I think I can create a current sink to achieve this; but as the transistor hfe (current gain) can be anywhere from
63 to 160 you will have to calibrate the amp to suit the actual transistor you have bought.
Also, as there is some doubt as to the actual current required for the gauge, the range of calibration will have
to allow some space for that.

Am I correct in assuming the above ?
 
That is correct and about the float end.

According to the information about the tank it sends a
Voltage because it is sents that to computer. Then the computer sends out a pulse to the stock camaro guage.

So
.39v low(empty) and 2.9v high (full) the other guage info is a
red herring. I obtained these values by not correctly connecting
the guage. Please disregard that information.

Well, the current power transistor i have is a 2N3055 and it
uses a

Hfe of 70
Vcbo:100V
Vebo:7V
Vceo:60V
Ic:15A

Power Dissipation of 115W

I hope this information will help with the calibration of the
cirucit. But everything else is correct to assume.

Thanks for the help!
 
Second converter Circuit

Try this then ...
The table below shows my design values for various points on the circuit (red letters on diagram).
Code:
If hfe = 45 (2N3055 typ) then ...

 In       A       B      C      D      E         F
 
0.39v    2.6v    3.8v   1.6v    1v    100mA    1.59mA

2.9v     4.9v    7.0v   2.6v    2v    200mA    3.17mA

gain of op amp = 1.4
so R4 = 1k6
and R3 = 4k0 . . . but see text

You wanted to use a 2N3055, I looked its hfe up as 45(typical), 70(max)
so the circuit needs a gain range to cope with that.
As the transistor is being used as a current amplifier this hfe is important and must be allowed for.

For R3 to allow the gain range required I would use a 1.2k in series with a pot of 4.7k or so.
R1 = 2k6 (decimal point replaced by multiplier, so 2.6k)
R2 = 9k4 (9k1 in series with 1k pot)
R4 = 1k6
R5 = 1k0
R6 = 10R 20Watt - this acts as short-circuit protection for the transistor
. . . . . . and gives some negative feedback to stabilise the output against temperature and voltage fluctuations.
Allow this resistor to dissipate heat :!:
 

Attachments

  • GM-Z_Converter_v2.gif
    GM-Z_Converter_v2.gif
    3 KB · Views: 1,151
Well i hooked it all up checked it twice. trouble shooted but for
some reason no go?

You said that the hfe was 45 but on the package it says
hfe(min):70 so i dont know exactly what to say. I got two
transistor books comming tomarrow, hopfully they will give
me a clue where to start trouble shooting! :?: :?:

I connect it all up and it constantly stays at 215mA. no matter what
pot i change it does nothing. I measured the votage at (B) and it
varies when i change input voltage and gain pot but amperage
through the load side doesn't. What transistor do you suggest?
I dont mind getting one that might work better, god knows how
much i have put in to get this to work.

Thanks again!

Briguy
 
Fault finding

OK I have two guesses to start with...

Is the 10 Ohm resistor connected in the transistor emitter line to 0v ?
If this resistor is the wrong value (say 7 Ohms or 12 Ohms) it will affect the operation.
I expect resistors to vary by upto 10% so if it measures a bit low (9.5 Ohm ?) that should be OK.

You said the voltage at point B varies - can this be set up to follow the table I posted (3.8 to 7v) ? If it is close to these values then the transistor is at fault, if these voltages are wrong then the op-amp is wrong.

The transistor hfe :?
OK, a third guess...
IF you have a higher spec 2N3055 than that I looked up then I may have dropped a goolie :oops:
I tried to allow for hfe values from 45 to 70 but if yours is a lot higher than 70 ...
We may need to change the base resistor (R5) to some higher value (you could swap it for a 3k3 or 4k7 to see what happens IF nothing else suggests a fault.

You said that the current to the gauge is in pulses ... could this be an issue ? ...
Could you try the circuit without the gauge, a dummy load of about 30 or 40 Ohms. This will need to cope with 2 Watts of heat so use a power resistor not a little 1/4 watt one :wink: Connect your test meter in series with this to check what is happening.
 
Hi Briguy and Mechie,

Ive been following this carefully, but i am still a bit
confused about the arrangement of your fuel gauge.

Normally the circuit needed by a fuel gauge is fairly
simple.

Typically the gauge would be in series with a variable
resistor operated by a float.

I am beginning to wonder if this is maybe not the case
here.

I presume you have available the diagrams of both the
fuel gauge system for the datsun, and also the fuel gauge
system for the GZ.

If you could forward a diagram of the original arrangement
of each of these, then i feel sure that a setup could be
easily reached, which would operate your fuel gauge.

electrical diagram of camaro fuel gauge system.
electrical diagram of datsun fuel gauge system.

Or maybe a URL to such diagrams on-line.

This in particular puzzles me:
"When measuring the amps they were in pulses so this is
the best i can get was the peak pulse at the resistant."


Now that would be when measuring the current operating the
gauge (i think)

So you can give the peak current.
So you must be using a digital meter, yes?
Cos a moving coil type wouldn't give the peak till it settled.

Or maybe its a moving coil type, and you gave the reading
as the highest place the needle reached.

The main question to me anyway is, why pulses?

Sometimes, mainly on older cars but not always, the instrument
supply is separated and run at a lower voltage, usually 10 v.
When this is the case, the supply to that rail is sometimes
fed by a 'regulator' from the 12v feed. Such regulators are
primitive units which simply have a hot wire element operating
a pair of normally closed contacts. Over 10v approx the
contacts will open, below 10v approx the contacts will close.
This gives a sort of average RMS of 10v.
Hardly high tech, but very reliable.
With this type of 'regulator' or 'stabiliser' the instruments
need to have fairly low response times, usually they are 'hot
wire' type indicators, this means they are not responding to the
regulators pulsing to provide its 10 volt average.

Now if this is why pulses are happening, then we can work
accordingly.
But it seems unlikely that such a system would be used on a
car that carries an on board computer engine management system.

Unlikely, but not impossible.
The engine management may be regarded quite separately from
the instrumentation.

I would like to check why there are pulses.

Regards, John
 
Status
Not open for further replies.

Latest threads

New Articles From Microcontroller Tips

Back
Top