Continue to Site

Welcome to our site!

Electro Tech is an online community (with over 170,000 members) who enjoy talking about and building electronic circuits, projects and gadgets. To participate you need to register. Registration is free. Click here to register now.

  • Welcome to our site! Electro Tech is an online community (with over 170,000 members) who enjoy talking about and building electronic circuits, projects and gadgets. To participate you need to register. Registration is free. Click here to register now.

Frying Arduino Uno boards

Status
Not open for further replies.
Thanks for the info.

You definitely need a diode across the change-over relay coil, with anode to ground for that configuration.

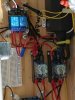
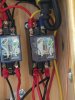
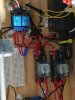
What exactly is the "SPDT relay" ?


Edit - looking again, just seen the motor is 1/6th horsepower - that's big!! Over 10A at full load.
The surge when it instantly reverses may be well over 20A.

I would be tempted to totally separate the 12V part from the 5V part; the relays provide isolation so there is no need for a direct interconnection. It's one less interference & spike path to worry about.

It would be a good idea to change to DrG's relay contact circuit so the motor can be stopped, and add something like a 0.1 Ohm resistor in series with the motor to slightly limit the current surges when it starts and stops.
Hopefully the current is rather less than 10A whilst running at steady speed, which would allow a somewhat higher value resistor without causing problems.
 
Last edited:
SPDT is a single pole, double throw relay. Earlier in the thread, the specific identification of this device was listed, It is a spongle branded relay that is normally open and goes closed on a low voltage input. It has three output terminals and three inputs. One input is the signal wire, and other two are 5 v source voltage and 0 volt return line. The outputs side has a 12 voly input supply that goes to the open or closed side depending on the input signal. Notice, I do not use the low output, only the high one. Also, the motor feed wires reverse polarity when the DPDT relay changes state. Thus there is no fixed high voltage or low voltage lines feeding the motor. So I would need a pair of relays and a pair of resistors criss crossing the lines to catch any back voltage spikes. Can be done if needed, but don't really see how these spikes could be getting to the fried boards.
 
Ok, everyboody, the schematic and INO file (the Legoo Code) are attached, The schematic is unique to me so this is the original. There is a bit more wiring to run the motor that turns the winder, but that is separated from this stuff, and the only logic to it is a start signal from the Legoo board so the winder and traveller motors start essentially together. I'm pretty sure I have some 10k resistors in house so I can easily add those to the outputs of the limit switches. Also, for those following the thread, the DPDT relays have an internal LED and resistor, but I would have to do some digging to find where they are connected. I do know the led only flashes when one of the two limit switches is hit, but that is probably because in one direction, the polarity does not activate the led. If anyone needs a word doc version of the code I can provide it.

I will look at this more carefully, but I have some questions/requests.

Can you please take a picture of both relays - anything clear that can show their hookup?

Is the +5V coming off of the Arduino +5 pin?

I see your notation "0v not ground". If you are using the Arduino +5V then use the Arduino GND. Keep the 12V and ground seperated.

I linked to a relay board with TWO relays (I may have edited the post) does your board look like this? https://www.amazon.com/SunFounder-C...DH4P&psc=1&refRID=CV88EA1HYYYTHQ51DH4PUsually

I know it is a headache but it really is important for us to see what you have.
 
OK, some of this is starting to sink in (it takes me a while).

Your motor is hooked up like this:
Motor relay.jpg

From:**broken link removed**

Your motor is always on and when the relay (call it the motor relay) is operated, it switches direction.

The motor relay is operated by the Songle relay (call it the UNO relay).

OK, so why are you bricking UNOs?

I think you should:

1. Remove the path from the 12V power supply/gnd to the UNO. There is no reason to have those GNDs connected at all.

2. Add a diode across the motor relay coil - something like a 1N4004 - even though it is being energized by the contact of the UNO relay.

So, your schematic looks like this:
schematic diagram2.jpg


and you have added resistors on the limit switches.

BUT:

Is that motor relay capable of switching a 10A inductive load? Do you have specs on that?

AND

I trust rjenkinsgb (and a bunch of other people on here) more than myself about these motor matters and what happens when you reverse the motor while it is moving...well I don't know much about that stuff at all.

As for the code, I only briefly looked at it and nothing flew out at me.

That's all I got right now, hope it makes sense and helps.
 
Last edited:
I will post some pictures of the relays after dinner tonight. Your changes look very reasonable, and consistent with what others are saying, so at a minimum I will implement them including resistors in the limit switch lines. Last time I ran, I had some LEDS across the motor relay lines to see if all was working properly. Had a 1K resistor in series with LEDs to drop most of the 12 V supply. The LEDs went off right after the board fried, but since the Uno relay was not getting signal, the motor relay was down too and I shut down the power to avoid any further damage.

Your picture of the Uno relay looks exactly like what I purchased, and your sketch of the motor relay is right on too. The relay was bought from Jameco, but is a std 12 V coil operated DPDT Relay. The specs say it will handle 10 amps at 30V DC. I haven't seen any evidence of this relay not handling the loads yet. It is an Onrom LY2N-J. I think the J indicates a socketed relay.
 
I'm anxious to learn what happens. Just by the by...

The specs say it will handle 10 amps at 30V DC

I have learned that, almost always, they rate those relays for resistive loads and they can't handle those amps with an inductive load. For example, look here at the specs for Songle relays. Notice how they get derated from 10Amps resistive load to 5A or 3A inductive load. I have not looked up your Omron, but I suspect something similar. Not sure how that would be causing the UNO bricking though, but it is worth keeping in mind.

had some LEDS across the motor relay lines to see if all was working properly. Had a 1K resistor in series with LEDs to drop most of the 12 V supply. The LEDs went off right after the board fried, but since the Uno relay was not getting signal, the motor relay was down too and I shut down the power to avoid any further damage.

That bothers me a little bit. If the LEDs were on the motor lead lines, one should be on all the time as long as the 12V is present - no? Because whether the UNO relay is operating or not, the motor is juiced. Maybe I am not understanding, because that would mean that the 12V supply got shorted somehow and if shorted to the UNO 5V or GND line, that would be a recipe for crispy UNO.
 
I realize the motor relays may not last long, but willing to pay that price. I just looked at the relays and they are rated for 1/2 hp A/C motors. The motors are rated 1/6 th hp, and are running under essentially no load. If I had to do it again I would look for 1/20 hp motors. But they cost half the project totals, so not anxious to replace unless they start killing something else. As for the LEDs, you will see in the p[ictures attached below a prallel set of relays whose only function is to turn the winder motor on at the same time the traveller motor starts. They are controlled by Elegoo, and are off with the Elegoo fried. I haven't mentioned them because once both motors are running they do not change state except for bd problems. The pictures should give a good view of all the pieces I have used to build this little device.

Just got a message my picture files are too big for the server. I will have to work on cutting them down. Post tomorrow morning.
 
Attached below are eight pictures of my equipment and the local wiring. I havre not made suggestedchanges yet. will start them in the morning now that pictures are uploaded
 

Attachments

  • Elegoo Uno bd.jpg
    Elegoo Uno bd.jpg
    253.9 KB · Views: 176
  • Elegoo Uno relay and wiring.jpg
    Elegoo Uno relay and wiring.jpg
    258.6 KB · Views: 179
  • motor and Elegoo relay wiring.jpg
    motor and Elegoo relay wiring.jpg
    314.2 KB · Views: 177
  • Limit switch after damage.jpg
    Limit switch after damage.jpg
    227.7 KB · Views: 175
  • motor relay.jpg
    motor relay.jpg
    248 KB · Views: 177
  • Motor relay and wiring.jpg
    Motor relay and wiring.jpg
    307.9 KB · Views: 187
  • Motor and on_off relay wiring.jpg
    Motor and on_off relay wiring.jpg
    284.5 KB · Views: 177
  • Elegoo and Motor Relays and wiring.jpg
    Elegoo and Motor Relays and wiring.jpg
    223.5 KB · Views: 176
Thanks for that info.
The blue relays are on PCBs that already have flywheel diodes (D1 &D2 in the photo), so they are not a problem.

DrG has put exactly the same basic changes as I suggested in the modified drawing he posted - a flywheel diode on the motor direction relay and isolate the 5V and 12V sections.

Those are the priority changes to avoid damage to the electronics side.

Can you also post the specifications of the motors, photos of the labels or links to the data sheets or sellers site?
 
Nice pics. Just a couple of thoughts...

I see that the UNO is being powered from the barrel jack. Is it being fed by, what appears to be a laptop power supply? Can you gives us the output of that supply and what else it powers?

On the Songle relay board: I am wondering specifically about the connections. Here is a close up of your Songle board connector that I am talking about.
songle-1.jpg


What GND is the brown wire (right side of pic) going to? What GND is the white wire (left side of pic) going to? Please check that your white wire is going to gnd and not the black wire next to it. From pic left to right, those connections should be, Vcc[5V], IN2, IN1, GND and the right side connector is GND, VCC, VCC-JD. You have jumped the two VCC pins, so VCC on both connectors needs to be 5V, which will come from the left side VCC connection.

Here is a pic of how I have used the board in a project.
UNOactuatorRelays.jpg


Since you have nothing else attached to the UNO, MORE than enough current can be supplied FROM the UNO 5V and GND to run the Songles (which take 70-80 mA each). Of course I am assuming that the PS going to the barrel jack has a healthy output.

See how I am tapping TWO GND connectors (see the black and orange wires) on the UNO. I would strongly urge you to check that the white lead on your connector is, in fact, GND and that you to try the connection scheme in the above pic first as it "isolates" any other power/gnd rails going on outside of the UNO.

Here are the specs for the OnRom relays note: 24 VDC 5 A (Inductive load (L/R = 7 ms)) , so that is something to keep in mind going forward.

I acknowledge that rjenkinsgb made the same observations/recommendations as I have (and probably before me). In one case I was typing and he was editing, but it is no matter. One of the strengths of a Forum like this is that you get several sets of eyes on the problem. I do read the other posts.

Here is some, potentially good news. Your fried UNOs may not be permanently fried. Can you please take a fried UNO and power it from the USB jack with nothing else attached and see if it works? If it does, read on.

There are two components that are particular sensitive to being fried in these situations, the 5V regulator and a diode protecting the barrel jack input. They are circled below. That M7 SMT diode can be replaced with a through hole 1N4004 diode with some careful soldering. I know, because I have done this - not because I fried it but because it was missing on a cheap clone that I bought. It was working fine from the USB port but when I went to the barrel jack it was dark. Drove me crazy until I went through the UNO schematic. I was happy when I soldered a new diode on there and all was well.

UNOPS-1.jpg


The 5V regulator is also not too difficult to replace and they are only about US$1.

I would plug it into the USB port and if it powers up, go to the diode fix. If it doesn't, I would take a meter to the regulator when you are using a barrel jack connected PS and see if you are getting the appropriate in and out voltage.

Although they are fried now, they can sometimes be reincarnated (you can rename them Lazurus 1 and 2).

edited for some typos and clarity
 
Last edited:
I have completed the changes I think are most critical based on the previous discussions. I have added 5k resistors to the lines between the limit switches and the Elegoo board, I have cut the 0 V bus between the 12 V power supplies, and the 5 V supply. I connected the 0 V part of the 5 volt bus to the GND connector of the Elegoo, and I have removed the 5 V power suppies from the circuit. Now the only power the Elegoo is getting is from the 9 V regulated supply that feeds the barrel connector. I also added a diode between the two leads feeding motor relay coil.

The 9 V power supply is specked at 1 amp and mfg by Shenzeng Bin Shen Technology Development LTD, Model # 12W0901000DUI.. For the record, the DC motors were mfg by Makemotor, and are part # PN017007-10038. I am considering adding a MOV varistor across the leads of the reversing motor to cut down on any back voltage spike from the motor reversal. Any thoughts on specifications for this MOV. Clearly the clamping voltage needs to be around 15 V, but any other thoughts. It will get hit about once a minute with the reversals.

Lastly I did try hitting the reset switch on the Elegoo board, and after I did that, both diodes light up normally when the board is powered, and the relays fire as they should, so it looks like the board itself may have been saved by one of its protective circuits. Since this is not occurring until a couple of minutes into winding, I am pretty sure there are no wiring errors, but this whole affair continues to smell more and more like a stray electrical spike that just occasionally gets too strong and throws the protective relay. Hopefully the changes you have all suggested will kill this problem and I will be able to start spooling my spare yarn hanks which has been the real objective all along (that and having some fun/learning at the same time--never too old to learn new tricks). I will probably run this evening after the Democratic Debates, and will let everyone know if I have more detective work to do.

In any case, I do want you all to know that I deeply appreciate the amount of thought and effort that everyone has put into your comments (even the one on frying chilis--a bit of comic relief). I found just about all your comments really helpful, and spot on. I was a bit surprised in the consistency of the suggestions, but this just made it easy to decide what was most likely to work. Again, thanks to one and all, you are a great bunch and a real asset to the field.
 
I've found those motors here:

They appear to be a simple commutator style DC motor, no internal electronics.

Unfortunately the page does not give the stall current rating.

Have you got a meter with a low ohms scale that you can use to measure the resistance across the motor leads, with one disconnected? (subtract the value you get with the meter leads connected directly together).

The instantaneous peak current as the motor starts from zero will be approximately 12 (supply voltage) divided by that resistance.

The "instant reverse" current, if the motor direction is switched without stopping, will be roughly twice that.
 
MrZenite Hope you will see some improvements and can't wait to hear.

rjenkinsgb (or anyone else who knows).

In the spec sheet for the relays, I see this:
  • 110 VAC 10 A (Resistive load)
  • 110 VAC 7.5 A (Inductive load (cosφ = 0.4)
  • 24 VDC 10 A (Resistive load)
  • 24 VDC 5 A (Inductive load (L/R = 7 ms)
Can you provide a general explanation for (cosφ = 0.4) and (L/R = 7 ms)? I did a brief search and look on them and they are used to describe ratings on other relays - I am not too embarrased to say that I don't know what those mean.

For example, from https://www.ia.omron.com/products/family/2036/specification.html

Note: If the L/R of an inductive load exceeds 7 ms with a Model for a DC Load, the arc interruption time must be less than
approximately 50 ms to use the Relay. Design the circuit so that the arc interruption time is 50 ms or less.
 
Cosφ is a symbol used for power factor, the phasing of current to voltage with an AC load.

I've not seen L/R before.
It appears to be the ratio of inductance to resistance, which will in turn define the time for rate of load current to decay, with an inductive load.

That will presumably determine the possible arc duration when the relay contacts open, if the load is not suppressed - hence the time limits given.
 
I did run last night after making the changes I talked about earlier, and successfully ran out the small ball of yarn I had. Total run time about 5 mins. No problems, and that was on the Legoo board that had failed but recovered after I hit the reset. I will run a larger spool today, but we are clearly making progress. Thanks again for all the great help.
DrZ. Hobbyist

Progress. Terrific!
 
Cosφ is a symbol used for power factor, the phasing of current to voltage with an AC load.

I've not seen L/R before.
It appears to be the ratio of inductance to resistance, which will in turn define the time for rate of load current to decay, with an inductive load.

That will presumably determine the possible arc duration when the relay contacts open, if the load is not suppressed - hence the time limits given.

Tks - https://www.ia.omron.com/data_pdf/guide/36/generalrelay_tg_e_10_2.pdf (e.g., p.20) It is a little difficult for me to understand but with some time, I am optimistic that I will get the general idea on how/why I can/should use this specification.
 
I did run again this afternoon, and this time I wound for over 10 mins with no problems. Looks like this problem is behind me! Great Solution everyone!
 
I did run again this afternoon, and this time I wound for over 10 mins with no problems. Looks like this problem is behind me! Great Solution everyone!
Hola MrZenite
Out of curiosity, could you show a picture or two of your device? The mechanical part of it.
Gracias.
 
Status
Not open for further replies.

Latest threads

New Articles From Microcontroller Tips

Back
Top