Continue to Site

Welcome to our site!

Electro Tech is an online community (with over 170,000 members) who enjoy talking about and building electronic circuits, projects and gadgets. To participate you need to register. Registration is free. Click here to register now.

  • Welcome to our site! Electro Tech is an online community (with over 170,000 members) who enjoy talking about and building electronic circuits, projects and gadgets. To participate you need to register. Registration is free. Click here to register now.

Electric Defroster For Small Freezer Query

Status
Not open for further replies.
Mr Al said:
...
Im not sure how much it matters if the compressor turned off naturally before defrost or not. It makes sense, but the defrost happens so fast that it may not be necessary to do that.
...

Sure, the only reason i suggested that it is done directly after the compressor turns off is so the main fridge is at it's coldest and its temp is unlikely to rise when the compressor is forced off for a while.

Like you said if the defrost only takes 5-10 minutes there should be no problem really.

Mr Al said:
... But with such short defrost times i dont think it takes that much energy. If you care to you could time the defrost cycle too and also see if it is sync'd to the compressor run time when it turns off.
...

I'll keep an ear out. ;) It's noticable from the sound, which makes a quiet but very different sound to normal operation. From memory it takes 10 minutes or so but that is a really rough guess.

I have not heard it for a week or two so it is likely happening in the middle of the night now, or at a time whan I'm not near it. Next time I hear it I'll glance at the clock and see how long it takes.

It's a shame we don't have a fridge repairer here on the forum who knows all these stats offhand!
 
Hi again,

Yes, that would be nice. For now i'll just experiment a little. Today i defrosted nicely but i left it on longer than needed. More experimentation needed yet that's all.

If you do collect any data though i'd like to hear about it so i can compare to my data.
 
Hello again,


Yesterday i left it on a little longer than needed and the sides defrosted too. But unfortunately i did not time it exactly so i have to repeat and see how long it takes to do the sides too. Again more experimentation needed. All said and done however, so far it looks very promising and it will save me a lot of work. No longer taking stuff out and putting it in a cooler or waiting until everything is out.

After all, i cant let my beer get too warm :)
 
Hello again,


Inspired by MrRB's nice pics of his regulated clock motor circuit, i decided to post a couple of pics of the defroster in action. The attached picture is two pics in one: the left side is the BEFORE picture and the right side is the AFTER picture (after a 10 minute 25 watt defrost cycle). We can see most of the frost is gone.

As a side note, you can spot a moon orbiting the temporary wood blocks holding the resistor against the bottom of the freezer compartment. Ok kidding, it's a drop of water falling from the bottom of the freezer compartment down into the tray underneath the freezer bottom. Kind of cool though that the camera caught that at just the right time...are you wondering how i got it to catch that droplet? You can see the moon's shadow too :)
 

Attachments

  • Defroster_BA.jpg
    Defroster_BA.jpg
    127.8 KB · Views: 131
This is a typical circuit of a frost free fridge, & a typical mechanical defrost timer. The timers are usualy either 12 or 8 Hr cycle, on time for defrost is about 15min aprox. My frost free fridge uses an electronic thermostat & defrost timer. The mechanical ones seem to be disapearing these days, the one in the pict ive salvaged from an old fridge. There is also a defrost termination thermostat usualy stuck to the evap, this terminates the defrost element if the defrost temp goes to high before the timer has moved on.
 

Attachments

  • DEFROST CIRCUIT.jpg
    DEFROST CIRCUIT.jpg
    151.6 KB · Views: 161
  • DEFROST TIMER.1.JPG
    DEFROST TIMER.1.JPG
    2.6 MB · Views: 125
  • DEFROST TIMER.2.JPG
    DEFROST TIMER.2.JPG
    2.5 MB · Views: 131
Hello there debe,


Thanks for the very useful info. What is the power of the heater element and how big (what size) is the freezer section?
 
Hi Al Heres a picture of a frostfree evap & the heater is in the bottom where the blue wire goes & its 150Watt element. What you are doing with a plate type evaporator just isnt done comercialy with heating elements, they use hot gas defrost. But since what you are doing apears to work, just use a mechanical defrost timer wired up as in previous post & it should work. Like your aproach thinking outside the square.
 

Attachments

  • Fridge.13.JPG
    Fridge.13.JPG
    1.8 MB · Views: 127
Hey MrAl, I don't want to sound rude, but that fridge looks ancient! What is that, 20+ or 30+ years old? I haven't seen those tiny internal iceboxes since 1980's fridges.

Appliances are so cheap now you could get a nice new dual-door fridge with very high year-round energy efficiency for probably $700-$800.

Is it really worth all the modifications to such an ancient fridge?
 
Hi Mr RB, i have a fridge that looks the same build & its an 80Liter bar fridge & its only about 2 yrs old. They are still avalable & cost very little to run. Popular with Motels & single people in flats.
 
Hi MrRB and debe,

debe:
Well i didnt have any choice in how to defrost it without changing things drastically. I used to have to take all the food and stuff out before using a fan or something, and that took hours to do. Now it takes between 10 and 30 minutes without having to remove any food or drink. I may go automatic in the future once i have tested it over several months.

MrRB:
Yeah it's a bit old, but i know they are still selling them like debe mentioned. They also make ones with auto defrost too now but i thought this would be interesting to do as well as useful. I dont know how they do the auto defrost on those little ones though. But im stuck with resistive heating and after all it works pretty well so im satisfied somewhat :)

I highly recommend this for others too like college people who have these little fridges in their dorm rooms. Sure beats having to take everything out first!
 
Not some thing i see very often, but some use a push button defrost thermostat which automaticly terminates the defrost cycle. The circuit using a heater is relavent to what you want to do. There is 2 temp sense capiliarys, one is fitted where your orig thermastat sensor is. The other is is clamped to the evaporator away from the heater element, so it senses the rise in temp when defrosted to automaticly switch back to refrigeration cycles.
 

Attachments

  • SEMI AUTO DEFROST.jpg
    SEMI AUTO DEFROST.jpg
    962.8 KB · Views: 134
Hi,

That's interesting because i was thinking of doing something like that too, with a simple button to initialize the defrost cycle. I was going to prefer this because i dont want the heater (resistor) coming on when i dont know about it. And also, in the winter it needs less defrost time because the frost doesnt build up as fast.

Thanks for posting those pics as they are self explanatory and interesting to see.
 
...
Yeah it's a bit old, but i know they are still selling them like debe mentioned.
...
I highly recommend this for others too like college people who have these little fridges in their dorm rooms.
...

Ahhh, my apologies MrAl, I did not realise it was a LITTLE fridge, that makes all the difference and they still use the old style metal icebox in the top. I was thinking it was a full size house fridge where that tiny icebox style would have been very old!

For the timer, why not use a $1 (8pin) PIC?

You could time a rough 24 hours, then wait for a cooling cycle to complete (compressor has just turned off) then run a 10 minute defrost cycle.

It only needs a few lines of C code, and two connections;
digital input; senses compressor running
digital output; operates relay, runs defrost

If you want to get fancy you can run a temperature sensor, about 2mm from the icebox wall. When covered in ice it will read <0'C, once the ice has melted it will not touch the wall at all and its temp will rise. That lets the PIC run a controlled cycle, just long enough.
 
Last edited:
Hi MrRB,

That all sounds good yes, some good ideas, and for sure i'll use a small PIC as that seems the most reasonable and wont have to purchase a mechanical timer. I'd like to incorporate a secondary device too for a back up measurement to make sure it doesnt turn on for too long :)

Yes it is a little compact for my bedroom. I did have a large fridge long time ago however that had the same style freezer but much larger. That was a big giant ugly monster of a fridge :) That's long gone now however, but who could forget that thing ha ha.

Im not quite as far along as i thought though. Day before yesterday there was more frost than usual so it took a little longer to defrost. But i cant leave it on all day obviously so im still experimenting a little. Also, today one of the leads broke off the resistor for no apparent reason. I had everything tie wrapped so it makes little sense. I can only guess that maybe some electrolysis was taking place but not sure. I also made the mistake of using some cheap $1 store wire which is not really copper ! So the solder joints were nasty so it made inspection for electrolysis very hard to notice. That's solved though as i have now replaced it with some quality wire. I should have known that could happen. I also plan to use AC to power it eventually (now using DC which i didnt want to do).

I also noticed that the same day there was more frost than usual a piece broke off the side on the inside of the box so i didnt see it until today. That means that a section of frost was laying inside the box and got refrozen and i didnt know it because the door was closed. So that means i might have to remove some of the frost/ice once it melts, which means it may have to be done manually anyway. But im still not sure about how i might handle this so i'll have to experiment a little more yet.

But one thing is clear, it does make it easier even if i have to do it manually by flipping a switch or something if cycling more frequency doesnt work right either.
 
Several things can cause exess ice build up, exess opening of the door, high humidity, poor main door seal. The main door seal should make good contact all the way around, especialy the bottom of the door. Easy test is open door & see if it will grip the sheet of paper when shut, all the way around. Door seal is important.
 
Hi again debe,


Sounds good i'll check that. I can start to see why the commercial ones come on three times a day.
 
Hello again,

Here's a small update.

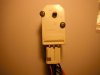
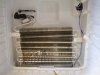
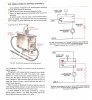
First to recap, i was using a 3 Ohms, 50 watt power resistor (aluminum case) under the freezer cage to defrost the freezer, running the resistor at only 27 watts (9 volts). It works exceptionally well, but i realized that one side does not get defrosted as well as the other side (the compartment has a metal bottom and two metal sides and everything else is plastic). Looking into this, i realized that the side that did not defrost as well has a big gap in the bottom section where apparently the air is allowed to circulate so that the refrigerator compartment gets cold but not as cold as inside the freezer compartment itself. So they designed it with a big gaping slot on one side where that side meets the bottom metal part. The problem was, the resistor on the bottom of the cage provides enough heat to defrost the bottom and the one side but it does that one side pretty good because there is plenty of heat conduction from bottom (the resistor heats the bottom) to that one side. The other side has almost no conduction thus it doesnt defrost well on that other side.

The solution which may be the only solution was to mount a second resistor on that one troublesome side. A second resistor mounted about 1 inch up from the bottom of the side seems to do the trick. I had quite a bit of frost buildup this evening and the two resistors working together freed all of the ice. There was more than usual because it built up on that one side so after about 10 minutes the ice came loose and was easily removable. This wont normally be the case, but at least now with the two resistors that one side will not be able to build up over a few days now so it should work much better. I suspected it was going to take at least two resistors but was trying one first just to see how it went.

So the bottom line is if the sides of your freezer are connected with metal and no gaps then one resistor on the bottom in the center will probably work ok, but if there are gaps in the metal between the bottom and sides then the sides need a separate resistor. Mine had one side connected completely (like one piece of metal) while the other side had a big gap, so i needed two resistors.

One more little note:
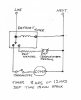
I was worried about electrolysis eating up the freezer metal if there was any leakage current getting from the resistors to the metal, so i decided to use AC rather than DC. DC will carry the atoms away from the metal and eat up some of the metal. But i also realized that AC will remove some of the atoms and then try to put some back, which will also appear like some sort of rust process in the metal, so it may not matter if we use DC or AC because the resistors have to be mounted so that the bare leads dont touch the freezer metal and also with some silicone to insulate the terminals.

If anyone reading this tries this with their refrigerator or freezer i'd like to hear about it too.
 
Metal case power resistors are insulated between the element and the case, so no problems there.

As for the power leads, you should be ok with some silicone over any exposed metal wiring.
 
Hi MrRB,


Yes i was just worried about any small leakage current that might exist because the area gets wet when the ice/frost melts.

I agree that silicone should help here and i have a tube of the 600 degree rated stuff on hand :)
 
Status
Not open for further replies.

Latest threads

New Articles From Microcontroller Tips

Back
Top