Continue to Site

Welcome to our site!

Electro Tech is an online community (with over 170,000 members) who enjoy talking about and building electronic circuits, projects and gadgets. To participate you need to register. Registration is free. Click here to register now.

  • Welcome to our site! Electro Tech is an online community (with over 170,000 members) who enjoy talking about and building electronic circuits, projects and gadgets. To participate you need to register. Registration is free. Click here to register now.

Electric Defroster For Small Freezer Query

Status
Not open for further replies.

MrAl

Well-Known Member
Most Helpful Member
Hello there,


We were talking about something similar to this in another thread but this will be higher power and involve some mechanical ideas too.

I have a small refrigerator that does not have an automatic defroster, so i'd like to add a heater element to help defrost faster than doing it manually by opening the door and waiting or similar ideas.

The first idea is to connect a large number of resistors in series and parallel to form a large surface about 7 inches wide and 10 inches long. I want it to be thin so i was thinking of using 1/4 watt resistors, but then realize that 1/2 watt resistors would be more mechanically durable over time.

Ok, so a flat sheet of around 500 resistors. Side by side they would fit together about 7 per inch, so along the width that means 49, and using a spacing of 1 inch along the 10 inch surface that means 10 rows along the 10 inch length.

If the resistors are 330 ohms each, each row would have resistance 6.7 ohms, and that would draw about 1.8 amps from a 12 volt AC supply voltage (transformer with isolated secondary). 10 rows in parallel would mean 10 times the current, or 18 amps from the transformer. The transformer can handle 30 amps so 18 amps should not be a problem.

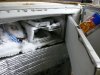
Now the thought was to mount the resistor sheet on the bottom of the freezer compartment which is all metal. I was thinking of using high temperature silicone. This means having the fridge off for at least 24 hours so i'll put my stuff in another fridge for the time needed.

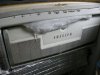
The freezer compartment looks like a rectangular box made of steel except for the top which is plastic, so that means two sides are steel too. The front and back are also plastic. I am also wondering if mounting something on the sides would be beneficial too.

Ok, so now you have an idea what this is all about, so now the queries :)

1. Any other ideas for doing this that may be totally unrelated?
2. Any thoughts on mounting the resistors other than using something that takes 24 hours to dry?
3. Any thoughts about any other material used to hold the resistor sheet to the bottom, glue, epoxy, etc.?
4. Any thoughts about how the water(humidity)/ice/frost might affect the resistor sheet over time even if it is sealed from liquids, such as water getting between the sheet glue and force it to part from the steel bottom when it freezes?


As far as the defrost timing circuit im not worried about that, as i will probably do this with a simple switch to turn off the fridge and turn on the defroster once in a while, maybe even once a day at least for now. I'll get into auto control later.

What else i dont want to do:
I dont want to have to remove all the food or put containers of hot water into the fridge. This is supposed to be as close to an auto defrost as you can get without a timer. So it will most likely always have to involve a heating element like that described here, although i am open to just about any ideas that you might care to mention.


Thanks much :)
 
Last edited:
Mr All:

How about IR heating? Something like this: https://www.quartzinfrared.com/Merchant2/merchant.mvc?Screen=CTGY&Category_Code=PROC3OL

Put a reflector (Stainless) on the side you don't need. We used similar ones in vacuum. Support was very easy. We just hung them in holes and the quartz was fine in direct contact with stainless steel.

If you can, post a pic of what we have to work with.

I've also been wanting to add defrost to a refrigerator. I have the heating elements from a regular fridge. To do it right, you need to be able to sense the temperature of the coil at a "good place". You can do it time or temperature terminated. Even if you do it manually, I think it would be worthwhile to be able to measure the temperature.
 
debe:

Actually a "Hair Dryer" deforms the plastic on an interior freezer door, so it's not recommeded. I can post a pic if you like. The fix might be a heat gun which I do not have yet.

We have changed to using a fan, sitting on a stool or chair, and it works very well.
 
Hello again,

KeepIt:
Yes that's a good idea too if i can find something small enough to fit, which i wouldnt want to take up too much room.
I've also used a fan along without heating but i still had to remove all the food first.
What was your idea with the heat gun? Aim it at the freezer? Would that hurt the paint on the metal or the metal? That also blows hot air so it would have to be done very fast, like less than one minute.
But then again im looking for something that can be made automatic later without human intervention.

debe:
I would use a hair dryer from a distance, but for this particular project i can not use anything with forced air. That's because i intended to keep the food in the fridge just like the auto defrost models where you dont have to remove food first. The hot air gets into the food compartment and heats up the food too and even though it should only be like 10 minutes it's still too much. So anything that blows air is out. That seems to leave only conduction. A heating element provides conduction from the element to the metal through direct or slightly indirect contact with the metal, so there is only localized heating. I think that's important if you dont want to have to remove food.

But i think i might have mentioned that it would not be too much trouble if i took only the food in the freezer out. This would be worst case though as even this would be a pain if i had to do it every other day for example, which is the time period probably needed to keep the frost down without requiring too much defrost time.

So the idea is to heat up the frrrrreezer box a little while keeping the other food as cold as possible, and without having to remove any food first.
 
Fridge

Attached are two pics. From the first, you can tell the inner door is leaking and from the second, you can see it needs defrosting. BTW, this is probably a 57 YO fridge with the locking handles.
The freezer compartment is a metal box with aluminum tubes around it. The gasket was replaced and I don't think the problem is the gasket. It's the door.

The first pic clearly shows a leak. The second clearly shows the damaged inner door from closing the door with an antique hair dryer inside. Those handheld things that sat on a pedestal. Something close to this: **broken link removed**

The idea would be to use a heat gun to fix the door.

I don't think this stuff is Vinyl, but when I went to a local window factory I got a demonstration on how the shoes (sliding brakes) are fixed on Vinyl windows. 1) You use a heat gun and spread. Remove shoe and replace. Then heat it again. The window "remembers" it's old shape. I got a piece to practice on. or 2) Cut a section carefully on the bottom or top of the window which is normally covered and remove the shoe.

@MrAl
KISS is preferred over KeepIt.
 

Attachments

  • P1010811_Fridge_Ice (640 x 480).jpg
    P1010811_Fridge_Ice (640 x 480).jpg
    86.7 KB · Views: 256
  • P1010812_Fridge_Door (640 x 480).jpg
    P1010812_Fridge_Door (640 x 480).jpg
    86.1 KB · Views: 234
Hot Gas defrost is very efective. Ive converted several fridges to this system. just fit a hot gas defrost solenoid to the discharge line from the compressor & run pipe up to the evaporator. To defrost swich on the solenoid & after 10-15mins the evap will be defrosted & turn off solenoid.
 

Attachments

  • HOT GAS DEFROST.jpg
    HOT GAS DEFROST.jpg
    823.6 KB · Views: 201
Hi debe,

That's a great idea, and you gave me another idea from that.

Just reverse the function of the two sides of the refrigeration system. That would cause the inside to heat up and the outside grill to get cold, and thus defrost. It would require valves that could switch the tubing around.

But alas, i do not want to have to modify the system in that way where we have to disconnect one of the freon tubes or associated. I need something that works totally apart from that. That's not only because i dont have the tools to work with the system properly, it's because this 'heater' may be moved to another unit some time in the future.
 
A pet heating pad? You can buy in different sizes and it would stick to the roof or a wall of the freezer with some silicone, removable later if needed.

I've made heaters from chains of resistors etc, it's messy and not good in a moist environment. The pet heating pads are mornally simple using a resistive wire and reasonably sealed against moisture ingress.
 
Hello Roman,

What are the pads made out of, is it fabric or plastic?

Messy, how? I was intending to seal it up in silicone.
 
This may be another option if its still avalable. Its a insulated resistance wire used in refrigerators as a heater for defrosting parts.
 

Attachments

  • FRIDGE HEATER WIRE.JPG
    FRIDGE HEATER WIRE.JPG
    3.1 MB · Views: 267
  • FRIDGE THERMOSTAT HTR.JPG
    FRIDGE THERMOSTAT HTR.JPG
    3.1 MB · Views: 267
...
What are the pads made out of, is it fabric or plastic?

Messy, how? I was intending to seal it up in silicone.

They are normally resistance wire (probably like the insulated resistance wire posted by Debe) in a flat pad made of flexible hard rubber/plastic material so it can be wash-n-wiped.

Making a large area heater from resistors is "messy" as you have to mount heaps of resistors, then run heaps of wires in between them, then try to goop it all up with silicone etc to seal it into one safe reliable thing. A ready made heat pad is so much easier, or even just the resistance wire Debe mentioned.
 
Hi again,


Yes i agree, and this is a small update on the progress.

I decided to go low key to start just to see how much power it actually takes. I could have turned to the heat equations, but decided to go with some quick trial and error just to see what would happen and determine how much power it would really take. One thing hard about using the equations here is it is a little difficult to estimate exactly what kind of ice will appear on the sides and bottom. It's not really ice or it would be easier. It's frost. And that's like snow, but maybe harder packed.

So i purchased a couple power resistors which i could use for other tests anyway, and found that i could easily get the temperature of one of them up to 200 degrees C and wow that's hot. But i still wasnt sure how much power it would actually take to defrost in a reasonable time. So i got a 50 watt aluminum power resistor and powered it at half power and the temperature rose up pretty high too, so i stuck it under the freezer compartment (after it cooled) and wedged in some wood pieces under the bottom to hold it securely against the bottom metal, which BTW is aluminum i think (non magnetic).

Turning the power up to about 25 watts, the BOTTOM of the freezer defrosted in about 10 minutes maybe a little less. One side defrosted but im not sure if that had any frost on it to begin with anyway. But one side did not defrost because there just wasnt enough conduction through the thin metal chassis.

So the bottom line then is that 25 watts per side should do it no problem. But for sure there will have to be a separate power resistor mounted to the sides, so that's a total of three power resistors required.

Also, a side issue came up im not sure if it is a big problem yet or not. What else is required is a thin insulator has to be mounted between the inside bottom of the cage and the food (if the food is not to be removed that is). The problem is that water develops between the insulator and the inside bottom and there's no way to remove it without wiping it down with a rag. Im not sure if this hurts yet though, as i did not wipe it down but just turned the fridge back on. So this is something that has to be looked at in the future. If it turns out that it doesnt matter that much if it just freezes back up, then no problem. It's only a thin amount of water left anyway so it might be ok. There was only a tiny amount of water total anyway because the frost was not thick. It's going to be done that way anyway, when the frost is still thin, just like a commercial freezer defrost system.

Eventually i will go automatic with backup check systems to double check what is going on temperature wise. But for now at least i know it works, and it doesnt take that much power. The bigger freezers will take more power of course.

I also have to adjust the defrost time to make sure the food does not get bothered. And as it turns out, this wont have to be done every day just every few days.

Comments welcome :)
 
Was the melt time "10 minutes" with the freezer door closed and the freezer running normally at full-cold temp?

Where does the water go when the ice melts? If there is no auto defrost feature there is unlikely to be a drain system, so if you manually defrost then pints of water will run out the bottom of the freezer? :eek:
 
Hello MrRB,

Some good points you brought up.

First, the fridge power is turned off during defrost. This is typical for a commercial defrost timer so i did it that way too. The freezer metal must be allowed to heat up without affecting the food too much. The insulator helps with that. The heat doesnt affect the other parts of the fridge because it's not there long enough. After defrost, the fridge power is restored.

The fridge comes with a bottom 'tray'. The tray is positioned right under the freezer metal compartment, about 2 inches below it. During normal manual defrost, the tray catches the water. As long as there is not a HUGE amount of ice then the water is not enough to even partly fill the tray. In fact, with only a little frost there is hardly enough water to completely cover the bottom of the tray. And a little while after the fridge power is restored the water in the tray turns to ice in the tray and can be removed with ease.

The catch is that the defrost cycle has to happen often enough such that there is not a huge amount of ice on the freezer. That limits the amount of water. I have let it go a few times in the past where there was so much ice that i had to place a small bucket under the tray to catch the water overflow after it filled the tray :)
So it has to be defrosted more often than that, and i am thinking even much more often than that so that it does not take too long to melt the frost. If it takes too long obviously the fridge would have to be off too long and also the heat could start to affect the food too much.
 
Cool, thanks for the info. :)

That sounds ok, assuming you can turn off just the freezer compessor.

Or, if the entire fridge runs from one compressor you could sense when the compressor has just run and turned off (so you can be sure the fridge area is already at temp), then run the defrost cycle.

My fridge runs the freezer defrost every 24 hours, based on rough observation.
 
Hi MrRB,


Yes i wanted to get the information about the 25 watts of heating power using a 50 watt resistor out there so that other people who might want to do this dont have to start from scratch like i did. And the fact that it worked on the bottom but there's still some question about how it will help the two sides. The top and back dont matter for this unit but may for other units.

Yes these little fridge's usually have only one compressor. You can unplug it or turn it off via the temperature control. For automatic timing i would guess use a switched AC socket with a triac or just solid state relay. I havent gotten that far yet and i might keep mine manual anyway as it's not hard to do. Just have to set up a routine time to do it.

Im not sure how much it matters if the compressor turned off naturally before defrost or not. It makes sense, but the defrost happens so fast that it may not be necessary to do that. Still unsure as i havent done this more than once so far :)

Yeah i think most commercial units defrost once or twice every day, these days probably only once to save energy. But with such short defrost times i dont think it takes that much energy. If you care to you could time the defrost cycle too and also see if it is sync'd to the compressor run time when it turns off.

I'll also probably update this thread in the future with more info as i find out over time. I may end up adding a second resistor to the side, and possibly a third resistor to the other side if it doesnt work well enough with one resistor. The sides dont get much conduction because of the thin metal. But three resistors will definitely do it i am quite sure of that now after seeing how well only 25 watts worked on the bottom.

One additional note is that this defrost is being done when there is only a small amount of frost on the bottom and sides. If there was a ton of frost like when you dont defrost it for two or three months in the summer time, it's going to be a whole different story. It may take much longer to defrost unless we get lucky and the resistors (which would now be embedded in ice or frost) heat up the metal enough so the ice lets go of the metal and we can break off the ice easily. But i wouldnt do it that way partly because then we have to get rid of the ice. Once a week maybe might be enough, but i dont think going longer than that is a good idea. Still remains to be seen how long i can go without defrost this way though so time will tell.

BTW thanks for your feedback on this Roman :)
 
Last edited:
Status
Not open for further replies.

Latest threads

New Articles From Microcontroller Tips

Back
Top