Continue to Site

Welcome to our site!

Electro Tech is an online community (with over 170,000 members) who enjoy talking about and building electronic circuits, projects and gadgets. To participate you need to register. Registration is free. Click here to register now.

  • Welcome to our site! Electro Tech is an online community (with over 170,000 members) who enjoy talking about and building electronic circuits, projects and gadgets. To participate you need to register. Registration is free. Click here to register now.

LED circuit for 1/6 scale diorama

JDGafford

New Member
First time posting here.
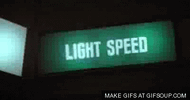
So, I'm wanting to recreate a scene in the movie Spaceballs where Dark Helmet puts his ship into Ludicrous Speed.
There is 3 illuminated signs in the scene.
The first sign illuminates, stays illuminated and then about 2 seconds later the second sign illuminates.
In about 2 seconds the third sign illuminates. But the third sign blinks on and off.

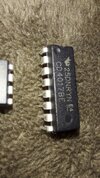
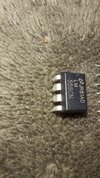
Would it be necessary to use and program a micro controller to achieve this?
Or can it be done with simple components?

I've never used a micro controller in a circuit before. So it will be a learning experience.

There will be a total of six 3mm LED's in the circuit powered by 5v USB.

Any insight would be greatly appreciated.
Thank you.
 

Attachments

  • oXef7 (1).gif
    oXef7 (1).gif
    1.2 MB · Views: 38
If you want to do it quickly and easily, I'd use a decade counter and an LM555 chip to pulse the decade counter.

The decade counter has 10 outputs (Q0 to Q9). When you turn the circuit on, it lights the first pin, then pulses to light the second, then third (all three I'd these are connected to light your first sign) Q1, Q2 and Q3j. Q0 wound be connected to anything as the dark starting point. .

Then the fifth, sixth and seventh pins (Q4 - Q6) light up the second time for about 0.6 seconds each for a total of 2 seconds. There will be no flash as one turns off and the next turns on.

Finally, for the third sign, flashes the second sign in, (Q7) makes the first flash, then Q8 not connected to anything means everything is dark, (Q9) flashes the third sign on again.

Now, you can make it stop there until you switch it off and on again, or you can have it continuously cycling back to the dark before the first sign and repeat.
Let me know what you prefer.

There will be a few more wires with this method but no installing software, writing a program and loading into the microcontroller. Just two chips. One that makes pulses, and one that takes those pulses and energizes ten different pins.
 
Last edited:
That definitely sounds like what I need.
And I would prefer this to continue the cycle over and over again until I power the circuit down.
Not have used components like this before, where would I get info or schematics to complete this wiring between the 555 and the decade counter?
 
That definitely sounds like what I need.
And I would prefer this to continue the cycle over and over again until I power the circuit down.
Not have used components like this before, where would I get info or schematics to complete this wiring between the 555 and the decade counter?
Here

I modified my original description a bit to allow an extended (4-6second) pause at the start of each cycle. Otherwise, it looks like it is just another flash if the "all dark restart" is the same amount of time as the all dark between Ludicrous flashes (0.66 seconds). To do this, Q8 charges a capacitor that the Q0 discharges. At the beginning of the discharge, the 4017 is paused in reset until it discharges enough.

I haven't breadboarded it yet but let me know if it works (or not).

IMG_5993.png
 
Use Arduino Nano board, ~$3, and write program (as shown) in mBlock. mBlock
takes your block configuration and generates Arduino code from that. Quick and
dirty solution, timing accurate as board has xtal on it.

1746810027793.png


Load of fun programming in block language. Many variants, like Tuniot, NodeRed, Scratch, Snap4Arduino
make it easy, 2 minutes, to bring up a simple server for example.

An example of a talking volt/freq/pulse width meter -

https://www.edaboard.com/threads/gui-codeless-processor-design.397358/#post-1708529

Sophisticated timer - https://www.electro-tech-online.com/articles/pulse-sequence-generator-smart-timer.938/

Post # 5 https://www.electro-tech-online.com/threads/help-please.162836/#post-1416676

The board cant drive high power LEDs directly, so use a NPN interface to pin like -

1746810769398.png


Use ~ 1K in base, Rc will set current thru LED, and add a 10K R from base to ground to insure
LED stays off when design first powers up and sets output pins floating.

Note I did not show debounce of trigger pin (lazy), easy to add simple blocks to do that.
 
Last edited:
If you want to do it quickly and easily, I'd use a decade counter and an LM555 chip to pulse the decade counter.

The decade counter has 10 outputs (Q0 to Q9). When you turn the circuit on, it lights the first pin, then pulses to light the second, then third (all three I'd these are connected to light your first sign) Q1, Q2 and Q3j. Q0 wound be connected to anything as the dark starting point. .

Then the fifth, sixth and seventh pins (Q4 - Q6) light up the second time for about 0.6 seconds each for a total of 2 seconds. There will be no flash as one turns off and the next turns on.

Finally, for the third sign, flashes the second sign in, (Q7) makes the first flash, then Q8 not connected to anything means everything is dark, (Q9) flashes the third sign on again.

Now, you can make it stop there until you switch it off and on again, or you can have it continuously cycling back to the dark before the first sign and repeat.
Let me know what you prefer.

There will be a few more wires with this method but no installing software, writing a program and loading into the microcontroller. Just two chips. One that makes pulses, and one that takes those pulses and energizes ten different pins.
While a microcontroller provides the lowest parts count for this idea, the 555 with a 4017, 4072 and LED driver circuits is a design starting point.
 
While a microcontroller provides the lowest parts count for this idea, the 555 with a 4017, 4072 and LED driver circuits is a design starting point.
Yes, that's what I said.
 
curious why not just use small LCD's to display the signs?
must be interpreting this wrong?
 
curious why not just use small LCD's to display the signs?
must be interpreting this wrong?
The Diorama has already been made. Modification of LCD signs would require redoing the Diorama which would be costly.
Adding LEDs to the transparent signs already made is less invasive and cheaper.
 
Here

I modified my original description a bit to allow an extended (4-6second) pause at the start of each cycle. Otherwise, it looks like it is just another flash if the "all dark restart" is the same amount of time as the all dark between Ludicrous flashes (0.66 seconds). To do this, Q8 charges a capacitor that the Q0 discharges. At the beginning of the discharge, the 4017 is paused in reset until it discharges enough.

I haven't breadboarded it yet but let me know if it works (or not).

View attachment 149770
I bought all the components for this circuit and tried wiring it tonight.
I could not get it to work.
Is there a simpler way to test this circuit to turn on just one light to test the circuit?
I wired the timer and got voltage out of the 555 timer. But once I added the output to the 4017, it wouldn't power anything out of the Q outputs.
So I'm not exactly sure what I'm doing wrong.
Included is the components I purchased.
Are they correct?
 

Attachments

  • 20250513_202937.jpg
    20250513_202937.jpg
    946.1 KB · Views: 24
  • 20250513_202934.jpg
    20250513_202934.jpg
    1 MB · Views: 24
I bought all the components for this circuit and tried wiring it tonight.
I could not get it to work.
Is there a simpler way to test this circuit to turn on just one light to test the circuit?
I wired the timer and got voltage out of the 555 timer. But once I added the output to the 4017, it wouldn't power anything out of the Q outputs.
So I'm not exactly sure what I'm doing wrong.
Included is the components I purchased.
Are they correct?
Sorry, pin 13 (CP1) should be connected to your + power supply (pin 16).
 
What is the part number for the LEDs being used. If you don't have that, do you know the recommended operating current? What we really need to know is the forward voltage Vf.

As the display steps through the three signs, does each sign stay on when the next one illuminates, or does sign #1 go out when sign #2 comes on?

Once #3 comes on and starts flashing, does it -

a) keep flashing indefinitely

b) flash a few times, then all signs go out

c) flash for a few seconds, then the cycle repeats with sign #1

4) other

Also, does the system start when power is applied, or is there to be a Start switch?

ak
 
An alternate theory of the crime:

1 - CD4060 oscillator / divider
1 - ULN2803 transistor array

ak
 
Last edited:
When running on 5 V, the 4017 is rated to source only 1 mA for a full output, and 3 mA for an output voltage reduced to 3 V.

ak
Yeah, I should have mentioned that the resistors for the LEDs should be 2.2k ohms and high-efficiency (High Brightness) LEDs should be used to light the signs.
 
What is the part number for the LEDs being used. If you don't have that, do you know the recommended operating current? What we really need to know is the forward voltage Vf.

As the display steps through the three signs, does each sign stay on when the next one illuminates, or does sign #1 go out when sign #2 comes on?

Once #3 comes on and starts flashing, does it -

a) keep flashing indefinitely

b) flash a few times, then all signs go out

c) flash for a few seconds, then the cycle repeats with sign #1

4) other

Also, does the system start when power is applied, or is there to be a Start switch?

ak
Led's are 3v
As each sign comes on, it stays on as the next illuminates. So #1 sign and #2 sign are still as #3 sign is blinking on and off.
I would prefer the #3 sign turn on and off a minimum of 6 times before the whole circuit resets and starts over.
The start switch will be controlled by either an on/off switch or remote control.
 
Sorry, pin 13 (CP1) should be connected to your + power supply (pin 16).
When I connect 13 to 16, it shuts down the circuit.
Using your original diagram you gave me, and putting pin 13 to ground, here is what I get....

LED #1 comes on....stays on for 1.4 seconds and turns off.
LED #2 comes on .7 seconds after LED #1 turns off and stays on for 1.4 seconds.
LED #3 comes on immediately after LED #2 turns off, flashes twice and turns off.
Then the circuit resets.

So, is it possible to have #1 and #2 to turn on and stay on throughout the duration of the circuit?

And, is there a way to have LED #3 to turn on 1.4 seconds after LED #2 comes on and blink 6+ times before turning off and resetting the circuit?

Also, I can't use 3 inputs on the first and second bank of LED's.
If I use 2, it will illuminate, but it's dim.
If I use 3, it wont illuminate at all.
Im using only 1, 3 volt white light LED with no resistor.
using 2 LED's dims them both unless i bump up the input voltage to 6 volts.

Thank you again for all your help.
 
Last edited:
Since the part that the OP has is the CD4017, the specs for the CD74HC4017 are irrelevant.
If the drive levels are not adequate, and he has to mod the circuit, why not unsolder the vanilla part
and put in the solution ?
 

Latest threads

New Articles From Microcontroller Tips

Back
Top