Hello everyone,
I finished the UNI course for which I was asking questions in this thread. Therefore, I'd like to post the final product so that everyone can take a look, and perhaps someone may find it helpful.
Product Description:
Electronic Musical Wind Instrument
Your design team has been asked to develop an original Electronic Musical Wind Instrument. The idea of the Electronic Musical Wind Instrument (EMWI) is that it is played by the user in a similar fashion to woodwind instruments such as the clarinet or saxophone, but produces the sounds electronically.
The EMWI has 8 keys (7 at the front and one on the rear) and a blow piece. The 7 keys on the front of the instrument are played with the fingers. They control which single note in the octave is played. All keys down should play a C, the lowest note on the EMWI. Releasing the keys one by one, starting at the key furthest from the blow piece, should play a major scale. Given that the first note was C, this will be the sequence of natural notes (C, D, E, F, G, A, B, C') ending in C an octave above when no keys are pressed. You are to develop a logical fingering pattern for also playing sharp and flat notes, by pressing different combinations of keys. This means that you must design fingerings to play all of the semitones between C and C' (C, C#, D, D#, E, F, F#, G, G#, A, A#, B, C').
The key at the rear is the octave key and is to be played with the thumb. Pressing this key will cause the notes to be played one octave higher, giving the EMWI a range of two octaves. The user blows into the blow piece to adjust the volume at which the currently fingered note is played. You will need to make a sensor that detects the amount of breath being blown into the device. If there is no breath into the blow piece the EMWI should make no sound. A gentle breath should create a soft sound, while a forceful breath should create a loud sound.
None of the above specification precludes the addition of extra keys, or alternate fingering modes, to achieve additional functionality. However, the unit must be playable according to the specification above as a minimum standard.
The unit must use standard alkaline batteries (such as Energizers or Duracells) - no Lithium cells are to be used. The batteries should last for 6 hours of continuous usage. The unit must weight less than 0.5 kg. It should be comfortable for the user to play. The product should be completely self contained.
Management has stressed that your priorities in designing your system should be:
1. The system must be delivered in a testable form by the due date. There will be a penalty of 1 mark deducted from the demonstration assessment for each hour (or part thereof) that the project is handed in late. There will be bonus of 1 mark for every full working day early that the project is handed in, up to a maximum of 5 marks.
2. The system must come in under budget ($100). There will be a penalty of 1 mark deducted from the demonstration assessment for each $1 (or part thereof) over budget. There will be a bonus of 1 mark added to the demonstration assessment for every full $10 under budget.
The other capabilities are flexible. For instance, you may choose to have a shorter battery life to meet the budget requirements, or you might not be able to optimise the dimensions of your design to meet the deadline. These compromises are preferable to either not having a working product by the deadline, or going over budget. Naturally, if you find a way to exceed the standards set above, you will be rewarded. To receive a grade of 6 or better, you need to meet all criteria and have full functionality. To get a grade of 7, you must exceed the criteria in some significant way. See the demonstration day assessment criteria. Apart from the explicit bonuses and penalties described above, the criteria to be used (in order of importance):
1. Full Functionality
* Produces natural notes.
* Produces sharps and flats.
* Plays across two octaves.
* Can sense breath into device.
* Controls volume based on breath input.
2. Design Parameters
* Battery consumption.
* Mass.
3. User Interface
* Ease and comfort of use.
4. Neatness and Sturdiness
* Reliability of hardware
* External appearance.
* Internal construction.
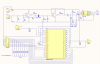
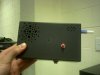
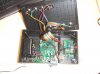
Project schematics and a couple of photos of the finished product are below.
HTH,
-NSKL