Continue to Site

Welcome to our site!

Electro Tech is an online community (with over 170,000 members) who enjoy talking about and building electronic circuits, projects and gadgets. To participate you need to register. Registration is free. Click here to register now.

  • Welcome to our site! Electro Tech is an online community (with over 170,000 members) who enjoy talking about and building electronic circuits, projects and gadgets. To participate you need to register. Registration is free. Click here to register now.

A/D Conversion accuracy

Status
Not open for further replies.
Is this an effort to avoid multiplexing and consuming I/O lines? The ADC has more accuracy than you need. Any variance is caused by the resistors and temperature. Yes, I would make a range for each button.

As for 9v to 5v operating voltage, as long as the ADC module uses a fixed reference voltage and the keypad buttons are connected to this same fixed reference voltage, you will get consistance results. But if you use a variable voltage as the source to the keypad resistors, then its a waste of time.

I suggest a 5v or less regulator to power the circuit and a 3v zener as an external reference voltage. So do all the keypads feed into a single ADC input? Will you be perform dual button decoding?

3v / 12buttons = 0.25v per step. Plenty of room for 10-bits or 8-bit ADC.
 
Last edited:
Is this an effort to avoid multiplexing and consuming I/O lines?

The keypad is not mine -- it is a commercially made product (which can be seen here), I am simply trying to read it. It is a 4 wire setup, one ground, one power out, one control line for LED/peizo and 1 analog output line for key reads. The setup is such that allows the keypad to pass through a safe door with minimal wires -- so the answer to your question is not really to save on I/O pins, just to cut down on the wires that are needed to operate the keypad in general, due to it's application. Saving I/O pins is a real plus though! :)

As for 9v to 5v operating voltage, as long as the ADC module uses a fixed reference voltage and the keypad buttons are connected to this same fixed reference voltage, you will get consistance results.

I have set the ADC module to use the Vdd/Vss as the reference, so I'm assuming it would be consistent 0-5VDC, no?

I suggest a 5v or less regulator to power the circuit and a 3v zener as an external reference voltage.

I could drop a 3v zener on the Vref+ line though -- not a big deal to do if it will be a better setup. (I'm already using a 7805 to power the circuit -- for my 5VDC.)

So do all the keypads feed into a single ADC input? Will you be perform dual button decoding?

Yes, all buttons feed to a single ADC input (RA0/AN0). And, no, I hadn't thought about dual button decoding... but I can think of some uses! :)
 
I have just finished up a test routine that scans the ADC results and issues results corresponding to my keypresses, and am able to set a "code" to compare a 4 digit entry to and respond to correct and incorrect entries -- so, the ADC routines are working as expected.

What I have noticed though is that they seem to be slightly erratic. The good part of that is that they are consistently erratic. :) What I have found is the Low Byte alternates between the odd and even keys, from CO (odd) to 80 (even)... the High Byte changes completely from button to button. So, by consistently erratic, I mean the CO is either CO or it's 00. 80 is either 80 or 40, consistently. The bad part is, the High Byte changes with the Low Byte -- ie. from 1A to 1B -- the good news, it's also consistent. So, it shouldn't be too difficult to trap the knowns.
 
Key pad is battery powered with 2 9V batteries. Any idea why 2? Did you try with only one?
Where is your PIC powered from? Same battery?

I suggest you do the follwing tests first to know how your keypad is working:
1) With power supply (not battery) set @9V press all keys one by one and measure the output with a voltmeter. That way you will know the voltage of each specific key. If the maximum readout is 5V you can't use a 3V zener as a voltage reference for the PIC ADC like donniedj suggested :( :)

2) Repeat those measurements for some voltages below 9V (8, 6, 5, 3) and see what happen with the voltage/key. As long as they are equal to the first measurement you're ok. If you see variations from a 6V power you need to monitor that voltage in your PIC and:
a) give a "Change battery signal" or
b) make the compare values dependent of the keypad battery power voltage.

3) Put all this data in Excell for "battery voltage dependent values" calculations.

This is my learn, simulate, evaluate, coding approach :D
Coding starts only when you know how it works and you know what you want :p
 
Last edited:
mcs51mc said:
Key pad is battery powered with 2 9V batteries. Any idea why 2? Did you try with only one?
Where is your PIC powered from? Same battery?

It has 2 batteries, wired in parallel, simply to extend the "operating cycles" of the lock the keypad is designed for. It will work with one, equally as well.

Yes, the PIC is powered from the same battery.

mcs51mc said:
I suggest you do the follwing tests first to know how your keypad is working:
1) With power supply (not battery) set @9V press all keys one by one and measure the output with a voltmeter. That way you will know the voltage of each specific key. If the maximum readout is 5V you can't use a 3V zener as a voltage reference for the PIC ADC like donniedj suggested :( :)

This I have done and have all data recorded. The data I have recorded is the same with a 9VDC power supply, or a 9VDC battery.

The maximum readout will only be what I put into it. The ADC line (RA0/AN0) has a pull up resistor attached to the 5VDC power rail, which provides the power -- the ADC line of the keypad then drops this power by a specified amount due to the resistor attached to the specific key pressed. So, if I drop a 3v zener diode on the ADC line to the pic, voltages read back will be between 0-3VDC. What I do not quite understand is if it is better to have a lower "range" -- ie. 0-3VDC over 0-5VDC, as I have it setup now.


mcs51mc said:
2) Repeat those measurements for some voltages below 9V (8, 6, 5, 3) and see what happen with the voltage/key. As long as they are equal to the first measurement you're ok. If you see variations from a 6V power you need to monitor that voltage in your PIC and:
a) give a "Change battery signal" or
b) make the compare values dependent of the keypad battery power voltage.

I have not done tests lower than 9VDC as I am using a 7805. I'll have to double check the datasheet, but I thought I recalled it operating from 9 - 15 V, or something along those lines. I don't forsee a problem though -- the reference is based on the voltage AFTER the regulator, so as long as the regulator is properly powered, the reference voltage should never change, unless the voltage goes under 5VDC (then, the PIC stops too... so what's it matter? ;) )

The "Change battery signal" will be implemented at a later date -- after I get everything else working. That shouldn't be too difficult.

mcs51mc said:
This is my learn, simulate, evaluate, coding approach :D
Coding starts only when you know how it works and you know what you want :p

A very good approach to follow. I have done most of what you have stated above, and do know exactly what I want -- I'm just not sure how to get there from here... but I'm finding my way, even without a map! ;)

It's really just a matter of testing, and more testing, and more testing.... it'll reveal it's secrets in time. I have it working now -- it only gets better from here! I'll update y'all when I have it working reliably. :)
 
Kyle-s4h said:
It has 2 batteries, wired in parallel, simply to extend the "operating cycles" of the lock the keypad is designed for. It will work with one, equally as well.

Yes, the PIC is powered from the same battery.

You should carefully consider the power supply option to the finished setup. It is not a good idea to have a 7805 wired permanently to a 9V dry battery as its 3~5mA quiescent current will drain the battery in a short period of time. If you are using a Walmart transformer to provide the DC, then its OK.


Kyle-s4h said:
What I do not quite understand is if it is better to have a lower "range" -- ie. 0-3VDC over 0-5VDC, as I have it setup now.

Everything being equal the 0 to +5V choice is a better one than the 0~3V one. It provide a bigger step per ADC result step and so the possible effect of noise in conversion leading to mistaken one key for another is reduced. The 7805 regulator regulates its output very well when its input voltage is 8V or higher and is thus suitable as a reference for this application. I think you don't need to use an additional voltage reference.

Best of luck to you. Overall an interesting keypad and an interesting project.
 
Kyle-s4h said:
It is a 4 wire setup, one ground, one power out, one control line for LED/peizo and 1 analog output line for key reads.
Kyle-s4h said:
The maximum readout will only be what I put into it.
Sorry but I don't get this :confused:
Where can you put something in ?
Beside the control line for LED/peizo, these are all OUTPUT lines :eek::eek:

How many V do you have on the power out line? If that's 5V you maybe can use it to power your PIC.

With nothing attached to the analog output line is there a voltage according to a key pressed on it? If yes you don't need to power that line, it's self powered from the battery.
The problems you described earlier (Today 01:37 AM) maybe comes from the fact that you force some voltage on that line because of :(
Kyle-s4h said:
The ADC line (RA0/AN0) has a pull up resistor attached to the 5VDC power rail
:(

After reading the user manual I'm pretty sure there's a PIC(-like) chip inside the keypad :D
 
It was my error in the way I worded it -- sorry. There are two inputs and two outputs.

The ground and power (black and yellow) provide 9VDC to the lock body. (outputs)

The green wire, what I call the ADC line of the keypad, is a resistor network and provides resistance only when NOT hooked to the lock body (even with batteries in the keypad). When the lock is hooked up to it, it has 3.44VDC applied to it (LaGard lock). Mine is using a 22K resistor attached to the 5VDC power rail. Either way, voltage is connected to ground through the keypad, so the ADC line would be a keypad input, requiring the voltage from the 22K resistor (from the lock) to pass through a resistor in the keypad to ground.

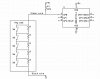
The red wire is an input and controls the LED/piezo.

The keypad does not have a PIC(-like) chip in it, the lock itself contains the :mu:C. If you read the manual a little closer, you will notice that you require a lock body (part number 4100, for example) to make that keypad do anything -- it is simply an analog keypad. I am a distributor for the product, as well as a factory certified tech for the entire product line. I service these locks on a daily basis, which generally entails unit replacement, so I have never really gotten into the schematics of it before -- now it interests me. :)

The batteries are going to be used to power the pic, which will be inside of a safe -- hence the reason to try and keep the wires to a minimum, and not have a Wall-Wart wired to it. There will be times when a Wall-Wart is warranted, but not in this case -- for development, OK -- batteries ain't cheap! ;)

So, eric1388, can you point me in the direction of a good regulator for use with 9VDC batteries (I did a quick search this morning and didn't find what I was looking for -- I look again after dinner, but it doesn't hurt to ask!). Oh, thanks, BTW, for the information -- I didn't know the 7805 would drain the battery -- but then I have to confess... I haven't read the datasheet on it too well. I have simply copied what I have seen in various schematics for the power supply portion of my tinkering.

I was at Sayal Electronics today -- man, these guys don't know their A$$ from a hole in the ground without a part number. I looked at their regulator wall for 20 minutes and couldn't find anything on my own (back to the net for some research). I even looked for a 7803 (if that exists, I'll look at that later too) or something similar, hoping I could find get 3VDC regulated for a stepper motor I want to play with, which is 3VDC. I figured it would be a whole lot better than using a resistor to reduce the voltage, as it probably won't work well under load. Well, that's another post... sorry.

Every part I was looking for "they could order" -- L298 or SN754410 H-Bridge, TIP107, TIP102, TIP112, 1N5817 (the list goes on, but these, I thought, were the common ones) -- I was frustrated today and put what else I had accumulated down and left. When I ask if they have any other H-Bridges, I get the blank stare and "what's the part number?". I think it might be easier to order things myself from DigiKey. :)
 
Thanks to clarify the wiring thing ;)
Now the final question. Why the 22k resistor?
If it's only a resistor network between green wire and ground you can connect power supply directly to it and also to the Vref of the PIC ADC.
That way you will always have the same ADC data in your PIC whatever the power voltage (= ref voltage) to the resistor network will be.
Don't care about diminishing power supply anymore :)

Since you make your own system why not using 4 AA rechargable NiMh batteries? That gives you 4*1.2 = 4.8V / +2500mAh.
Will last way longer than your 9V batteries :p

I don't know PIC :(
But check if it has idle state capability and use it :):)
 
Kyle-s4h said:
So, eric1388, can you point me in the direction of a good regulator for use with 9VDC batteries (I did a quick search this morning and didn't find what I was looking for

I have not used them before. I just put in a search phase in Google "low quiescent current voltage regulator" and I got many hits.

Some regulators have ground quiescent current in the uA range like 15uA or even 5uA. Trust that we should really retire the old faithful 7805 or 78L05 which consumes 3mA or more. Most PICs and AVRs operate well with this total current consumption or even less.

@mcs51mc:
The PIC is ok with 4.8V, but how about the lock mechanism? I don't think the original lock mechanism(motor, plunger or solenoid) operates with regulated supply. The difficulty is the OP can't "get" at the internal of the lock to separate the supply into two paths of 6V and 9V.
 
Last edited:
msc51mc said:
Now the final question. Why the 22k resistor?
If it's only a resistor network between green wire and ground you can connect power supply directly to it and also to the Vref of the PIC ADC.

Well, simply because I am not a hardware guy -- I am learning, but am mostly a software guy! I put the resistor there because I didn't think of it like you explained it above -- I didn't want a direct short between the power rails, but with the resistor network in the keypad, that shouldn't happen (as you have pointed out). Why 22K -- I don't know -- 'cause it was sitting on my desk so I used it -- if a 1K would have been sitting there, I would have used that! :)

mcs51mc said:
Since you make your own system why not using 4 AA rechargable NiMh batteries? That gives you 4*1.2 = 4.8V / +2500mAh.
Will last way longer than your 9V batteries

As eblc1388 has stated above, 4.8VDC just won't cut it for the operation of the solenoid. 9VDC has been in use for some time and has proven to be reliable and, I won't say "long lasting", but they last as long as we need/want them to. Heck, I'm almost sure they are designed that way for the service industry! ;)

Here are some specs that I am seeing with these locks;

Single 9VDC battery -- 1700 cycles to low battery warning, 2560 cycles to failure to retract solenoid.

Double 9VDC batteries -- 4000 cycles to low battery warning, 5520 cycles to failure to retract solenoid.

Now, if that is not enough, you can hook up a secondary battery pack to a second input on the lock body. You can add a small battery box, which adds another 9VDC battery, or a large battery box, which uses 6x1.5VDC C cells.

Using a large battery box by itself will produce;

Large battery pack" 29,000 cycles to low battery warning, 36,000 cycles to failure to retract solenoid.

Of course, these cycle duties will change depending on the features in use, such as time delay which utilizes battery power while in the delay mode -- the more the delay, the more the drain on the battery. Otherwise, it simply sleeps (so, this answers your last question/statement -- the PIC has sleep mode and I do plan on implementing that as well).

As for "building my own", yeah, but I don't want to change the voltage on it for a couple of reasons. I am not designing "locks", perse -- I do not want to reinvent the wheel. What I am doing is trying to design a couple of different boards to meet specific needs within my industry. Accordingly, I will use what is available to me to avoid having to make what is already available. Meaning -- why design a keypad if I have one available to me already? Besides, when I get this pad working, I have a half a dozen others that can be utilized from the same company (even a couple with an iButton (1 Wire) port). LaGard also sells a lock body without electronics -- mechanical, with solenoid only. So, I don't have to design a lock either. I simply need to be the "go between man" between the keypad and the lock. The keypad is simply used for input -- the lock body is only used when I want to actually open the safe -- the board between is the important part!

eblc1388 said:
I have not used them before. I just put in a search phase in Google "low quiescent current voltage regulator" and I got many hits.

Excellent -- thank you. It's the terminology that is sometimes hard to find. I would have never, in a million years, searched for "low quiescent"! Again, not being from the hardware side of things, I don't always know what to search for.

( I appologize for bastardizing your screen name in my first post to you -- I thought I saw eric1388! :eek: )

eng1 said:
I've used the LM2936-5. It's a Low Drop Out - Ultra Low Quiescent Current regulator. Here's the datasheet: https://www.electro-tech-online.com/custompdfs/2007/08/LM2936-1.pdf
It's expensive if compared with other regulators, but perfect when low quiescent current is required.

Thanks -- have downloaded it and reading it now! :)
 
msc51mc said:
Now the final question. Why the 22k resistor?
If it's only a resistor network between green wire and ground you can connect power supply directly to it and also to the Vref of the PIC ADC.

Actually, I remembered later why I did it this way -- like I said, 22K just because it was there, but I could have used anything really -- it was just a matter of getting voltage to the keypad and I didn't really care exactly how much to start with.

The resistor was put there in the first place because, although the resistor network would work fine under normal use, the pin on the PIC *could* go low during initialization and cause a direct short to ground if the power rail were connected directly, without a pullup resistor.
 
Kyle-s4h said:
Actually, I remembered later why I did it this way -- like I said, 22K just because it was there, but I could have used anything really -- it was just a matter of getting voltage to the keypad and I didn't really care exactly how much to start with.

The resistor was put there in the first place because, although the resistor network would work fine under normal use, the pin on the PIC *could* go low during initialization and cause a direct short to ground if the power rail were connected directly, without a pullup resistor.

I'm not really very clear on exactly how it's wired, but I'm concerned about 22K, where ever it is!. Try checking the PIC datasheet, the maximum source impedance for feeding the analogue inputs is only 2K or so.
 
Nigel Goodwin said:
I'm not really very clear on exactly how it's wired
Me neither but I think it's something like the attached file. The value of R1 should be calculated not "because it was there" :eek:

Don't care about the PIC type, just select first from list :p
 

Attachments

  • AnalogKeyPad.jpg
    AnalogKeyPad.jpg
    60.5 KB · Views: 270
mcs51mc said:
Me neither but I think it's something like the attached file. The value of R1 should be calculated not "because it was there" :eek:

Don't care about the PIC type, just select first from list :p

Right, that's obviously much higher than the minimum 2K source impedance!, although the main effect is to slow down the reading speed (you have to wait until the internal capacitor is charge/discharged before it's accurate). You might try taking multiple readings, and seeing how many readings it takes until successive readings are the same.
 
I will check out the datasheet on that, Nigel, thank you.

Currently, I have no complaints on how it is working -- it seems to be very consistent and reliable the way it is setup. Every once in a while, the readings will be off by a number, so last night I sat down and started to write in a high and low range (+/- 2) to deal with any noise. I have to finish the routine today. I have also added a check to make sure the button has been released.

I have not yet written a calibration routine, but will once I have everything working as intended, and I understand WHY it works. ;) Anyway, my point is, how I got my numbers in the first place was to put a breakpoint in the ICD2, just after the ADC read -- press a button and hit run, record the ADC readings. The readings only take one button press / ADC read to get a good read. I have even added a "debouce" routine (not really sure if its needed right now or not... still have to think more about that one) to wait 20ms and then check the ADC again to make sure it's the same. If either check fails, the routine aborts.

The thing that I have noticed that is strange is the fact that I am only using the ADRESH byte for my calculations. I just got up and have not looked at the datasheet or midrange manual regarding A/D Conversion, but I was under the impression that the high byte should only contain the first 2 LSB, with the upper 6 clear. Nigels tutorial even masks the upper 6 bits to make sure they are clear. Anyway, what I am seeing is a consistent LOW byte (either C0/00 or 80/40) and a HIGH byte that is unique (but using more than the first two bits).

My ADRESH readings are as follows;

#0 0x00 .00
#1 0x05 .05
#2 0x0A .10
#3 0x0F .15
#4 0x14 .20
#5 0x1B .27
#6 0x22 .34
#7 0x2B .43
#8 0x35 .53
#9 0x41 .65

I'll go grab the project and do up a schematic on it -- gotta do it sometime anyway! :)
 
Status
Not open for further replies.

Latest threads

New Articles From Microcontroller Tips

Back
Top