Electro Tech is an online community (with over 170,000 members) who enjoy talking about and building electronic circuits, projects and gadgets. To participate you need to register. Registration is free. Click here to register now.
Welcome to our site! Electro Tech is an online community (with over 170,000 members) who enjoy talking about and building electronic circuits, projects and gadgets. To participate you need to register. Registration is free. Click here to register now.
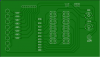
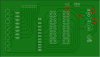
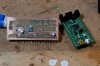
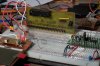
So, I bought some Pulsar paper to try it out. Here's a step thru of my process with a mini review. This is just a breadboard module for a Stellaris Cortex-M3 ECU. The last photo's show it beside and ARM7 module I had made up, which was much more complex, due to the external PLL and external VCore routing. I wouldn't be able to do the ARM7 on a single sided board without a lot of jumpers and it looking pretty messy.
I wont inline the images, you can click on them on the bottom.
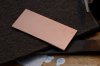
1. Print design. I'll print out the design on a normal piece of paper, then cut out the resist paper to completely cover it and print again. The piece of paper, I then cut out to use as a template for cutting the copper clad the right size. You'll see the cut out paper later.
2. File off the raised copper around the edges of the board. If you don't, the toner won't stick to the edges.
3. Roughen/clean the surface of the board. I use some gray scotchbrite pad. Then I use some alcohol and paper to clean off fingerprints.
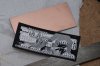
4. Board is ready for transfer. The white paper here is the regular printer paper I had cut out to use as a template for cutting the copper.
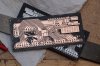
5. Pattern is ironed on with a regular iron. The Pulsar paper just drops off once it's been wetted, which is really nice. Only problem I have here is that it releases too well. You can see the places where the toner has not covered in the black areas. Top left edge of the board and bottom edge. The photo paper I usually use, is a real hassle to remove, but it fills those areas with gunk, so I usually don't get this problem. I see why they sell that green TRF stuff. I also found that the Pulsar paper tends to squish lines easier. Perhaps that's because none of the toner soaks into the paper. I filled in these area's with sharpie marker.
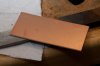
6. Done. Well, I skipped the etch, drill, populate phase. I had a real problem etching the board. The new etchant, like I mentioned earlier, seems to have died on me. The board looks dull because the etch took way too long to do its thing.
7. This is the first time I've done this, but I decided at the last moment to put on a silkscreen with the pin labeling. Turned out pretty good, except for the SCL, SDA.
The more toner the printer can deliver the better the black areas are. A fresh cartridge will do a better job then an older one. You can also use the hatch fill to require less toner.
You may have less problems with squished lines with a laminator which delivers more uniform heat and pressure. I understand there is a point where the toner is sticky but not liquid. If you are interested you can get them on Ebay for $25 including S&H.
The green foil cover small holes in the toner. It would not have covered the large holes.
hero999 you anit hurt my feeling the board had the holes in it when I found it.
It came off a motor controller and i sanded off where four wires was solder to it and reused it just to try it out never did it before the one hole on the right hit where two
resistors went and the jumper I forgot to run the ground to the header I like junk have a basement full of it. and plan to use it some where. LOL
It's ok I sanded that board to much and if you seen where i put solder over the track
that's why. You think it had jumpers on it that looked bad you see it now I put the switches pad wrong and had to cut all of them and jumper them lol
I still would like to try the pulsar paper. When I have time.
But, the picture paper (staples, hammermill) work well.
The problem with it, is when you drop it in the water to remove it, it is coated on the back side (as it is coated on both sides). I do not iron it on directly with the iron without a paper towel over it so I do not have to deal with the back coated side.
I dip it for a minute in warm water, scuff it with a plastic brush (to get the coating off the back side of the ironed on paper), then dip it again to get it to release when the water can actually get though the paper.
Then thumbs to remove the other coating on the copper once the paper is off.
The pulsar still doesn't seem to hold the sharpness of lines that blue pressnpeel does though, but maybe that's offset because its so much cheaper than pnp??
I purchased one and after finding out that putting the board through several times then cooling immediately (right when it comes out put into some water) the traces are 100% transferred.
Apply the green TFF then etch.
big difference from using an iron.
Also the board thickness = thinner is better IMHO
The only problem is some of the angles might be too tight to etch reliably. I tend to avoid anything <45°.
I've ringed round the fairly obvious ones. There may be some I've missed, they're appear to be some accute angles on the resistors but it's difficult to tell because of the low resolution and it appears to have gone through a JPG conversion at some stage.
Frank here from Pulsar. The sharpness of transferred images is directly related to exceeding one of 4 parameters that must be controlled (eg. Time, Heat, Pressure & Toner Density). We want maximum pressure as a constant then with enough heat, we effect the toner's "sticky" state and don't encroach on the "melting" temp! Partial melting is what makes traces distort. This is why the "laminator" works so well at making perfect transfers every time. We have a short procedure on the website to "calibrate" an iron. It's the trick that makes the iron work as well as the laminator approach, albeit a bit more work.
Is it necessary to pass the board through the laminator multiple times, or is a single pass good enough? The boards are thin, maybe credit card thickness, and the laminator is a $25, 4" model.
I got good boards almost every time (careless fingerprints on edge), but bought a refilled toner cartridge, and get very grainy, barely usable boards. Have to replace the cartridge when I do toner transfer, and switch back for regular print.
Never tried PNP, so don't know if its worth the higher cost. My experience with a cloths iron and various papers, even overhead inkjet transparencies was terrible, only two barely usable boards, and a lot of wasted time (which I have little of). The laminator and Pulsar paper have worked great, very simple and quick. I've printed, etched, drilled, and stuffed several projects in less than an hour. Never get that with photo paper and a cloths iron.
Hi everyone, sorry to jump to the next phase but i have a question, is there any substitute to solder mask? All the PCB's that i make go dull because i cant find solder mask here and it makes a nice work look ugly.
If it bothers you, just cover with a conformal coating or tin plate the whole PCB immediately after etching.
It doesn't bother me if it goes dull as long as I've soldered everything. If the board is going to be used in a corrosive atmosphere I'd conformally coat.
A light coat of clear acrylic spray just after etching will keep the copper bright. If the layer is too thick it will be difficult to solder. By light I mean one quick pass.
but dry it really dry. I used soap and water, dried really well and had green appear on the copper a week later.
I tried the acrylic spray, musta got to thick.
I purchased some liquid tin. I found soldering easier and my solder joints are a brighter shine.??
after soldering and testing I then spray a coat or two of clear acrylic or laquer.
I'm gonna argue that! I've used many brands of rosin cored solder over lots of years, and I always leave the flux on the joints unless it's for a photo or something. Rosin flux leaves a clear coating over the joint that actually stops corrosion.
Maybe you have been using some type of acid flux cored solder??
This site uses cookies to help personalise content, tailor your experience and to keep you logged in if you register.
By continuing to use this site, you are consenting to our use of cookies.

")