Continue to Site

Welcome to our site!

Electro Tech is an online community (with over 170,000 members) who enjoy talking about and building electronic circuits, projects and gadgets. To participate you need to register. Registration is free. Click here to register now.

  • Welcome to our site! Electro Tech is an online community (with over 170,000 members) who enjoy talking about and building electronic circuits, projects and gadgets. To participate you need to register. Registration is free. Click here to register now.

Tesla coil progress

Status
Not open for further replies.
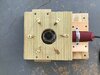
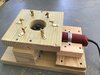
He has the raised threaded bosses to mount a panel in the back. The enclosures I used, used something like 1 3/8 nut and a 1/4" Aluminum plate,

Didn't see the raised bosses. The Hammond panel boxes they used where I worked had 1/8" steel plates in them for mounting the components. And the electricians building panels mostly used 8-32 screws and nuts for mounting. Just drilling a hole was faster than drilling and taping.
 
You could use "top hat brackets" to lift the DIN rail, they may be more stable than studding.
They are available for that exact purpose, but you can equally just make them from cut & bent metal strip.

These are rather shallow ones, but you can get (or make) them to whatever height you need.

View attachment 130990
That’s a great idea. I’m not necessarily looking for perfect. I just need something workable and maybe looks a little professional, I think between these posts I should be able to throw together something.
 
I found these caps what do you think? I know rms amps can be an issue, but these seem like they might be a little bit cheaper option than the Cornell Doubilers and still hold up for a while.

I found this guy and I am super surprised his cap bank has held up as long as it did! Gives me more respect for the seller. Check out his schematic, he only uses like 4 caps, I say that because the current dissipation can’t be equal with the ratings of his other caps.
I can watch Tesla coils for hours...

 
This is kinda dumb, but what is the plastic or silicon thing in the center of the rotary? Is it a common part? I need to find something that will work for my angel grinder.
1619300108043.png
 
Do you mean the white colored square? It looks like it could be a nylon or maybe polyethylene square bar. Pretty easy to find on Ebay. Or did you mean the thing it's mounted on, that looks like a lazy susan bearing, the ring has ball bearings in it.
 
The white colored square is what I was referring to. Is it easy enough to cut to fit directly on my angle grinder? Would nylon or polyethylene be able to with withstand the heat?
Should I purchase a tungsten rod? Or will stainless steal work?
 
Looks like Nylon. Delrin is a possibility. Then you have shaft collars. It would probably be best if you used an over reamer. it;s 0.001 over the nominal size, So if 0.250 rod an overramer would be 0.251. See www.mcmaster.com
 
Here is a 0.251 reamer. https://wttool.com/catalog/product_info.php?cPath=4440&products_id=31397 These guys are a bit cheaper.
You drill a 0.250 hole or slightly smaller and then ream to get a round smooth hole.

This https://wttool.com/catalog/product_info.php?cPath=4901&products_id=14216 or a brad point bit would work really well drilling plastics. If you need a lubricant use a little dish soap and water.

Those type of drills generally drill a round hole in sheet metal, but work well in plastics. I had to drill some 3/8" in polycarbinate, so I re-grund a normal bit to do it with soapy lube.

Reamers are used slow speed with lube.

Delrin is nice and stable and easy to machine.
Thank you, I think I have one of those bits lying around so just need to get one of those nylon blocks.
I checked the links you sent for the reamer rods, but are they going to cut well? I don't know what the hex-bit-looking thing at the end of them are, but they will obviously need to go.

I really appreciate the extra research you did to help this project along.
 
I checked the links you sent for the reamer rods, but are they going to cut well? I don't know what the hex-bit-looking thing at the end of them are, but they will obviously need to go.

Reamers, just make a smooth round hole and not designed to remove a lot of material. A force fit is defined as 0.001 under and a slip fit 0.001" over, hence under/over reamers. You would use the closest drill size under or over the size you need.

EDIT: A reamer makes a precise round hole. Precision shafting for say 0.250" won't exceed 0.250 inches.

I don't see a hex thing.

A regular drill, drills a somewhat triangular hole in sheet metal.

This https://www.dewalt.com/products/acc...its/29-pc--pilot-point-set-metal-index/dw1969 is a very nice set to have.

You can get the bits individually at **broken link removed**

These https://www.automationdirect.com/ad...its_(hss,_hss-tin_-a-_co_5)_-_fractional_size step bits are nice too for sheet metal.

I have a 3/8 Hitaci VSR battery powered drill. Dad's was a 1/4" corded drill. I then bought this https://www.dewalt.com/products/pow...-with-clutch-and-bindup-control-system/dwd460 drill
because I was drilling holes in studs with a flexible bits installing ethernet and phone at home and the Hitachi would not handle it.

I don;t own a hammer drill, but I do own a demolition hammer. This one: https://www.boschtools.com/us/en/boschtools-ocs/demolition-hammers-11316evs-26682-p/ Bought off of ebay and I had to rebuild it. I have a clay spade, a tamper and a few chisels. I bought it to lay drainage pipe.
 
Last edited:
Ok, I understand now. For some reason I thought you were suggesting the Reamers as the electrode! XD
Wow I’m such an idiot.

Maybe I can ask around to see if anyone has one for me to borrow. Doesn’t feel right buying this if I’m only going to use it once.
I looked for nylon square bars on eBay around 1” by 1” by 3” and couldn’t find anything and the things I did find were in the $30 to $50 range.

Do you know of a site I can check for these?
 
I changed out that little piece of wood for this big boy. This is by far the fattest rotary I’ve seen!

But it’s SOLID I think it will last quite a while.
 

Attachments

  • 29891B47-3F41-41B7-BF64-BBDE5F19D4D4.jpeg
    29891B47-3F41-41B7-BF64-BBDE5F19D4D4.jpeg
    1.7 MB · Views: 187
  • AE55B24D-F8A0-4A6E-8D06-8E9AF40FA17C.jpeg
    AE55B24D-F8A0-4A6E-8D06-8E9AF40FA17C.jpeg
    1.5 MB · Views: 190
I went ahead and got a sheet of Teflon 6 inch by 3 foot should be here Tuesday.

If you just ordered plain old Teflon your going to be disappointed, it can't be glued. Like KISS said it must be acid etched on one side, that allows the Epoxy to stick.

And you need to start thinking out side the box, when doing things on a budget. A section of PVC pipe could also be substituted for the square plastic. Or look in the phone book for plastic distributors, many of those sell what is called "drops", leftover pieces from cutting for an order placed by someone else.
 
Last edited:
If you just ordered plain old Teflon your going to be disappointed, it can't be glued. Like KISS said it must be acid etched on one side, that allows the Epoxy to stick.

And you need to start thinking out side the box, when doing things on a budget. A section of PVC pipe could also be substituted for the square plastic. Or look in the phone book for plastic distributors, many of those sell what is called "drops", leftover pieces from cutting for an order placed by someone else.
I was just going to hold it down by the screws that hold the terminals.
 
Status
Not open for further replies.

New Articles From Microcontroller Tips

Back
Top