Hello again Irjaj,
Oh ok that's good that you understand the equation without vL because we can work with that equation to transform it into an equation that works with vL in it too. You may want to note that the longer equation with vL is simply a charging cap, same as before, but the only difference is that the cap now has an initial voltage before we start the charging process. In that equation, vL happens to be that initial voltage, so that longer equation will work with any cap charged by a voltage source through a resistor with the initial voltage being vL.
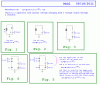
To see the full derivation, look at the attachment. The figures show how a simpler circuit is transformed along with the equation.
Referring to the drawing attached...
In Fig. 1 we see a circuit with a 3 volt battery E, a resistor R, and a capacitor C. The capacitor has no initial voltage across it so we can use the simple formula
Vc=E*(1-e^(-t/RC)).
In Fig. 2, we have some initial voltage v0=1v across the capacitor before we start to charge, so we can not use the simple formula for this circuit.
In Fig. 3, we drew an equivalent circuit by showing the initial cap voltage v0 as a small battery instead of as a voltage stored in the capacitor, and so we show the initial cap voltage now as Vc=0. The new circuit obviously has two batteries now.
In Fig. 4, we broke up the bigger battery E that was 3v into three smaller batteries, each 1v, and they are in series so they make up the same battery bank as E did previously. Note that we have drawn two of the batteries a little higher up and one battery a little lower, parallel to the v0 battery on the right. Also note that the total voltage across the two upper batteries is now the original battery voltage E minus the initial capacitor voltage v0. This of course is not a coincidence, we do this on purpose.
In Fig. 5, since the lower small battery on the left is equal in voltage to the small battery on the right, we can short them together as shown by the red jumper. Note that after we do this, the two upper batteries on the left are now connected directly to the capacitor, and again the capacitor has zero voltage across it. Now what we have for the upper part of the circuit is a new circuit which we can consider separately from the lower part of the circuit (the lower part is the two lower batteries shorted together). Because the upper part can be treated separately now and we know the voltage source is now E-v0 we can write a new equation that simply replaces the 'old' E with the 'new' E, where the new E is now E-v0. This makes the new equation:
Vc=(E-v0)*(1-e^(-t/RC))
Note that this is still the simple equation, but we changed the 'voltage source' from just plain E to "E-v0" because that's the source voltage in the upper part of the circuit.
There's only one problem here. That is, the voltage we have indicated there as Vc is no longer referenced to ground, but is now referenced to the two shorted nodes drawn with the red line. We should note however that the two shorted nodes are always exactly v0 volts more than ground, so all we have to do to correct this new equation is to add v0 (the initial cap voltage) back to the equation, and we end up with:
Vc=(E-v0)*(1-e^(-t/RC))+v0
So in the end we end up with an equation that allows us to calculate the voltage across the capacitor even if the capacitor has some initial voltage before we start the charge process.
The other derivation is straightforward circuit analysis, where we write one differential equation and solve it however we choose. The end result is exactly the same as the above final equation once we rearrange the form a little.

")