Continue to Site

Welcome to our site!

Electro Tech is an online community (with over 170,000 members) who enjoy talking about and building electronic circuits, projects and gadgets. To participate you need to register. Registration is free. Click here to register now.

  • Welcome to our site! Electro Tech is an online community (with over 170,000 members) who enjoy talking about and building electronic circuits, projects and gadgets. To participate you need to register. Registration is free. Click here to register now.

request for a schematic/hex for a little project

Status
Not open for further replies.

arassel

New Member
Hello,

If this is posted in the wrong section please correct me.

Would like a solution to a little project i'm working on :

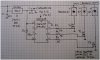
I need a circuit ( using a 12F629 ) that will get powered with 12v (from a car battery) and will light up 3 individual led strips consecutively with a delay of 0.3-0.4 seconds (and stay powered as long as the circuit has power).

Any feedback would be appreciated ..
 
A 12F629 cannot drive large LED strips directly, you would need some interface between the PIC and the LED strips to handle the current. A PIC can source or sink only 25mA per pin, enough for one or two LEDS, but not a "strip" of them.
You are not clear what timing you want for the 3 LED strips. Is it 0.3 seconds for one, then turn it off and turn on the next and repeat, or just delay all 3 strips for 0.3 seconds and just turn them on and leave them on? Or, turn on each strip 0.3 seconds apart and leave them on?
One would need to know the current rating of each LED strip to determine a proper interface.
 
@ sagor1 thanks for the reply, first i'd like to make you aware i know little to nothing about what i'm asking for, my electronic knowledge is scarce .. i'm some kind of scared about talking about it, not knowing exactly what i'm talking about :D .

please take into consideration i barely know what i'm doing ..

- operating voltage is 12-14v, i'm trying to switch my taillights from bulb to led with a personal design, the strips are not big, 21 smd leds with resistors at every 3 smds

I've been looking alot for a solution to my idea as simple as possible .. i've attached pictures with what i've found online and tried to build so far. any other simpler solution would be apreciated !

so far i've done this:

- i have bought the components and the pic and the programmer, i used the hex i found and the programmer didnt give me any errors but i have not yet finished building it, managed to screw some thing up with the schematinc and build up a wrong setup. ( it was the first time i ever did this, last time i worked on this level was probably 15 years ago when i made my one bike led blinker :D )

what i need hep with is :

- if the hex can be verified if its what i want it to be : when circuit is powered 1st strip to light up, 0.3 seconds later 2nd strip lights up, 0.3 seconds after 3rd strip lights up and all stay on from the moment they are turned on by the pic.
 

Attachments

  • 3EDaS97o0.jpg
    3EDaS97o0.jpg
    239.4 KB · Views: 182
  • blink.hex.txt
    322 bytes · Views: 159
Ok, you have the interface MOSFET devices in the schematic that will handle higher current. Not sure what part number they are, but they MUST be "logic" level MOSFETs in order to work with the PIC output voltages of around 4.5 to 5V.
At low currents (up to 200mA), one could use simple 2N7000 devices. At higher currents, one would need something like a IRL520 or IRL530 or equivalent that can pass a couple of amps. Not that you need that much current, but they have a low RDSon (low ohms when on)
If you can, connect one string to a +12V source and measure the current a single string takes with a multi-meter. If it is less than 100mA, the 2N7000 Mosfet will do (and they are small)

I'll look at your hex file and see if I can figure it out...
 
Last edited:
Took a quick look at the hex file in my simulator, and with an internal 4Mhz clock, the LEDS come on at about 1 second intervals.
At first power on, first LED comes on almost right away, second one 1 second later, and third a second after that.
 
this is the mosfet i got .. i bent the legs to do less routing on the circuit board i drawn from the schematic
 

Attachments

  • EF1A82D9-69C9-425C-82D6-DD488F90B0B7.jpeg
    EF1A82D9-69C9-425C-82D6-DD488F90B0B7.jpeg
    676.3 KB · Views: 177
  • 13BE58E2-51B4-4E9A-B96D-C3BC92DA976D.jpeg
    13BE58E2-51B4-4E9A-B96D-C3BC92DA976D.jpeg
    236.7 KB · Views: 203
Try this code, it is set for 300ms delay between LEDs...
 

Attachments

  • blinker.hex.txt
    329 bytes · Views: 156
  • blinker.lst.txt
    4.4 KB · Views: 160
I do not recognize that MOSFET, not clear as to the part number. Unless it is "logic level", it may not work properly with the PIC. You have to make sure about that MOSFET, what kind it is, what the actual part number is. If you ordered it, what part # did you order? If it is a AOT2916L, then you are ok, it will conduct well at 4.5V Vgs, and will probably handle the current ok.
 
Last edited:
Another comment, the unused pins (2 and 3) should be either held low or held high by some 10k resistor. Pick which is easier (high or low), but it will keep those pins from floating and possibly causing problems.
 
sagor1 much appreciate the help ! after i rebuild the circuit board i can test the hex.

but help me understand .. what should i do with the lst file ? and what do you mean "held low or high" ? you mean bridge them togetter with a resistor ?
 
The LST file is just an assembler listing of the compiled code, just for information as to what I wrote. You can throw it out if you wish....
For pins 2 and 3, put a 10k resistor to each pin and tie it to the +5V (Vdd). If that is too difficult with your board, you could put the 10k resistors to ground (Vss) instead. The idea is that floating pins may cause some problems, like "noise" to the rest of the system. I've seen one PIC project that failed to work properly until the un-used pins were tied to Vdd (pull-up resistors)
 
Another idea is to use the pins 2 and 3 to change the timing period of the code. That is, read a pin (or both) to change the timing from 300ms to something else like 400ms or 200ms. Using a high (Vdd) or low (Vss) resistor on a pin could let you change the options in the code. Mind you, one would have to re-write the code to read those pins, then set the appropriate delay.
Or, one of the un-used pins could be set for a "repeat" signal, to cause the timing sequence to repeat itself after a short delay. Options are many, just have to decide what you want to do.
Use pull-up to set default state, and ground a pin if you want something to change.
This is all optional of course. If the PIC code works as you want, leave it alone, except do put in the pull-up or pull-downs on the un-used pins
 
sooooo .. had a go at the schematic again ... funny story is that with the hex i had ... something very wierd happens .. when i power up the circuit, 1st led strip gets just ~5% power, 2nd and 3rd strip gets ~70% intensity .. after 1 second 2nd led strip turns off, after 1 more second 3rd led strip goes to ~20% intensity ...

sagor1 also tried your hex .. happens the same .. but faster :D .. so it must be parts i used ... i must be really bad at this :D if i couldnt get that right ..
 
I would suggest 10k to 47k pull-downs on the gates of the mosfets.
The fact that the intensity of the LEDS seems to vary indicates a possible power supply problem, not enough power??
Also, put 0.01uF and 1000pF caps across between Vdd and Vss close to the chip to prevent oscillations.
Also, since both sets of code produce the same results but at different timings suggests the code is good, but hardware is an issue. 2Nd LED strip should not turn off at all, unless some wiring or hardware fault.
Have you put pull-ups on pins 2 and 3 yet?
 
Use npn transistor with resistor in series, invert bit logic -> 5V connected to base through resistor will bring ground to collector pin of npn transistor. Use that collector pin to control yours mosfets.
0V mcu output -> VCC npn collector -> mosfet on
5V mcu output -> GROUND npn collector -> mosfet off
VCC is 12V
 
I've driven logic level mosfets directly from a PIC, no need for anything between. Using NPN between makes sense if using mosfets that need a full 10V or more on the gate, but logic level mosfets work fine at 4.5V on the gate.
Good point anyway, something to remember if using non-logic level mosfets. However, I usually set up a 2N7000 mosfet to drive a higher level mosfet (and invert the logic as well). Chaining two in series lets the first mosfet handle the higher (12V) gate voltage on the second mosfet. Similar concept to using NPN as the "driver", but a 2N7000 will handle it as well, usually.
In this posting, the user should be able to drive the logic level MOSFET directly with the PIC.

Arassel, have you done the pull-ups for pins 2 and 3? Measure the voltage outputs on the GP0-GP2 pins without the mosfets to verify the output voltages are in the 4.5V range (or higher). Worst case, tie pins 2 and 3 to pin 4 if you have no room for extra resistors.
 
Last edited:
sagor1 thank you for the way you're trying to make me understand, but i'm not getting all of that, its the first time i'm doing whatever it is i'm trying to do here .. i actually understand few things, was hoping for all of it to go acording to schematics .. at least those i can follow ..

i dont have any other components lying around, i bought just what i needed for this schematic, and if i order more i'll have to wait for them to arrive. meanwhile when i saw what i've build has to no avail i've searched more for an alternative, someone found something more simpler with on a similar forum where i tried to ask for help .. it doesnt involve any programing ..

let me know what do you think about it ?
 

Attachments

  • Sequential Turn Signals - Like Old Mercury Cougars Had.gif
    Sequential Turn Signals - Like Old Mercury Cougars Had.gif
    9 KB · Views: 176
If the other schematic works, use it instead.

All I was doing was suggesting things for testing the PIC:
1) connect pins 2 and 3 to pin 4 (which is high when power is on).
2) Check the output voltages on the PIC - GP0, GP1, GP2 with nothing else connected to those pins. Verify you are getting 4.5V or more when it sequences.
If you see no voltages on the PIC outputs, you may have blown the output drivers of the PIC
If that all works (high voltage on the outputs), then your mosfets are either wired wrong, or blown.
Check that you have 10k pull-downs to ground on the gates of the mosfets. Without those, the gate charge may float high when PIC is turned off, keeping the mosfet turned on.
 
So you want audi style indicators.
The second circuit shown looks as though it'll work at first glance.
The first lamp will light immediately, the second after 1/2 a sec and the third after about 1 sec.
To change the times you can replace the 240k and 470k resistors, for symetry the larger one shpuld be close to double the smaller, as per the originals.
You dont need logic level fets with this circuit as the chip runs at 13.8v.
Take note where there are 2 numbers next to the chip on the drawing you need to connect both those pins to the same wire.
 
dr pepper i've tried that schematic .. but it doesnt work .. it actually works inverted .. the led strips turn off at the designated time ... i gave up on that approach

i already done the sequential turning signals, its already on the market.. what i want to do now is make the stoplight out of 3 led strips that turn on progressively for eatch stoplight.

.. added a new schematic in post 17, and will try that after i receive all the components i ordered .. i will remove the turnsignal involvement in that schematic and wire all that to the break signal for the stoplights.
 
Status
Not open for further replies.

Latest threads

New Articles From Microcontroller Tips

Back
Top