hi dustin,
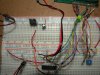
I would agree with Sarma regarding the use of the finished pcb, the project board layout is messy and prone to electrical noise etc.
On the pcb I would add a 100nF cap across the +V and 0V pins of the PIC , as close as possible to the PIC.
From Sarma's and my tests of the programs, it should work if the hardware is ok.
") EDIT:
EDIT:
Checking the last LCD PCB voltage list pins 11 thru 14 now look ok.