Continue to Site

Welcome to our site!

Electro Tech is an online community (with over 170,000 members) who enjoy talking about and building electronic circuits, projects and gadgets. To participate you need to register. Registration is free. Click here to register now.

  • Welcome to our site! Electro Tech is an online community (with over 170,000 members) who enjoy talking about and building electronic circuits, projects and gadgets. To participate you need to register. Registration is free. Click here to register now.

Please check my simple circuit for errors

Status
Not open for further replies.
I am a professional power supply designer...

I know! That's why i used the smileys. ;) :D :D The point I was trying to make was that bolting some IC's to a big slab of metal heatsink and pumping enough amps into a messy vat of acid might not require the "finesse" of a pro power supply engineer doing heatsink thermal resistance calcs... ;)

...
Even assuming the LM338 devices are in the large TO-3 package (which is the best for heat transfer) the thermal resistance from IC to the heatsink will be about 1.5C/w. If the device did not have thermal shutdown, 100W of dissipation would spike the die temp to over 175C even if the case was held at 25C using an infinite heatsink. Thermal shutdown will kick in at 160C, which will cut off or reduce output current very quickly.

A very good point. I think you might be still a little conservative on the figures, the datasheet says MAX junction-case of 1'C/W so it's probably not that bad. Many TO-3 devices are rated at >100W but they are usually the alloy package not the crappy steel ones like the LM338K.

The anodising voltage curve looks a lot like a cap charging curve, the 100W will drop fairly quickly as the coating builds.

But you are still right, Ceefna needs to reduce the DC voltage well under 20v (which means he won't get a good anodised layer) or needs to change the circuit by adding more LM338's or some other solution...

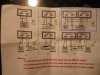
Ceefna- if you use a 100 ohm pot you need to increase the pot current by reducing the LM117 fixed resistor to 100 ohms.
 
This is why I sometimes get depressed...... pointed out that the design could not possibly work given the operating conditions (IC's would go into thermal shutdown or blow up) even if they were connected to an infinite heatsink and the next post is about the selected heatsink.

Good luck gentlemen.

As a last suggestion on the off chance anybody will listen: if you do want the ICs to run, I would suggest getting more LM338s and dividing the load current among them. Instead of 3 ICs at 5A each, it MIGHT be possible to use 6 ICs at 2.5A each although I make no guarantees since I don't know the exact input/output voltage.

But, if it is as previously posted (that the initial load looks mainly like a short to ground) the initial power dissipation of each IC will be the load current multiplied times the input voltage during that period. If that power calculates out to 50W or more per IC, it won't work no matter what the heatsink is. Realistically, you can't assume a thermal resistance lower than 2C/W going from the transistor to the heatsink so your transistor will always be at least 100C hotter than the heatsink temp.

If you divide the power among enough 338 devices to get the power down to maybe 40W each or less, there is at least a hope it might work if you have a massive heatsink/fan.
 
A very good point. I think you might be still a little conservative on the figures, the datasheet says MAX junction-case of 1'C/W so it's probably not that bad.
Check other data sheets. I saw 1.4 on most, I don't believe 1C/W and these days the numbers come from computer modeling anyway so I automatically assume they are wrong. Companies copy other data sheets in cases where the specs have been out there a while. When you see a newer data sheet with different specs, it means they actually measured it.

Rth(j-c) Typical Junction-Case Thermal Resistance 1.4 oC/W

http://www.datasheetcatalog.org/datasheet/SGSThomsonMicroelectronics/mXuuvz.pdf


Rthj-case Thermal Resistance Junction-case 1.4 °C/W

http://www.datasheetcatalog.org/datasheet2/8/0ujhh2scud4dfop1xfyut2u2qopy.pdf
 
Sorry bountyhunter if it seemed I was ignoring you. All your comments have been greatly appreciated. I have been anodising small parts as a hobby for a while now just using a 12V 6 Amp battery charger, most of these parts when connected draw about 3 amps at 12V but as Mr RB said this current soon drops off. The main issue with using a battery charger is when you first switch on you get too much current which quite often ruins the contact between part being anodised and the anode, so the reason I was wanting to build this was to have some control over current. The reason for building something capable of 15 amps was just to have some headroom if I was doing a bigger part but I can see from your comments that this is probably not going work.
Thanks Mr RB on the resistor info.

Ceefna
 
Last edited:
Hi all, the project is well on it's way( see pics). I have put a 140mm fan in the top which exits through the back and across the heat sink, just waiting for the digital volt and amp meters to come from China. I did as Bountyhunter sugested and fitted 6 LM338's to reduce load on them. This question is to Mr RB, I changed the potentiometer to a 100Ω and lowered the LM117 resistor to 100Ω as you suggested, but when I switch on with a 12v/55w halogen bulb connected across the outputs I am getting 1.91 amps@3v output across the bulb even with the pot set on its lowest, any ideas? would like it to turn lower because some parts I do are tiny. Only other change I made from original circuit is replaced current sense resistors from 0.24Ω to 0.22Ω as couldn't get 0.24Ω ones. Hope you can help with this problem.


Ceefna
 

Attachments

  • DSC01463.JPG
    DSC01463.JPG
    546.5 KB · Views: 147
  • DSC01467.JPG
    DSC01467.JPG
    576.6 KB · Views: 142
Hi all, the project is well on it's way( see pics). I have put a 140mm fan in the top which exits through the back and across the heat sink, just waiting for the digital volt and amp meters to come from China. I did as Bountyhunter sugested and fitted 6 LM338's to reduce load on them. This question is to Mr RB, I changed the potentiometer to a 100Ω and lowered the LM117 resistor to 100Ω as you suggested, but when I switch on with a 12v/55w halogen bulb connected across the outputs I am getting 1.91 amps@3v output across the bulb even with the pot set on its lowest, any ideas? would like it to turn lower because some parts I do are tiny. Only other change I made from original circuit is replaced current sense resistors from 0.24Ω to 0.22Ω as couldn't get 0.24Ω ones. Hope you can help with this problem.


Ceefna
Can you please explain:

1) Are the LM338 devices in TO-220 (small metal tab with screw hole) or TO-3 package (large metal can with two holes to mount it)?

2) How are the devices mounted to the heatsink?

3) Can you post how the regs are wired?
 
Last edited:
Hello Bountyhunter, the 338's are T0-220 and are insulated and screwed to the heat sink. The transformer is a 240v-24v x2 at 12.5A each outlet, I have connected this to a bridge rectifier and a 200v 2200uf capacitor, I also fitted a 1N5402 diode to protect from discharges.
Hope this helps you.

Ceefna
can you post a schematic with voltage readings at the pins for diagnosing problem?


Try CAREFULLY touching the LM338s and see if they are the same temps.

What is the input voltage being fed to the LM338s? If you have a 24V secondary fed to a bridge, you will be getting about 35V.

I hate to beat a dead horse, but the thermal resistance of a TO-220 device is about 5C/W just getting from the package to the heatsink. The low readings COULD be if the devices are in thermal shutdown.

A 12V 55W halogen light draws about 4.6A. If the LM338 devices are not sharing the load properly, the one doing the work will instantly shut down from heat. I have never tried using them as parallel current sources so I don't know how their internal control loops will handle that.
 
Last edited:
The problem I have seems to be that it is working too well, a small turn of the current adjusting pot and the bulb burns hotter than the sun!!! and then blows!!! What I wanted to know was if I change the 100Ω resistor for a 36Ω do you think it will let the pot lower the current to nearly zero? I set the pot to 4.64A and ran the bulb for best part of an hour Didn't notice any real change in temp of the heat sink.

Ceefna
 
but when I switch on with a 12v/55w halogen bulb connected across the outputs I am getting 1.91 amps@3v output across the bulb even with the pot set on its lowest, any ideas?


Ceefna

sorry just read through my post and it doesn't read right. I meant I cant turn it down lower than 1.91A, it goes much much higher so it's not a heat problem.

Ceefna
 
The problem I have seems to be that it is working too well, a small turn of the current adjusting pot and the bulb burns hotter than the sun!!! and then blows!!! What I wanted to know was if I change the 100Ω resistor for a 36Ω do you think it will let the pot lower the current to nearly zero? I set the pot to 4.64A and ran the bulb for best part of an hour Didn't notice any real change in temp of the heat sink.

Ceefna
I can't really diagnose it because it is not working correctly. The pot should linearly adjust the current.
 
Hi, I have done the voltage checks and attached a schematic with results. The min/max refers to current adj pot turned from low to high. The circuit i have made is the same just with another 3 LM338's tagged on. What can I connect across to test under load as I can't adjust it much with the 12v bulbs to test the voltages at load

Hope this helps diagnose the issue.

Ceefna
 

Attachments

  • current1 volts.jpg
    current1 volts.jpg
    60.9 KB · Views: 150
Hi again ceefna, that's so great to see the design come together! :)

I would suggest using a ANALOG moving-coil panel meter for the current as well as the digital meter. Sometimes there's no substitute for watchign that needle jump up/down while you turn the dial. Then you can use the digital panel meter to trim the current more exactly and slowly.

For higher current jobs you could just get one of those little 8" mains powered desk fans and point it right at the fins of the heatsink, you'll soon find out if it goes into thermal shutdown. :)

The current control mechanism is based on 2 factors;
1. The LM117 is constant current drain so it always draws the same current through the pot. That makes a set voltage across the pot (end to end) regardless of the output voltage.
2. The pot adjustment makes a reference voltage which is subtracted from the current measured voltage on the current sense resistors.

So the LM338 always regulate to 1.2v, like this;
Pot = 1v, current sense R = 0.2v
Pot = 0.6v, current sense R = 0.6v
Pot = 0.2v, current sense R = 1v

So pot=0v = full current
pot >1.2v = no current

So to fully turn the anodising current off you need to set the pot voltage at >1.2v (from pot top to wiper). Just decrease the value of the LM117 resistor a little, say from 100 ohm to 82 ohm. That gives more current through the pot and a little higher pot voltage.

Now if you are doing small parts a lot and need fine adjustment, you could get a 10-turn wirewound pot. I have one on my main bench PSU and I love it.

Or, you can put a range switch in. That's a bit tricky, it involves changing LM117 R to 200 ohms, and adding another 100 ohm resistor above the pot. That would give you a range of zero current to half current instead of zero current to full current.
You can do range adjustment by switching out one or two of the LM338, but that leaves just one doing all the work, the other system is better.

If it was me I would definitely add a 10 amp analog panel meter, and I would probably change the 0.22 current resistors to 0.33 ohm, that will give you about 10.8A max instead of 15 which increases reliability and makes current adjustment finer. Later, if you really think you need 15A then you can add one or more LM338 which will be pretty easy job.
 
Thanks for all you expert knowledge Mr RB, the analogue ammeter is a great idea, I will check the voltage across pot top and wiper and set it below 1.2v. Don't know if you read through the previous posts but I did as Bountyhunter suggested and fitted 6xLM338's to spread the load. Will two 12v/55w halogen bulbs connected in series be ok to load supply up(should draw 9.6A I think)? Adjustment seems ok( not too sensitive ) so if I can get the base setting to 0A I will be very happy with my creation.

Thanks again

Ceefna
 
The pot need MORE than 1.2v measured across it's 2 outer pins. That will allow the current to adjust down to zero.

Good going on fitting 6 output devices, that's a big improvement. I hope you increased the size of the current sensing resistors from 0.22 ohms to 0.44 ohms...

You can use the 2 bulbs in parallel as a dummy load.
:)
 
Hi Mr RB, I didn't change the current sence resistors( each 338 is fitted with a 0.22Ω resistor) is this going to cause problems? My transformer is rated at 2x24v at 12.5Amps each outlet. I only connected one up so transformer can supply 12.5A.

Ceefna
 
Yes problems. :)

The max current from each LM338 is set by that resistor;
1.2v / 0.22 ohm = 5.5 amps

So with 6 times that you have set it up for 0-30 amps, it will be twitchy to adjust down low and possibly fry something if you turned it right up to 30 amps...

If you change them to 0.47 ohms you get;
1.2v / 0.47 = 2.5A (*6 devices = 15.3A total).
 
Thanks Mr RB, I will change the resistors. I hope you are not getting too tired of my lack of knowledge but here is another probably dumb question:-
The digital volt and amp meters turned up but in the supplied paperwork it says they can't share the same power supply, why is this? I fitted an ATX power supply in the case to power both these meters. Is there any way I can use the ATX or do I have to fit another 12v source?. I have attached a picture of the paperwork and circled the way I was going to wire them in blue.
Thanks again for all your help

Ceefna
 

Attachments

  • meter.jpg
    meter.jpg
    152.7 KB · Views: 140
in the supplied paperwork it says they can't share the same power supply, why is this?
It looks like it's because the current meter will have a floating ground with respect to the voltmeter. In other words: the shunt resistor means the current meter's ground point is not system (power supply) ground which is the ground for the voltmeter. That means the power to the current meter must be isolated so it's ground can float with repect to system ground.
 
Last edited:
Status
Not open for further replies.

Latest threads

New Articles From Microcontroller Tips

Back
Top