Walmart has your cable for under $20
https://www.walmart.com/catalog/product.do?product_id=932028
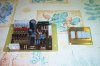
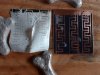
Mark256, read this thread starting at Page 1. Should find answers to all your questions, plus a picture of a board I made last week using toner transfer.
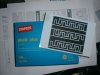
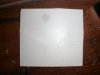
Laminator not hot enough? Hmm... mine gets hot enough that I need to set the board down to cool off. I run them through twice. I'll do a couple of light strips on the photo paper tomorrow. Can let it soak while I mow the yard... Guess I'd better charge the camera batteries so I can use the flash this time...
https://www.walmart.com/catalog/product.do?product_id=932028
Mark256, read this thread starting at Page 1. Should find answers to all your questions, plus a picture of a board I made last week using toner transfer.
Laminator not hot enough? Hmm... mine gets hot enough that I need to set the board down to cool off. I run them through twice. I'll do a couple of light strips on the photo paper tomorrow. Can let it soak while I mow the yard... Guess I'd better charge the camera batteries so I can use the flash this time...
") )
)