Continue to Site

Welcome to our site!

Electro Tech is an online community (with over 170,000 members) who enjoy talking about and building electronic circuits, projects and gadgets. To participate you need to register. Registration is free. Click here to register now.

  • Welcome to our site! Electro Tech is an online community (with over 170,000 members) who enjoy talking about and building electronic circuits, projects and gadgets. To participate you need to register. Registration is free. Click here to register now.

not what you think!

Status
Not open for further replies.

craigey1

New Member
Hi all,

I've had a small amount of exposure to electronics, but have stumbled upon a really great idea for an electronics project.

I am an instructor in the air training corps, and was hoping to build a fake bomb, which the cadets can diffuse By cutting the correct wire.

What I'm trying to do is have 4* 7 segment display's as a countdown timer, with either switches or a numpad to set up the countdown time. The "bomb" should have about 6 wires that can be cut (they will be replaceable). 1 wire should result in instant detonation, 1 should stop the timer/detonation (and if possible change the timer to green - There is a link to a store that carries red/green 7 segment displays). The 4 other wires should speed up the countdown.

I know it's a lot to follow, but I have some of the circuit diagram already. See Link https://www.acrim.co.uk/_images/circuits/circuit-det4.jpg

I need to change the 7 segment displays in the link above to the ones here and for them to go green when the timer is stopped, and red when it is counting down. Also if someone could incoporate a numpad that would be cool !

**broken link removed**

Can anyone shed some light on a parts list / PCB design etc.

I would really apreciate any help on this. I know what you are probably all thinking, but this is for a legitamate project.

Thanks
 
Are they just supposed to guess what wire to cut or is it a replica of a real device they may encounter?
I built a few 'fake' bombs for the local police bomb squad to practice with, a friend of mine was on it at the time. They never defused a single one. I stopped doing it because I ended up getting them reprimanded.
 
It sounds like a very fun idea to play around with, but I think the practical use of it might be negative towards learning how to diffuse a bomb.

Most people that are crazy enough to throw together a bomb, will not make it soo easy to stop. There are many tricks and etc. that you will need to incorporate before it will be closer to the real thing. Sometimes it is a huge challenge to even open the box to get to the wiring. This is why you see a lot of robotics in the bomb squad, people are getting too good at making them!

Steve
 
Fundraiser ?

I am quite taken by this idea, I see it as a simple fundraiser game for cadets / ATC open days. 5p a go - see if you can #unscrew# the leads before a big flash and win a toffee!

To use the displays you suggest you will either have to have 28 transistors to convert the 4511 for common anodes or replace the 4511 with 7447 driver (I can't find a CMOS common-anode driver - mixing TTL with CMOS seems to be the only option!).
:idea: How about making a bi-colour 7-seg display from lots of LEDs so the common cathode driver can be kept?

Adding some BCD-encoded thumbwheel switches for pre-setting a start time would be easy and making the display change colour when 'diffused' would be easy, a few more logic gates and two transistors would achieve it.
I wouldn't bother with a pcb design for this, a ready-made matrix board would be OK. **broken link removed**

Hey! I fancy building one myself now! (probably end up giving it to the local Army cadets!).
 
I see it as a simple fundraiser game for cadets / ATC open days

I was actually thinking more of an initative exercise for the cadets, where they find cryptic clues on how to diffuse the bomb.

Are they just supposed to guess what wire to cut or is it a replica of a real device they may encounter?

It's just a game. The Air Training Corps is a Volunteer Youth Organisation overseen by The Ministry Of Defence. They are not funded by The MoD and recieve the majority of funding through being a charity.


Thanks Scubasteve I apreciate that this could be really complex with all sorts of booby traps etc, but as I mentioned above it's just a game.


Cheers

Craigey1
 
I'd recommend calling it something other than a bomb. It's a touchy subject these days. Who needs to get arrested and questioned over a bad choice of a name for a kids toy.
Personally, I'd have the thing spray you with a little water. call it the "The Pisser". Kids will love that. :roll:
 
these are kids 13 - 21 yrs of age. They fire rifles and do are promoted to have an interest in the armed forces. I don't think they or their parents will find it offensive as it is only for a team exercise, and isn't going to hurt anyone if it goes wrong. Where as if a rifle goes wrong, they can do some serious damage.
 
First stab ...

Just thought you people would like to see this...
As we often discuss 'breadboards', here's my prototyping board close to full :wink:

The circuit is based on craigey's posted circuit (above) with a few alterations for
leading zero suppression (saves power and looks better)
better (more sensible) ripple-carry
counts in minutes and seconds rather than just seconds
display changes colour from red (counting) to green (stopped before zero)
all running on a 9v supply

We (cragey and I) are still discussing this and working on it together :wink:

The single red LEDs are just indicating what the ripple carry outputs are doing, the green is the clock pulse.
Yes, those 7 segment displays are HUGE - look at the 16-pin ICs at the bottom of the breadboard :shock:
 

Attachments

  • Timer-1.JPG
    Timer-1.JPG
    86.2 KB · Views: 4,209
  • Timer-on.JPG
    Timer-on.JPG
    73 KB · Views: 4,202
Hey mechie, where'd you get the breadboard modules ?

Been looking for something like that so I can size the breadboard to what I need.
 
Oh yeah, and as for hints, as with mechie's breadboard modules, I'd make it out of 4 pcb's, and try to make it as confusing as possible by putting 1 of the pcb's on each side of the box you plan to put this thing in. leaving the top for the display and bottom free to use as a way to open the box.

Or if you don't want to be too traumatic to these kids, I'd say stack 2 layers on top of each other, which in bomb making isn't unheard of, using the top as a dummy bomb, and the bottom as the real guts, but in this case, just build them as you would the 4 layer one, and instead of mounting them edge to edge, make them flat against each other, with enough wire to seperate them and look at everything, so probably a good foot on each wire.

Heh I'm so evil... 3D bomb, 4 layers, lots of wires.
 
Also if you ever go up in rank and train bomb defusing, or just want to play a joke on someone, as I plan to, you can always think about adding traps, and dummy circuits (no actual power to them).

Traps could include Barometric Pressure Switches, thermal sensors, IR transmitter with a 5 or less degree angle that detonates the bomb if someone puts their hand or tools in a certain spot.

Dummy circuits could include stuff you just strip from broken stuff like hard drives, servos, stuff that looks important, etc.

Also the payload could include stuff like a buzzer, a small firecracker, a container of some rather offensive odor that breaks open when it detonates, or a real bomb several hundred feet away.
 
they sound like some real fun ideas! Currently though the cadets will be getting clues to disarm the bomb, (not enough clues and they will probably cut the wrong wire resulting in detonation or speeding up the timer).

However traps etc, may make it in to the 2nd / 3rd revision of the completed product. Just for fun :p
 
Just an FYI, barometric pressure switch would only work if you plan on teaching disarming bombs mid flight, they work by detecting the pressure of the air, when it gets to a certain elevation it closes and BOOM!!!
 
I didn't know that. Thanks. I suppose we could always get them to run up a mountain with it!

You've given me an idea though.......Could use touch sensative switches, so if the wrong section are touch even gently, then timer speeds up, or sets off a couple of small bangs. Just to scare the heck out of them!!!
 
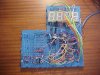
Here's an idea for you, I'll make the bomb in my head and explain, I suck at drawing schematics so you may want to print this out.

Stuff you'll need to acquire.

Get a few Estes Model Rocket engine packs from your local hobby shop.

Pull out the ignitors, and a piece of paper and make a 2"x2" square. Open one of the rockets, and scrape about a teaspoon full of powder from the engine (The Dark Grey/Black Powder, should be the longest one, DO NOT SCRAPE OFF THE STUFF FROM THE TOP!!!, this is high explosive and will most likely do serious damage to one or more of your cadets), pour it into the paper and place one of the ignitors inside. Roll it into a ball so the ignitors are still outside the paper ball. (Make one of these for each cadet)

Okay, get ahold of a cheap computer, something around $50 from ebay or something, don't worry about specs, you'll only need a few parts.

Take out the hard drive and gut it. (You can use the disks inside as target practice if you want, they break in a rather nice way)

Take the IDE cable and set it aside.

Now unsolder the socket the IDE cable was attatched to and remove two of the pins that are parallel to each other (Only the ones inside the socket, you're still going to want to connect these to your PCB later) this is where the real "bomb" meets the dummy, make a small mark on the inside with something bright, like some orange paint

Now take out the memory and unsolder the sockets (these are purely for show, no actual use in the "bomb")

If the computer has a sound card with a cable attatched to a CD Rom drive, remove that (this will be your fake connection between the real guts and the fake)

Unsolder the socket and set it aside.

Now take care not to get yourself killed on this next one.

Remove the power supply and cap the plug, open this baby up and discharge the main capacitor, unsolder the capacitor and close it up.

Strip the connector coming from the CPU Fan (the female connector), remove some of the insulation from the ends, and cut two of the wires from the top of the connector, bridge these two (mark them with a piece of tape so you won't forget which ones they are) and hide them so you won't be able to see it from a casual glance.

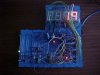
Now get out something that can cut PCB with little damage (probably a hacksaw) cut around the CPU and sand down the edges, now get out a drill (not sure of the measurements) and drill 4 holes large enough to fit a spacer in around the corners.

Now take a look at the schematics. See where it says instant detonation, here's where one of your parts is going to come into play.

Remember that connector from the fan you stripped, those two wires you bridged are going to be where this part of the bomb is. (The current travels up one wire and down the other, out to the "real" bomb)

Take the stripped ends and connect them to the pcb, making sure the two that are bridged are maked, this is probably where your cadets will start as this connector goes to one of the plugs on the dummy power supply.

Now the CPU will be mounted somewhere where it looks important, doesn't matter where so long as it doesn't actually connect with any of the "real" bomb components, once you have found a place for it, drill 4 holes onto the bomb PCB in line with the 4 you drilled into the computer pcb around the CPU.

Mount the memory sockets next to this (also artificial)

Okay now the hard drive and IDE socket, mount the hard drive on the side of the bomb, and place the IDE socket where "cut here for maximum timer speed" is, remember those two pins you removed from the inside, here's why, when you solder in the socket, don't clip these two pins on the underside, instead, push them together and solder them together, replicating the above idea, if they seperate the hard drive from the "bomb" by pulling out the IDE cable, nothing happens, but if they see the orange paint, they may inspect further, see the missing pins, look underneath and try to seperate them, or unsolder them, resulting in maximum timer speed.

Now that that's mounted connect the hard drive to the socket via the IDE cable.

Remember the "Cut here to stop wire on the schematic" well pull out your sound card connector, and if you only have one socket, strip one of the ends.

Mount the socket next to IC input, and connect the cable to it, making sure the connector you use corresponds with a wire that has a contact on the connector (one of the pins on the socket has no function, thus it also has no contact in the connector, so no connection between the wiring.

Now follow the wire used to connect to the IC input and solder this one down next to set switch 5.

So if they pull this connector, they just disarmed the bomb.

Now Where it says bomb output, just rig one wire to each end of the ignitor ball I told you about earlier. Place this inside a film canister (LEAVE IT OPEN!!!) Mount this into a corner where no parts are near and the cadets face is away from. This is the BOOM!

If they fail, pop, out shoots some flames, and burning cinders. Make sure they wear a face shield, or at least safety goggles.

OR, if fireworks are legal in your state, consider making your own low voltage ignitors, and hooking up a smoke bomb to it, and put it inside a film canister, close her up, and drill a hole in the top, and you can also put it parallel with a buzzer.

:twisted:

Let me know if I didn't properly explain anything before you try to do this one.

I know if I was better at schematics, you'd understand a whole lot easier.

Also, when all is said and done, make sure you weave all the wires together, so it makes a confusing braid, that way they'll pour over this, probably waisting valuable time.

Oh... And NO RED OR BLUE WIRES :p
 
Also, could you guys hook me up with the places you got the parts from, the places I go to don't seem to have these parts, well, maybe one has one or two, and another has one or two, etc.

If you could give a product list that would be great.
 
That prototype board

Nostrafus,
The prototype boards are called BimBoards,
made by BOSS Industrial Mouldings, Mildenhall, Suffolk, IP28 7DE, UK. Tel (01638) 716101.
HERE.

I have bought them at various places in the past, so this is not a unique supplier :)
Notice the use of an 'extender board' in my photo - under the LEDs - to correct the hole spacing to 0.1" across two boards.

Most of the components are easily obtained from anywhere, Radiospares (http://rswww.com) or Maplin (http://www.maplin.co.uk). Radiospares sells everything including the large 7 seg displays and the little BCD rotary switches (bottom centre of my photos) but insists on opening an account with them.

ps.
If there is
no red or blue wires
will it still be a bomb :?:
How can you "cut the blue wire" :?:
 
Heh, true true

And Meh!!!, they're all UK companies, :( would have to pay extra to have it flown over, sorry if I'm a pain in the ass... but paying in pounds gets a bit expensive if you know what I mean, 1 1/2 times as much in USD.

It also says that IC 4072B has been discontinued...
 
Status
Not open for further replies.

Latest threads

New Articles From Microcontroller Tips

Back
Top