Continue to Site

Welcome to our site!

Electro Tech is an online community (with over 170,000 members) who enjoy talking about and building electronic circuits, projects and gadgets. To participate you need to register. Registration is free. Click here to register now.

  • Welcome to our site! Electro Tech is an online community (with over 170,000 members) who enjoy talking about and building electronic circuits, projects and gadgets. To participate you need to register. Registration is free. Click here to register now.

Need Help recreating circuit with 25 year old schematic

Status
Not open for further replies.
Like I said... in ISIS when the pot is one extreme the leds sweep fast and then when its at the other it sweeps slow. to make it go back and forth you need to hook the flip flop to the up/down input of the counter....However! i put 200ohm resistors on the led pack and ....You're right that's what the flip flop is for..

Back and forth the pot slows it down then speeds it up
 
Ian - that is terrific. It is good to know the schematic is (mostly) correct. Could you explain exactly how I need to alter the circuit to make it work how I want? Or better yet, can you provide a screenshot of the schematic you created in ISIS?

Again, this is all new to me, so I need detailed info :)

Thanks,
Kyle
 
Sorry Kyle...I'd gone to bed when you last posted, 11:30 here the sims at home. So I;'ll try and draw it again here at work.


Right here we go... The kick start is just for ISIS ( simulations have no dynamics )

Oh and the bar graph in ISIS is ten led's not 8 so adjust to original design
 

Attachments

  • ledsweep.GIF
    ledsweep.GIF
    10.3 KB · Views: 162
Last edited:
Thank you Ian. I am running to the store today to get some 200 ohm resistors and then I will set my breadboard up just as you've laid it out. Hopefully I will get the same result you did!

I will post my results...

Kyle
 
Haha no sorry, I had registered under one user name a while back but couldn't remember the user or password so I created another to post this question...I have since remembered the other user name but I accidentally replied with the wrong one!
 
well, everything works perfectly except the LEDs still only light in one direction, not back and forth. I checked the voltage at Pin 1 of 4013 and it was a constant 9v.

The voltage at pin 10 of 4510 bounced all over the place, from near 0 to around 6v.

Any suggestions?

Kyle
 
Last edited:
Hey guys,

I am back with another issue regarding this project. I was able to successfully re-create the led display that I was working on at the start of this thread using a solderless breadboard. I even went so far as to add a 2804 darlington so I could power some higher wattage bulbs...everything worked perfectly when running it from the breadboard. So, I wanted to get a PCB made of it and using Eagle I designed the boards. I had a set made and they don't work! When I hook the power up, I only get one LED that lights and stays on, no back and forth motion. I've been over and over these designs, comparing them to my breadboard and to me, everything looks the same. I did split the circuit over two boards as the enclosure I need to use isnt big enough for one board. Can anyone provide any insight as to where I go from here?

Thanks,
Kyle

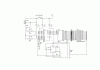
Here are the boards. Also note that the 220 ohm resistors connected to the LEDS are not on these boards but they ARE part of the circuit. Also, for the pads marked LEDs, I am soldering wires to an led bar array that is mounted on the enclosure itself, not the circuit boards.

Board 1:
**broken link removed**

Board 2:
**broken link removed**
 
Last edited:
Hi... I'm a tad worried about the size of your ground tracks... They have to travel an awful long way.. It would be hard to get the RC to oscillate.. As a temp measure could you take an external wire from the GND input to the 4049 pins 7 & 8... Just to bolster that side of the circuit up?

One other thing is the darlington array soldered in? as that will be pulling some power... I wonder if its staving the rest...
 
Last edited:
Hi Ian,

Yes the darlington is soldered in....I will try running the ground to those pins to see what happens...will check back in soon with the results.

KISS - yes they are plated thru holes.

Thanks,
Kyle
 
Hmm, interesting. I hate that I keep ordering boards that don't work. I've been using BatchPCB...they are the cheapest I've found but they take 3+ weeks to arrive. So every time a board doesn't work, it sets me back another 3 weeks! But I am committed to getting this thing to work!

Kyle
 
Status
Not open for further replies.

New Articles From Microcontroller Tips

Back
Top