Continue to Site

Welcome to our site!

Electro Tech is an online community (with over 170,000 members) who enjoy talking about and building electronic circuits, projects and gadgets. To participate you need to register. Registration is free. Click here to register now.

  • Welcome to our site! Electro Tech is an online community (with over 170,000 members) who enjoy talking about and building electronic circuits, projects and gadgets. To participate you need to register. Registration is free. Click here to register now.

LED sequencing/animation

Status
Not open for further replies.

supersith22

New Member
Hello everyone,
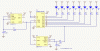
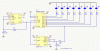
I'm pretty new to electronics and the most complicated circuit I've ever built is a 555 blinking LED; I can build things successfully, but I'm not very knowledgeable and things usually only come out nicely if I am instructed on what goes where =P. My school team is trying to make a sign for an event and we wanted to make a light-up, animated shooting star. I was wondering how this could be done, if at all, with LEDs. I did find a circuit that may work but I want something that would light up one LED and then the next but leave all of them on until the sequence was complete. So, one lights up and then the next and the next and then like a big circle of LEDs at the end and stay lit for a few seconds and then start again. Does anyone have advice?
Thank you, Nick.

PS here is the circuit I found: MetkuMods - Because you love your hardware!
 
That won't quite do the trick, sure it will turn one on at a time, however when it gets to the next led, the previous won't stay on.

A microcontroller is probably over your head and budget, so I don't know what to suggest, possibly change the animation?.

Mike
 
Or try this one. U2 clocks the shift register, which gives the chasing effect (without the leds extinguishing). When all leds have been lit, and then a few more seconds (C2 charging), U3 clears the shift register and then after a few more seconds (C2 discharging), the sequence starts again.
 

Attachments

  • SEQ.gif
    SEQ.gif
    25.1 KB · Views: 890
Sorry, LEDs were backwards on the last circuit I posted. Try This:
 

Attachments

  • SEQ.gif
    SEQ.gif
    25.9 KB · Views: 569
Sorry, LEDs were backwards on the last circuit I posted. Try This:

Hi dougy83,

I'm afraid your timer IC won't be triggered that way. It's floating if the counter output is low and goes high when the counter output is goes high.

Triggering must be a negative going pulse edge.

Boncuk
 
Hi Nick,

here is a circuit which offers you more than one option for the shooting star.

Presently it's wired to count up, meaning the picture (depending on LED arrangement) will look like an exploding star.

To "reassemble" the star the count sequence can be selected to count down. :)

The clock frequency is variable from 9.361 to 24.92Hz and the delay time between cycles is variable from 1.099 to 11.11 seconds.

If you intend to connect LEDs directly to the shift register outputs I recommend using low current LEDs (If=2mA). If you plan for high intensity (20mA) LEDs use the option as shown at the right hand top of the schematic.

Boncuk
 

Attachments

  • SHOOTING-STAR-1.pdf
    91.6 KB · Views: 540
Hi dougy83,

I'm afraid your timer IC won't be triggered that way. It's floating if the counter output is low and goes high when the counter output is goes high.

Triggering must be a negative going pulse edge.

Boncuk

I didn't understand what you said. What is floating? What counter are you referring to? Who is triggering?
 
LED Flashing Circuit

Can any answer this question on my design?
 

Attachments

  • LED flasher circuit.pdf
    14.4 KB · Views: 377
I didn't understand what you said. What is floating? What counter are you referring to? Who is triggering?

U3 can't work as well as U1. U3 receives a positive level shift which will stay there forever.

U1 can't work because charge and discharge resistors are missing.
 
Can any answer this question on my design?

R1=560Ω, R2=1.43MΩ, C1=1µF, R3=47Ω, R4=250Ω.

You should be able to calculate at least for R3 and R4.

The formula: RL (Ω) = VDD (V) - (Uf (V) * number of LEDs in chain) / If (A)

So for R3 you calculate: RL=9-(2*4)/0.02; RL=50Ω; next suitable standard value is 47Ω. (The output does not switch precisely to VDD)

Use the same formula for R4.

Boncuk
 
U3 can't work as well as U1. U3 receives a positive level shift which will stay there forever.

U1 can't work because charge and discharge resistors are missing.

U2 provides a clock to the shift register, which clocks in Logic '1' along the outputs. When the 8th output becomes high for a time determined by R10 & C2, U3 out goes low. This clears the shift register & all of its outputs go low. C2 is now being discharged through R10 by the 8th output of U1 (which is low due to clearing); when discharge sufficient, U3 output goes high and allows the shift register to clock in the logic '1' once again.

I'm not sure what you're having trouble with, for U1, the clock is edge triggered, while the clear pin is asynchronous.
 
When the 8th output becomes high for a time determined by R10 & C2, U3 out goes low. This clears the shift register & all of its outputs go low.

Just refer to the NE555 datasheet. It can only be triggered by a negative going pulse edge at pin 2 (TR).

I mixed up U1 and U2, assuming IC count from left to right. U2 will not provide clock pulses with that wiring.
 
Just refer to the NE555 datasheet. It can only be triggered by a negative going pulse edge at pin 2 (TR).
The NE555 output goes low when the voltage on pin 6 exceeds 2/3 VCC; the output goes high when pin 2 is below 1/3 VCC.

I mixed up U1 and U2, assuming IC count from left to right.
They are clearly labelled.

U2 will not provide clock pulses with that wiring.
And why is that? Perhaps you should wire it up and see for yourself. In the mean time, feel free to read & understand the 555 datasheet & 555 operation and maybe even have a play with a 555.
 
Status
Not open for further replies.

Latest threads

New Articles From Microcontroller Tips

Back
Top