Continue to Site

Welcome to our site!

Electro Tech is an online community (with over 170,000 members) who enjoy talking about and building electronic circuits, projects and gadgets. To participate you need to register. Registration is free. Click here to register now.

  • Welcome to our site! Electro Tech is an online community (with over 170,000 members) who enjoy talking about and building electronic circuits, projects and gadgets. To participate you need to register. Registration is free. Click here to register now.

i want to buld my own CT

Status
Not open for further replies.
Wow, just call me a bad engineer, I never caught that. You are correct!

This application note describes a single-phase power/energy meter with tamper
logic. The design measures active power, voltage, and current in a single-phase
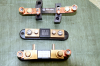
distribution environment. It differs from ordinary single-phase meters in that it uses
two current transducers to measure active power in both live and neutral wires.

This enables the meter to detect, signal, and continue to measure reliably even
when subject to external attempts of tampering.

Very, very good as I sure missed that. In my humble defense I have several things going so I failed to look in detail at the schematic and read all the text in detail. That is my weak excuse. :)

OK, you are correct and here is what is going on. Normally a watt hour or kilo watt hour meter would only need a single current sensor. Remember how I said Current to the Load = Current from the Load? That holds true. The key words in the above quote are "This enables the meter to detect, signal, and continue to measure reliably even
when subject to external attempts of tampering". Since this sort of power meter is designed to measure a customer's power usage and the supplier (power company) is paid for the amount of power used, they don't want people stealing power. That is the logic behind using two sensors. At any given time the input current should match the output current. Line 1 should match Neutral.

The currents aren't added but compared. If I have 10 amps in I should have 10 amps out and the In / Out difference should always be Zero or if we place In / Out it should always be a 1.

I have not looked at the code for the AVR so I don't know how the data is actually used but that is what is going on. You do not need two current sensors to get accurate and reliable power measurements. You need two power sensors to make the metering tamper proof.

Did your teacher assign this particular design using the AVR?

Ron
 
You helped me a lot! why would i think you as bad engineer! it is not your responsibility to read all of my matter! You are doing a favor to me and I'm grateful for that.

No, my teacher did not assign any power meter, I chose among the available open source energy meter from online. This what i've found. Actually i want to add a modem to send the reading to a central office after the metering part complete.

I've attached a picture in my previous post to know the connection from ct in both T1 And T2 with one CT, i will use one CT if metering part can be done using one CT. I need to get the consumption data through the modem to a server, that's what i need. so i need to build my meter.

Can you explain
You need two power sensors to make the metering tamper proof.
please.
 
Hi Again

My comments as to "bad engineer" were aimed at humor. I try to keep things light hearten and funny. Learning should be fun when possible.

OK, when I said you need two current sensors to make the metering tamper proof here is what I was getting at. There are several ways to measure current in a circuit. For example using a CT we can measure what we call high side current (High Line Current) or we can measure low side current (Neutral Line Current). For a given load they will be the same amount of current as we covered. Remember current high is equal to current low.

Now let's say my power company, the people who sell me electricity, only measured the low side current. They place a CT on my neutral line. Neutral always ties back to Ground. What would happen if I placed a resistance to ground before the power company CT? What if I somehow routed some of the return current before it reached the power company CT? If my load current was 10 amps and my line voltage was 230 volts my power would be 2.3 KW. But if I cheat and steal I could shunt some of the return current to to neutral or ground before the power company CT.

If my load is 2.3 KW and I run that load for 1 hour I will use 2.3 KWH (2.3 Kilo Watt Hours) of power. However, if I shunt half the current to Neutral before the CT the CT will only see 5 amps or about 1.15 and if that load runs like that for 1 hour I will only be charged for 1.15 KWH and not what I actually used. Thus, we have "Tamper Proof" where the power company monitors the current in and the current out and Iin and Iout had better be the same. Making it tamper proof prevents theft or stealing power.

How about another example of where we closely monitor current in and current out? Here in the US the GFIC (Ground Fault Circuit Interrupt) is very popular. We use GFCI outlets as well as circuit breakers. These devices use two current sensors. They are used to instantly kill the power when current in does not equal current out. They are a safety device to prevent electrocution. A Google of GFCI should bring up plenty of results.

Hope all that helps.

More Later...........
Ron :)
 
My problem with CT is solved, I got 200:5, can you tell me what is the change are needed for the circuit to use this CT?

Another thing is, Can i use Shunt sensor in this circuit?

Or can i use Hall sensor in this circuit? If i can, can u tell me what change are require to use those sensor?
 
After work today I'll give you some ideas. I will be off work a few days and have some time to put into this and help more (American Holiday Thanksgiving). You can use the single CT and 200/5 is fine but you will need to modify your code for the AVR chip. That is something I am not at all good at as I never worked with AVR and my C programming is terrible. I will write more later.

Ron
 
OK, let's look at things. You want to build a power measuring system so lets start at the beginning. You will need some sensors to give signals proportional to Current and Voltage. So everything starts with choosing the current and voltage sensors since the project will be designed from them.

There are many types of AC current sensors. Each has both good and bad points. The oldest and likely most popular is the current transformer. They use a primary consisting of the main current carrying conductor and provide a secondary output current proportional to the mains current. Generally a shunt or burden resistor is placed across the secondary to generate a voltage proportional to the mains current. This signal requires signal conditioning to become useful, generally amplification of a low milli-volt signal and maybe some low pass filtering.

The Hall Effect current transducer is a much newer way to sense mains current and has become more practical today offering greater accuracy and other advantages. Given a choice I prefer using sensors like the ones shown here. Sensors of this type offer a voltage (0 to 5 volts or 0 to 10 volts) proportional to mains current, they also offer a current out (0 to 20 mA or 4 to 20 mA) already fully signal conditioned. Everything (signal conditioning) is done in a nice single package.

For voltage sensing it can be as simple as a voltage divider followed by some signal conditioning or the use of a Voltage Transducer some examples of which can be seen here. I prefer the latter for voltage sensing.

I have made a simple little power metering demo program that simulates Voltage and Current and you can download it here. It is a simple watt hour simulator where you use the vertical voltage and current scroll bars to set voltages between 220 and 250 volts and 0 to 200 amps. The file downloads as a zip folder so just download the file and extract the contents. Then double click the .exe file to install it. I will post the code soon if you have interest. It should provide an idea of how things work.

Ron
 
I've got the idea about this before, But the information u provide has given me refreshing memory again. If we can stick with the previous project of avr 465, it would be better, cause i've already bought almost all the things accept ATmega 88, instead i'll use atmega 8. Now i need to know how the current reading and voltage reading are multiplied in avr 465 example. If i want watt houre, i need p=VIcosO. If you explain both the current sensor and voltage sensor part from the avr465. I might can built it with atmega88.

And yes, please give me the code. I also try to make that work so my understanding will be better. I like to use hand made sensing more than ready made element like you gave above.
 
I first suggest you give this a read as to true and apparent power which gets into what you mentioned. The math in this case, the example AVR we have been looking at, is done in the software. I have not seen the software so have no idea how they do the math. The simple little example I wrote only is an example of V * I + Watts and the power is cumulatively added. It would only be true of a purely resistive load. When it loads all the text boxes show their names in the program so they can be identified looking at the code.

Code:
Private Sub cmdReset_Click() 'Clear Values Reset the data to nothing
txtVolts.Text = "00"
txtAmps.Text = "00"
txtWatts.Text = "00"
txtWattHours.Text = "0.000"
txtKwh.Text = "0.000"
txtTimeStart.Text = ""
txtTimeStop.Text = ""
txtTimeElapsed.Text = ""
VScroll1.Value = 250 'Set VScroll1 to 250 volts
VScroll2.Value = 4 ' Set VScroll2 to 4 Amps
End Sub

Private Sub cmdStart_Click()
txtTimeStart.Text = Now 'Get current Time & Date on Start
Timer1.Enabled = True 'Enable Timer1 at 100 mS
'Timer2.Enabled = True 'Enable Timer2 at 100 mS
End Sub

Private Sub cmdStop_Click()
Timer1.Enabled = False 'Stop Timer1
'Timer2.Enabled = False 'Stop Timer2
txtTimeStop = Now 'Get current tims & Date on Stop
txtTimeElapsed.Text = DateTime.DateDiff("s", (txtTimeStart.Text), (txtTimeStop.Text)) & " Seconds" 'Get Elapsed Time Stop - Start

End Sub

Private Sub Form_Load()

End Sub

Private Sub Timer1_Timer()
txtVolts.Text = (VScroll1.Value) & " Volts" 'Place Voltage Scroll Value in txtVolts
txtAmps.Text = (VScroll2.Value) & " Amps" 'Place Current Scroll Value in txtAmps
V = Val(txtVolts.Text) 'Calculate Power P = V * I
I = Val(txtAmps.Text)
P = V * I
txtWatts.Text = (P) & " Watts" 'Place Watts in txtWatts
Dim WattHours As Long
s = WattHours
r = Val(txtWatts.Text) / 36000
s = s + r
t = Val(txtWattHours.Text) + r
txtWattHours.Text = Format(t, "0.000" + " WH")
txtKwh.Text = Format(t / 1000, "0.0000" + " Kwh")
End Sub

The timer function runs at 100 mSec.

Again, when it comes to the AVR code you will need someone familiar with programming them as I am far from a programmer type. :)

Ron
 
Actually my question was related with the circuit. T1 and T2 are current sensor, the will give me current reading, so i get the current reading to my ADC from T1 and T2 for active and neutral line. Another input has came to (ADC2)PC2, is that voltage reading or voltage sensor for circuit?
 
Yes, the line going to PC2 is the voltage derived from a divider circuit and has an offset bias applied. T1 to PC0, T2 to PC1 and the voltage to PC2.

Ron
 
Halo Ron, Can you tell me why different gain have been used in this circuit? I mean the op-amp gain controlled by MCU for low, high, and medium. Why is that? Another wuestion is if i use 200:5 and if i wanna add load above 10A, can i calculate the RS say for 20A like the way you did for 10A?
 
To fully understand the gain scheme you would need to actually look at the code and note at what points the gain autoranged. My guess is for low currents maybe below one amp (remember this is only a 10 amp design) they want to have higher gain on the signal. Thus autoranging low, medium and high gain. Using a 200:5 CT you can have up to 200 amps. If you loop the primary twice through then you would have a 100:5 using the same CT you have. I believe I covered that technique and it may have been in some of the links. You can scale this however you choose.

Ron
 
Halo, I've built T1 T2, and the voltage part of the circuit. I've to question today.

There is an equation no 8 in the doc, where they have used 68ohm for RS, i've calculated it with 215:5 A CT using 6 Ohm resister which give me nearest value .34883Vrms. But you gave an example previously where you have calculated 1.08 ohm value for RS using 200:5. Which resistor should i use now? 6ohm or 1ohm? Then how do i convert .3488Vrms to .9Vpp?

second question is i did not programmed the MCU, can i connect the T1 and T2 part with CT? as i do not have any control over the switching IC. Will op-amp give any kind of value?
 
This is what I stated:

Remember our 10 amps that gave us .004 amp through the 68 ohms for a voltage of .272? Well let's amplify that .272 * 1.25 and we get 0.340 Volts RMS. To get the peak value we multiply that 0.340 * 1.414 = 0.48076 Volts Peak and the Peak to Peak is now = 0.4876 * 2 = 0.96152 Volts Peak to Peak. There are a few ways to arrive at this number as can be seen in the AVR sheet but you should get the idea.

So in conclusion you can use any number of current transformers. The magic or trick becomes working with the CT ratio (keeping in mind the CT maximum current) and of course the Rshunt value.

If for example we used the shunt I posted pictures of earlier it was a 200:5 ratio with a max current of 200 amps. Since 200 amps = 5 amps this would be a 40:1 ratio. If we take 200 / 5 = 40 we get a 40 to 1 ratio. So now if we pass 10 amps through the primary the secondary current will be 10 / 40 = .250 Amps. We want a maximum voltage of .272 volts RMS so we get .272 volts / .250 Amp = 1.088 Ohms for our Rshunt. We know that .272 volts RMS will give us the peak to peak voltage we want.

That was based on having a 200:5 CT and a maximum current like the example AVR circuit of 10 amps. Rather than their CT with 68 ohms I used about 1 ohm for the CT you have. We still have a maximum 10 amp range.

I am at work so do not have access to everything but as I recall they used a 4066 IC for the ranging. If you build the circuit less the AVR but with the Op Amp and the 4066 you could simulate the ranging by applying a voltage like 5 volts to the 4066 pins that are used for switching. Then measure the op amp outputs that would be going to the AVR. This is the 4066 IC data sheet, the control pins are what you want. You need to understand how this part works. I can post more over the weekend.

Ron
 
Halo again! I've done almost all the part of the avr application. But i want to use LCD display, in order to do that, i might use another micro controller, but I'm confused that what kind of out put would i get from the DPP and DPN pin, can u discuss the out put part of the meter pleas? specially the data which i expect as output to display?
 
Sorry but the uC and display are not things I am good with, not my forte. You may want to start another thread in the uC sections of the forum with your question(s).

Ron
 
Shunts are used more for DC current sensing? I also replied in the new thread. I also got the PM. I thought you had the CT? Why a shunt?

Ron
 
No, For AC current sensing, i want to use shunt. Because if i use shunt, the meter can be built in cheap price, i have the CT, but my instructor asked me to do it with shunt to make the meter cheaper. I've attached the analog part in my previous comment, if you can give me some knowledge and calculation, it will increase my knowledge.

Another thing is, I'm getting wired problem with uC, so i would like to get a good understanding about shunt sensor circuit.

The display part problem have done, so i'm back to circuit part again. I've solved the problem of display by adding another micro controller. any way, i wish to use shunt sensor to make a cheap energy meter.
 
If you use a shunt you get a shunt output about the same as what we had with a CT. You get a milli-volt output that is proportional to the current flowing through the shunt. Attached are a few images of the shunts I am speaking of. A shunt is no more than a low resistance. The output of the shunt is a voltage drop across that low resistance.

I have no clue what the instructor is getting at as to metering?

Ron
 

Attachments

  • Shunts1.png
    Shunts1.png
    1.1 MB · Views: 168
  • Shunts2.png
    Shunts2.png
    781.6 KB · Views: 139
Status
Not open for further replies.

Latest threads

New Articles From Microcontroller Tips

Back
Top