Continue to Site

Welcome to our site!

Electro Tech is an online community (with over 170,000 members) who enjoy talking about and building electronic circuits, projects and gadgets. To participate you need to register. Registration is free. Click here to register now.

  • Welcome to our site! Electro Tech is an online community (with over 170,000 members) who enjoy talking about and building electronic circuits, projects and gadgets. To participate you need to register. Registration is free. Click here to register now.

Driving Stepper Motor Gauges

Status
Not open for further replies.

jpanhalt

Well-Known Member
Most Helpful Member
Background:
For the past few years, I have been working on small projects to help control my hobby farm equipment. One such device is to show when pallet forks attached to the front-end loader are level. I used an accelerometer to measure level and a GLCD for display. The prototype "worked" but had two major deficiencies: 1) The display was hard to read in all lighting conditions; and 2) "Bounce" made the reading too variable for its intended purpose.

To address the bounce, I am looking at using a magnetic angle gauge. Here is a previous thread related to that: https://www.electro-tech-online.com...gnet-distance-adjustment.144645/#post-1220904 My PCB from OshPark should arrive Tuesday.

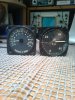
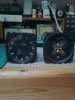
Regarding the readability issue, I have been thinking of using an automotive stepper motor gauge. The one I have chosen is the Switec, which draws about 20 mA or less per phase (https://www.tindie.com/products/TheRengineer/analog-gauge-stepper-breakout-board/ ). There are several application notes describing driving such gauges, but all of the ones I have seen use a full-bridge or half-bridge driver between the MCU, mosfets, and gauge. Three very useful notes are Microchip's AN1307 and AN906B and Cypress's AN2197 (https://www.cypress.com/?rid=2638). I have been working on adapting the code in AN906B (https://ww1.microchip.com/downloads/en/AppNotes/00906B.pdf ) to my purpose. Rather than using a potentiometer and ADC for input, I will just be reading a value from a register.

Questions:
1) Does anyone have experience driving such low-power stepper motors directly from a PIC MCU?
2) At power up, how do you determine what the indicator is reading? In other words, how do you "zero" the stepper?
3) That particular stepper supposedly has 600 full steps per 315° rotation. It seems that simply using half-steps, rather than micro-stepping, should be adequate. Any comments?

Regards,

John
 
Last edited:
I can only answer question 2. At power up you would have to drive the stepper motor to a mechanical stop for long enough to be sure it had reached the stop. (This assumes that you do not need a full 360 degrees movement.)
 
Thank you both.

From what I have read so far, there appear to be two common ways to detect when zero is reached. One just uses an optical interrupter. The other looks at the emf generated by the second coil while moving the motor to its stops. The latter method may or may not integrate that voltage. I think that is the method to use. It may also be a good reason to add a smart driver chip rather than depend on the MCU itself. BTW, the 33970 has replaced the 33991 and is RoHS.

John

UPDATE:

It appears the MC33970 and MC33991 are relatively new (2007) but already at end of life. Maybe air-core gauges don't require determining zero? The NXP SA777A (**broken link removed** Figure 5) shows that a code # gives an angular deflection, and if one assumes that zero is determined mechanically based on the construction of the air-core motor, then it won't be necessary to set a zero each power-up cycle. If so, great news. What could be simpler? I suspect the motor I bought is the older (?) stepper design rather than the moving magnet air-core design. Not a lot of money lost, but will wait to see, since the datasheet for my motor is vague as to its construction.

EDIT#2;

I haven't paid attention to automotive gauges since the days of cable-run speedometers. It appears stepper gauges are newer than air-core. So, I will wait until my stepper comes, and I can play with it.
 
Last edited:
John:

At least the motors are a dime a dozen. http://www.wholesalesteppermotors.com/
Maybe your right that a dedicated IC would be better.

Maybe when your all done, your have material for an article on ETO?

I never had any real gauge issues in any vehicle I've owed ow my parent's owned except for replacing real lamps and a gas gauge issue in a 1968 vehicle.
 
As this is a one off project and repeatability (on other vehicles) isn't required, why not use a model servo? Very cheap, position always known, very repeatable.

Mike.
 
Hi Mike,

Servos are an option I always consider. I have bags of them sitting around from my years of modeling and still continue to collect them. One of the biggest problems with modern RC models is they don't crash frequently enough due to equipment failures. The last model that I built up was about 3 years ago, so I quickly searched on what was new. One thing, Hitec has now switched over to the Futaba 25-spline servo arm (yuck :) ). With one other exception, things are pretty much the same. Typical servos with ±45° movement take a signal change of about 800 to 900 uS for full range of movement. The dead band for non-digital and many digital servos is about 8 uS, which translates to 0.9° to 1° of error, mostly evident as hysteresis. For newer and more expensive digital servos, that dead band has been reduced to 2 uS (about 0.2°). The hysteresis can be bit of a pain, but in my application it wouldn't matter much. I intend to have the display pointer exaggerate the actual error in alignment. Thus, an error of 1° in actual alignment , which translates to 3/4" , will be displayed as 2° to 4° or maybe more.

Right now, though, I am intrigued about how the zeroing problem with stepper motor gauges is addressed in practice. I am thinking of just swinging it using full steps between the stops. My interest is in the way the stops are detected in practice.

FWIW, that other exception mentioned above is what Hitec calls a Tail Rotor Servo (e.g., HSG8315BH, **broken link removed** ) . This servo came out about 2 years ago and allows use with refresh rates of 200 to 560 Hz. In my experience, most standard servos start acting funny when the refresh rate exceeds 100 Hz by very much. Unfortunately, that servo is spec'd for only 6.0 to 7.4V operation. Its center position is 760 uS and its dynamic range is a bit unclear. The link given above gives that range as 760 uS to 1020 uS, which seems a bit narrow. The servo cannot be used directly with standard RC receivers, but that refresh rate may get it into a range that could be controlled by the PWM module of PIC MCU's, if one should want to do that.

Regards, John
 
2) At power up, how do you determine what the indicator is reading? In other words, how do you "zero" the stepper?

Presumably you're fairly young then? - and don't remember the 1541 disk drive for the Commodore 64, Vic20, C16 and Plus4? :D

The designers neglected to fit an 'end stop' switch to the track stepper motor system, so regardless of where the head was they stepped back 256 times to ensure it was on the first track - this made an awful noise :p

So unless you can come up with some method of physically detecting the end stop, then you probably need to do the same.
 
That guy has quite a fascination with simulated aircraft instruments -- everything from D'Arsonval, air core, and stepper motor movements to servos. His full panels are impressive.

John
 
This technique might be good for making the face of your gauge.

**broken link removed**
 
John:

If you need a custom face, I can probably print one for you, I have the adhesive laminate that can be printed on and a piece of adhesive clear that can go on top. The paper path has to be relatively straight to print on it.

The hard issue was punching the holes. I have only two punch sizes and off the top of my head forget the sizes.
 
Thanks for the suggestions fellas. I am a long way from needing a faceplate. KISS, I may take you up on your offer. Don't count on it before next year, at the earliest. ;)

3M makes several photosensitised products for making thin metal name/face plates, etc. in almost any color. Many years ago, I was fortunate to have a great graphics department where I worked. It used a 3M product to make a duplicate serial number and ID placard for an instrument that was indistinguishable from the original that had gotten badly defaced. Using the material was no more difficult than using the photosensitive method for PCB's, which I have been doing for many years. It did not require a darkroom.

The problem with 3M is finding a source. The company is/was divided into divisions, and you would be "assigned" to one division based on your industry. If that division didn't have what you needed, it was impossible to get a catalog, much less buy from another division. As just one example, I had found a double-stick mounting tape that was very thin, held its shape, and was perfect for our application. I even had the 3M part number, but because it was from a different division than the one we bought from, I couldn't buy it. I had to rely on "insider" help to get me one roll.

For the time being, I have decided to get an integrated driver with dual full-bridge or quad half-bridge power transistors. My power needs are minimal (about 20 mA per coil). There are about a half dozen good candidates at DigiKey for me to sort through. Such chips usually have and Imax sensor resistor on the ground (ca. 1 Ω) connection for protection in a typical comparator circuit. I will try to use that for my range and zero "counter" during startup.

My PCB for the sensor sender arrived Saturday, May 23*, and I am anxious to get it assembled and tested. Project today is to turn the rotating part that holds the magnet and goes into the bearing.

upload_2015-5-25_6-47-16.png


The board is not populated yet. That connector is 1.5mm pitch and board is 1.3" in diameter.

John

*Purple = OshPark. I submitted on May 12th, but missed that day's panel. Design was sent to PCB house on the 13th. Total TAT from my order to receipt was 11 days.
 
John,
I do not think the current taken by a stepper motor changes much when it is stalled so I don't think the Imax sensor idea will work. I think detecting contact with a mechanical stop would work better. (Or just allow enough time to be sure it has reached the stop.)
Les.
 
Yes I have done this, a few times.

I drive the steppers direct from a pic, and in half step mode, they only pull about 20ma.

If you look at a car dash that uses these you'll notice that on power up the guages rotate to full scale then back to zero, this is to reference them, there are 2 ways of doing this, the guage movements have hard stops at zero and fsd, if you give the movement enough pulses to go from one end of the scale to the other you can be sure its on the end stop, if you go to fsd then back to zero then you are not stalling the motor, and it looks good.

There is a max speed that if you exceed then you'll loose sync, it is quite quick though.

Air core movements allthough related to steppers are not the same, they have 2 coils, you drive them with sine and cosine waves, the phase relation ship determines the position, because there are 2 waves and 4 quadrants you do not need to reference them, you can position the pointer anywhere on the scale - apply the signal and it will point to the right position (an air core is a 4 step stepper that you microstep to get finer resolution).

P.S. we have a fork lift at work, it has a mast level indicator, I'm afraid its rather boring though, its just a piece of flat bar with a pointer on attached to the frame that lines up with another secured to the mast.
 
Last edited:
First pic, 12,000lb fuel guage for a nimrod and 6,000lb indicator for a wessex helicopter, they are a clock, hours and mins, the movemets are steppers.

Second pic, tacan radio compass for a tornado, currently empty, I have made the hardware to build a compass using a i2c compass module for this, and the other is a dual oil pressure guage for a lancaster bomber ww2, one side is temp the other humidity, the steppers are fitted but theres no pointers, havent found a good way to make them yet.

Third pic is a full set of decca radio navigation guages for a shackleton bomber, I'm thinking of using these with little or no mods, the movements look like 2 phase jobs, theres a perm magnet and 2 windings, I need to spend some time sussing them out.
 

Attachments

  • Photo0211.jpg
    Photo0211.jpg
    641.9 KB · Views: 428
  • Photo0336.jpg
    Photo0336.jpg
    775.3 KB · Views: 401
  • Photo0337.jpg
    Photo0337.jpg
    1,020.2 KB · Views: 402
Sorry to take awhile to respond. I took time off for the holiday and to make the other (rotating) part of the sensor shown above. I have gathered from my reading that the advice given above has been right on. Let me add a couple of clarifications and some purely operational questions.

I do not think the current taken by a stepper motor changes much when it is stalled so I don't think the Imax sensor idea will work. I think detecting contact with a mechanical stop would work better. (Or just allow enough time to be sure it has reached the stop.)
Les.

That is certainly true for the gauges being discussed. However, Microchip's application note (AN906) does use Imax in the non-modulated winding to sense stall in a stepper that is being driven with higher than rated voltage to attain greater torque (e.g., a motor rated for 0.5A @ 5V being driven by 12V). My Switec gauge arrived Saturday. It is rated for 5V and will be driven at that voltage.

What does change when these motors are stalled is the back-emf profile in the driven coil and the generated emf in the non-driven coil. It is those voltages/currents that are used to detect stall in several of the smart drivers, such as the ST L9942, Cypress CY8C24xxA (see: Cypress AN2197), and the afore mentioned Freescale series of devices (e.g., MC33991). That is what I was thinking of measuring/detecting to detect stall, if necessary. The ultimate question is whether it is necessary. I am leaning strongly toward thinking it is not necessary to do.

If you look at a car dash that uses these you'll notice that on power up the guages rotate to full scale then back to zero, this is to reference them, there are 2 ways of doing this, the guage movements have hard stops at zero and fsd, if you give the movement enough pulses to go from one end of the scale to the other you can be sure its on the end stop, if you go to fsd then back to zero then you are not stalling the motor, and it looks good.

There is a max speed that if you exceed then you'll loose sync, it is quite quick though.

It is easy to see how driving past the stop at FS and then counting back to the zero stop would allow one to accurately calibrate the gauge, but I can't see how driving past both stops would allow that to be done. From a practical standpoint, I suspect one can assume that any given gauge will have a constant number of full steps between FS and zero, so when one is known to be at FS, it just needs to stepped back that distance. In my case, I will be stepping back half that number.

The datasheet I have for my gauge indicates a maximum speed of 600°/s and a start-stop speed of 200°/s. Rotation is 315° and number of steps between stops is about 600. I will probably have "up" and "down" buttons for the user to fine tune the indicator "zero" position depending on operating conditions. Also plan to use only half-step mode and nothing finer.

What is the other way of indexing them? Are you referring to the methods to detect stall?

QUESTIONS:

1) How reproducible with a single meter are the number of steps between stops (full-step mode)? Switec gives a specification for mechanical play of ±0.5° (max. 1°).
2) dr pepper : I am curious which PIC's you have used? Did you use the enhanced PWM capabilities like in the 16F684? I don't have that chip, but I do have the 16F1829.

Regards, John
 
Nothing special, it was a p16f628a, no pwm the motor is wired to 4 digital i/o pins of the chip, in fact one pic controls 2 motors and everything else including rs232 for remote setting and control, the 1828/9 are updated versions of the 628 as far as I know.

The motors I have are the same spec, allthough they are probably diffrent I got them cheap as they are discontinued, they are pcb mount and the pins stick out the front, the same side as the pointer axle.

The oil guage I showed only has 90 degrees of pointer motion, so I have no choice but to drive the pointer against zero for the max no. of steps on power up, it works, I remember some data that quoted stalling the motor, you can do it for around a minute without causing any heating up, there is internal gearing but I think this is more than up to being stalled.
I took the stops out of one movement just to see if it would continuously rotate, and it does perfectly.
 
I did some peeking at some of the application notes too and noted:

1. I have a better appreciation for micro stepping now, The currents have to follow sin/cos functions.
2. To find zero, full steps are used.
3. Two coils are used in sin/cos energizing.
4. So for the unenergized windings and no motion, no voltage is generated.
5. It should not take long using full steps to find zero. Zero and FS are just that, stops.
6. You effectively get 90 degrees/(full step)
7. Micro stepping gets you the finer positions.
8. Velocity control is employed.
 
Status
Not open for further replies.

Latest threads

Back
Top