tjerkotten
New Member
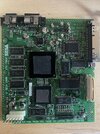
Hi, I am new on this forum, but I hope to learn more about this. I am working for the last 1,5 years with Motherboards of an old game console, the Dreamcast. Sometimes I have faulty motherboards. I replace the capacitors if needed and hope I can get it up and running again. I am currently working with a board that has a problem I can't seem to understand.
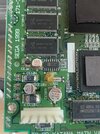
One of the capacitors seemed faulty. When I checked it with my multimeter, it had a continues beep, where it should be a short beep for good capacitors. I removed the 100uf 16V SMD capacitor and check it on it's own. It has the continues beep, so I replaced the capacitor with a new one, but still it would give me the continues beep when on the board.
I removed the capacitor again and check the pads itself on the board without the capacitor on. It also gives a continues beep, where it should be short. Is there something wrong with the circuit? Could someone give me some more information on this?
Thank you very much in advance. In this picture the pads aren't cleaned fully yet.