How do you know that the fuel level meter gives those exact Ω values? Did you measure it, or did you get the information from a datasheet or something similar?
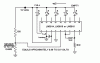
Nevertheless, the sensor can still work, but the signal now needs to be amplified. As can be seen from the attached schematic, I now changed the sensor and voltage divider resistor network around, to cater for the grounded sensor signal and the feedback signal (for lack of a better word). I.e. the ONE wire that comes from the sensor (and I assumed here that the Ω measurement was made with one lead of the DMM (Digital Multi Meter) connected to the car chassis (i.e. ground) and the other lead was connected to the sensor).
The wire from the sensor is wired in series with R3 (1.452KΩ) I got this value calculating a volt drop of 1V over the sensor if the tank is empty (i.e. sensor = 132Ω).
With the sensor measurement at 12Ω, the circuit simulator gave an output of 5.03V, and with the sensor measurement at 132Ω, the output was 0.11V. The OPAMP output can be wired directly into the LM3914 signal input.
I hope this will help you. Don't feel too bad about not knowing too much. I was in the same boat about a month ago. Our forum colleague, Mr. Eric Gibbs helped me with the designs of OPAMP circuits.
Good luck.