Continue to Site

Welcome to our site!

Electro Tech is an online community (with over 170,000 members) who enjoy talking about and building electronic circuits, projects and gadgets. To participate you need to register. Registration is free. Click here to register now.

  • Welcome to our site! Electro Tech is an online community (with over 170,000 members) who enjoy talking about and building electronic circuits, projects and gadgets. To participate you need to register. Registration is free. Click here to register now.

Voltage regulator for 0 to 1V

Status
Not open for further replies.

mvoltin

New Member
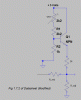
I need to provide exact voltage 0-1v to control current through a driver IB462H with the picture of the page below. I am hesitant using resistors to control the voltage since the output voltage may change if there is a variation in the current.

all the voltage regulators I found start around 1v and up. is there a regulator or another solution to that would output <1v? Easily adjustable regulator will help since I may change the voltage time to time (for 1.2amp vs. 2amp motors) but more "permanent" solution will be fine too.

P.S. I am also little confused about the resistor value table: how the higher resistor values would give higher current since the formula shows that the current increases with the increase in voltage (closer to 1v should output 1amps). Am I missing something?

P.S. the voltage divider current referenced in the text uses IC 71HC123 to cut down current when not stepping and should not matter for this question - I assume.

b8ntj6.jpg
 
Last edited:
An LT3082 regulator should do what you want.

Otherwise you could use a more common regulator, such as an LM317, which has a minimum output of 1.2V (with the ADJ terminal connected to common), and use a pot at the output to adjust the voltage to your stepper from 0V to 1V as desired.
 
Last edited:
Hi,
See attached schematic. It is the modification you need to make to the schematic given in Fig 1.7.2 on page 30 of the IB462H datasheet. Adjust VR1 to get 1V between the emitter of the NPN transistor and ground. The rest of Fig 1.7.2 remains the same. The npn can be any general purpose type eg 2N3904, BC239 etc.
 

Attachments

  • IB462H_Modification.gif
    IB462H_Modification.gif
    105 KB · Views: 277
An LT3082 regulator should do what you want.

Otherwise you could use a more common regulator, such as an LM317, which has a minimum output of 1.2V (with the ADJ terminal connected to common), and use a pot at the output to adjust the voltage to your stepper from 0V to 1V as desired.
I love the LT3082 BUT I just noticed it does not work well with less than 500uA load. It will not allow less than 0.5 volt output with out this minimum load.
 
I am hesitant using resistors to control the voltage since the output voltage may change if there is a variation in the current.
What current? The current on the current adjust pin?
The current adjust pin is not stated in the data sheet but I think it is about 10uA. The resistor divider has a impedance of 50 to 1000 ohms and will not be effected by 10uA.
I think you are OK with just a resistor divider.
 
Hi,
See attached schematic. It is the modification you need to make to the schematic given in Fig 1.7.2 on page 30 of the IB462H datasheet. Adjust VR1 to get 1V between the emitter of the NPN transistor and ground. The rest of Fig 1.7.2 remains the same. The npn can be any general purpose type eg 2N3904, BC239 etc.
First of all, thanks to everybody.

Ramuna, thank you and unrelated question: what program did you use to draft the PCB diagram? I just need something simple that would allow me to track what is going on as I try to "reverse engineer" some of these things but most of the recommendations online are fairly complicated with a learning curve. I was hoping of just a simple drawing program that would allow to drop in basic components and assign basic specs and your example looks like it.
 
mvoltin asked: what program did you use to draft the PCB diagram?

I used a combination of LTSpice and MS Paint. I drew the schematic in LTSpice first, then pressed the PrnScn (PrintScreen) button. I then opened MS Paint, and pressed the Shift & Insert keys together. This dumps the screen image of the LTSpice schematic into Paint. I then used the various utilities in Paint to edit the image (erasing unnecessary LTSpice comments, copy/pasting resistor symbols, changing a resistor into a variable resistor, cropping the image and so on).

An additional virtue of this method is that both LTSpice & MS Paint are free (the latter for Windows users like myself) :).
 
Last edited:
mvoltin asked: what program did you use to draft the PCB diagram?

I used a combination of LTSpice and MS Paint. I drew the schematic in LTSpice first, then pressed the PrnScn (PrintScreen) button. I then opened MS Paint, and pressed the Shift & Insert keys together. This dumps the screen image of the LTSpice schematic into Paint. I then used the various utilities in Paint to edit the image (erasing unnecessary LTSpice comments, copy/pasting resistor symbols, changing a resistor into a variable resistor, cropping the image and so on).

An additional virtue of this method is that both LTSpice & MS Paint are free (the latter for Windows users like myself) :).

Hi

I use "Paint.net". It's like MS Paint on Steroids. :)
and it's also free..

eT
 
I've done something similar to emulate lambda exhaust gas sensors on vehicles to make diagnostic tests, my circuit uses a 1k pot to generate 0 to 12v, this is then divided to 0 to 1.2v with 2 resistors and fed into a simple op amp acting as a follower to give 0 to 1.2v o/p.
 
Status
Not open for further replies.

Latest threads

New Articles From Microcontroller Tips

Back
Top