Continue to Site

Welcome to our site!

Electro Tech is an online community (with over 170,000 members) who enjoy talking about and building electronic circuits, projects and gadgets. To participate you need to register. Registration is free. Click here to register now.

  • Welcome to our site! Electro Tech is an online community (with over 170,000 members) who enjoy talking about and building electronic circuits, projects and gadgets. To participate you need to register. Registration is free. Click here to register now.

Use of sample & hold

Status
Not open for further replies.

kinarfi

Well-Known Member
I have been working on an electric power steering unit and have recently made a change because the sensor out put wanders some. I don't know, but suspect it is temperature related. I am using strain gauges to sense the torque on the steering wheel and then power the motor to reduce the torque back to zero. I was wondering if there is a way to capture the voltage of a Wheatstone bridge at rest to be compared that to the torqued bridge to derive how much drive the motor needs. Then if temp changes the at rest output of the bridge or if it just wanders, capture that voltage and updated and use that voltage. Updating the capture and hold could be tied to the key of the vehicle start up.
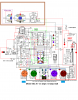
Here is a link to pictures of the strain gauge build and schematic, also shown below, of concern is the portion with in the brown box.
Thanks
Kinarfi
**broken link removed**
 

Attachments

  • Rev-7.04 .png
    Rev-7.04 .png
    72.1 KB · Views: 159
Hi Ya kinarfi how goes it?

Before even looking at the electronics I have a few comments. Nice images that present detail. Now I may be wrong and off base but I see what I think are a few problems. I know mounting those little strain gauges can be a real pain but surface prep and bonding are the two most important steps to good repeatable results. Before all else you want a really smooth micro finish on the surface, it should not look like the grooves of a 78 RPM record.

This link provides some really good video material on surface prep, give it a look. Remember the micro finish is really important or the gauges will drift and give non-repeatable results. It's all about surface prep and bonding after a good prep.

Next, it is best to come off the gauges with very fine wire like AWG 28 for example and then tie into your larger gauge wire. This makes for easy soldering to those annoying tiny gauge tabs. This also avoids placing any unwanted forces on the gauge while it is in use.

I will leave the electronics and circuitry to someone else who would likely be of much more help than myself.

<EDIT> Also check out some of the installation accessories which can be found here. Note the bondable terminals and the precision resistors. </EDIT>

Ron
 
Last edited:
Status
Not open for further replies.

Latest threads

New Articles From Microcontroller Tips

Back
Top