Continue to Site

Welcome to our site!

Electro Tech is an online community (with over 170,000 members) who enjoy talking about and building electronic circuits, projects and gadgets. To participate you need to register. Registration is free. Click here to register now.

  • Welcome to our site! Electro Tech is an online community (with over 170,000 members) who enjoy talking about and building electronic circuits, projects and gadgets. To participate you need to register. Registration is free. Click here to register now.

Switching H-Bridge

Status
Not open for further replies.

camerart

Well-Known Member
Hi,

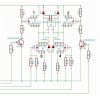
I have been using this design of H-Bridge for years quite successfully, only switching 1 and 4 or 2 and 3 on and off in pairs. I am now trying to use PWM, by switching PWM to 1 and 4 or 2 and 3. I have been getting odd results, because the settings for PWM need to be higher than I would have thought to start the motor. Thinking the problem could be a difference in ON/OFF timing between the transistor switched FETs and the directly switched FETs or the different characteristics of P and N FETs or both, giving misaligned square waves, I tried different switching. The stop/forward/reverse/stop sequence: ALL OFF>>1 ON then PWM 4>>ALL OFF>>2 ON then PWM 3>>ALL OFF. This gave good results.

Can someone confirm that this is a good way of switching please?

Camerart.
 

Attachments

  • H-Bridge.jpg
    H-Bridge.jpg
    262.9 KB · Views: 193
Looks as though it'd work, the resistors to the gates of the p channel fets, why are they 1k, 100r like the n channels might be better, you might find that there is shoot through when the p channels turn off as they will be slightly slower.
Also are the 2n2222's drive by a digital pull low/pull high, if not then a resistor to ground on the base is a good idea to prevent unwanted turn on.

A motor will take a certain amount before it starts, if your controlling a motor from software then program a 'kick' of higher pwm to get the shaft turning, if its practical to do so.
 
I agree with Dr Pepper, the gate resistors on 3 and 4 are marked as 100, while 1k is used on 1 and 2. This will give them inherently different switching times due to charging/discharging the gate capacitance. In addition the additional transistor stage will add some signal propagation delay.
At low duty cycles it may mean that your not turning on the upper and lower fets at the same time. And as pepper points out you might get shoot through if your switching between 1&4 and 2&3.

The sequence you suggest "OFF>>1 ON then PWM 4>>ALL OFF>>2 ON then PWM 3>>ALL OFF" will work well as the switching delay will be neglected. And you've selected the correct 'slower' switching fets to turn on while PWM the faster switching 4&3.

If you wanted to PWM both upper and lower fet at the same time i'd suggest changing the gate resistor so they match and possibly putting an extra transistor stage on the lower fets.
 
Looks as though it'd work, the resistors to the gates of the p channel fets, why are they 1k, 100r like the n channels might be better, you might find that there is shoot through when the p channels turn off as they will be slightly slower.
Also are the 2n2222's drive by a digital pull low/pull high, if not then a resistor to ground on the base is a good idea to prevent unwanted turn on.

A motor will take a certain amount before it starts, if your controlling a motor from software then program a 'kick' of higher pwm to get the shaft turning, if its practical to do so.

Hi Doc,
"Looks as though it'd work," Do you mean that it looks like switching the NFETs on, then PWM the PFETs will work?

EDIT: After reading this again and Misterbenn's post I now see what you mean. They should be changed.

Well spotted! I will add pull down resistors to the 2n2222 bases to GND. Thanks.

C.
 
Last edited:
Hi C,
The IRF7207 is already hard On with the existing Vgs of close to -9V, check this image

The 2N2222 Base is connected to a PIC output pin via a 1K, you will not get unwanted turn On, unless the Base is left disconnected.

E


EDIT:
This is the way to control the bridge, as per Misterbenn
The sequence you suggest "OFF>>1 ON then PWM 4>>ALL OFF>>2 ON then PWM 3>>ALL OFF" will work well as the switching delay will be neglected. And you've selected the correct 'slower' switching fets to turn on while PWM the faster switching 4&3.
 

Attachments

  • AAesp01.gif
    AAesp01.gif
    17.5 KB · Views: 150
  • AAesp02.gif
    AAesp02.gif
    32.5 KB · Views: 169
Last edited:
I agree with Dr Pepper, the gate resistors on 3 and 4 are marked as 100, while 1k is used on 1 and 2. This will give them inherently different switching times due to charging/discharging the gate capacitance. In addition the additional transistor stage will add some signal propagation delay.
At low duty cycles it may mean that your not turning on the upper and lower fets at the same time. And as pepper points out you might get shoot through if your switching between 1&4 and 2&3.

The sequence you suggest "OFF>>1 ON then PWM 4>>ALL OFF>>2 ON then PWM 3>>ALL OFF" will work well as the switching delay will be neglected. And you've selected the correct 'slower' switching fets to turn on while PWM the faster switching 4&3.

If you wanted to PWM both upper and lower fet at the same time i'd suggest changing the gate resistor so they match and possibly putting an extra transistor stage on the lower fets.

Hi MB,

Ok, As it seems logical to me to switch in my suggested sequence "OFF>>1 ON then PWM 4>>ALL OFF>>2 ON then PWM 3>>ALL OFF" that's what I'll do.

How does this method of switching H-bridges compare with switching both FETs at the same time? (Once the circuit was corrected to match P and N speeds?)

Thanks,

C.
 
Hi C,
The IRF7207 is already hard On with the existing Vgs of close to -9V, check this image

The 2N2222 Base is connected to a PIC output pin via a 1K, you will not get unwanted turn On, unless the Base is left disconnected.

E


EDIT:
This is the way to control the bridge, as per Misterbenn
The sequence you suggest "OFF>>1 ON then PWM 4>>ALL OFF>>2 ON then PWM 3>>ALL OFF" will work well as the switching delay will be neglected. And you've selected the correct 'slower' switching fets to turn on while PWM the faster switching 4&3.

Hi Eric,

OK with the H-bridge circuit and 2n2222 pull down resistors.

The sequence "OFF>>1 ON then PWM 4>>ALL OFF>>2 ON then PWM 3>>ALL OFF" is what I tried in one of the latest TRACKER programs we have been working on, to check the high PWM rate before the motor would start. This is where you asked the question about the variable FORN I added. FORN was introduced to the program so that this sequence would be used.

Thanks, C.
 
hi C,
What is wrong with the HB circuit that we have been using for the past 12 months, with PWM control?
Its got the option of 4 or 6 control lines. ie: dynamic brake and hold.

The improvements you are requiring for the head control can be achieved by modifying the program PWM settings.
Get that sorted and then add the 2 Brake/Hold lines under control of the program.

E

Hi Eric,

You may recall early in the year, that we were getting odd results with PWM, i,e, high PWM to start the motor. (See attached duty1) I suspected something to do with any differences in switching between the PFETs and the NFETS, and if the answers in this thread are correct, the PFETs and NFETs will be different. This will give two mistimed PWM outputs from the two FETs. I tried switching on one FET before PWMing the second, and this brought the PWM down to (from memory) a PWM of 30 which started the motor, and a more expected result. So I wouldn't need to change the circuit, only to use the "OFF>>1 ON then PWM 4>>ALL OFF>>2 ON then PWM 3>>ALL OFF" sequence if this is possible.

I recall you having to work wizardry on the program, to get round the Oshonsoft inadequacies, so I hope the one at a time FET PWM and braking switching can still be achieved.

I am still setting up the TRACKER test rig, and programs.

C.
 

Attachments

  • duty1.jpg
    duty1.jpg
    56.6 KB · Views: 149
hi,
You will require a longer On period of the PWM signal in order to get the head mass moving from rest, once it is moving you can reduce the On period.
Its really going to be determined by the total head mass and the required head acceleration rate.

E

EDIT:
IIRC you did have a program, that a user pot could set the ADC voltage which in turn set the PWM control duty cycle, for initial testing???
 
Last edited:
hi,
You will require a longer On period of the PWM signal in order to get the head mass moving from rest, once it is moving you can reduce the On period.
Its really going to be determined by the total head mass and the required head acceleration rate.

E

EDIT:
IIRC you did have a program, that a user pot could set the ADC voltage which in turn set the PWM control duty cycle, for initial testing???

Hi Eric,

You don't say whether your reply refers to switching FETs in parallel or one switch one on then the other switched PWM, I read it as parallel. The test rig is a motor with 100:1 gearbox with no load. Do you think that the start PWM of 150 found by experiment, is ok? It seems high to me. (It is only 30 when PWM is switched using only one FET, which to me seems a more expected number)

C.
 
Last edited:
hi,
You are using 8 bit resolution for the PWM setting, this means 0 thru 255, as a program setting figure.
If you assume 255 is equal to 100% On period, then [150/255]*100% = ~59% On time.

Your current program only switches Forward OR Reverse, no parallel sequences.

It is very IMPORTANT that you determine the PWM control settings when the geared motor output is driving Fwd or Rev, the final head load mass.

E

Hi Eric,

In the RED line you say "no parallel sequencies"

To clarify what I mean by parallel :

The circuit has 4x connections between the PIC chip and the H-Bridge. Because of a problem with Oshonsoft PWM and your subsequent assembly code fix, you asked me to connect each 2x FET pair together in PARALLEL.

Now I want connect all 4x conections independantly, switching one FET of a pair, on/off with a binary pin and switch the other FET of the pair PWM with the CCP1/2 output pins, and the same for the other pair. This how I brought the motor start PWM down to 30.

Let me know if this is clear.

C.
 
The circuit has 4x connections between the PIC chip and the H-Bridge. Because of a problem with Oshonsoft PWM and your subsequent assembly code fix, you asked me to connect each 2x FET pair together in PARALLEL.

Now I want connect all 4x conections independantly, switching one FET of a pair, on/off with a binary pin and switch the other FET of the pair PWM with the CCP1/2 output pins, and the same for the other pair. This how I brought the motor start PWM down to 30.

Let me know if this is clear.

hi C,
When you say parallel 2, FET's that is incorrect.
What you are doing is driving the two FET's at the opposite Top Left and Bottom Right of the bridge from a single PIC pin, for say the Forward direction and the Top Right and Bottom Left of the bridge from a single PIC pin, for say the Reverse direction.
This is NOT paralleling two FET''s.

If you intend driving each of the 4 bridge FET's independently from the PIC and later add braking on 2 PIC pins, IMHO using Oshonsoft basic, it will be a major task.

I will again emphasise the importance of carrying out the motor PWM development by using a driven mass equivalent to the final scanner head mass.
Why do you think Getting the PWM down to a lower value is important.?

I wish you success, I will be interested to see your final program.

Eric

Hi Eric,

In post #1 I used "in pairs" then accidentally changed to "parallel" my mistake, I hope I haven't confused everyone.

If you intend driving each of the 4 bridge FET's independently from the PIC and later add braking on 2 PIC pins, IMHO using Oshonsoft basic, it will be a major task.
Is it still a major task if 1x FET of the pair is switched on with a binary pin first then the other FET is switched PWM on a CCP pin? If it is a problem, then reading the thread replies, I need to re-design the circuit, so that both FETs in a pair switch at the same speed.

I will again emphasise the importance of carrying out the motor PWM development by using a driven mass equivalent to the final scanner head mass. This is difficult as the head mass will change. I also make mistakes, and prefer to use a separate test bed, before connecting to the waiting Tracker.

Why do you think Getting the PWM down to a lower value is important.? After lots of testing, and whistling of motor, I got the feeling that something was wrong when driving 2x FETs together. But once a higher PWM was used to start, it ran ok.

Thanks,

C.
 
Last edited:
Hi Eric,

I have a simulation image sent from you last year, attached, with a note outlined in red. Is this now not viable, after finding the Oshonsoft PWM difficulties?

Camerart.
 

Attachments

  • HBridgeDB1.gif
    HBridgeDB1.gif
    55.2 KB · Views: 153
Last edited:
The improvements you are requiring casesam can be achieved. And then you will find **broken link removed** hat they will be slightly slower when the p channels turn off.
 
Last edited:
Status
Not open for further replies.

Latest threads

Back
Top