Continue to Site

Welcome to our site!

Electro Tech is an online community (with over 170,000 members) who enjoy talking about and building electronic circuits, projects and gadgets. To participate you need to register. Registration is free. Click here to register now.

  • Welcome to our site! Electro Tech is an online community (with over 170,000 members) who enjoy talking about and building electronic circuits, projects and gadgets. To participate you need to register. Registration is free. Click here to register now.

Speaker sync LED help

Status
Not open for further replies.

xX1SHOt

New Member
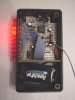
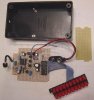
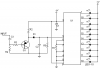
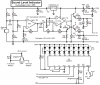
I was wondering the best way to make a pwm audio synced led's. I want to use four led's to sync with left speaker and four to sync with right. I dont really know what I am doing but have come to understand that I will be needing some resistors at unknown values and some capacitors and maybe some other type of voltage regulator. I want to use 3v blue led's and is it also possible for me to use a 12v dc outlet plug that goes to some other device but splice the wire to use a power source that doesnt really run out like a battery?

Any help with this would be great, thx to anyone who helps.
(im a newbie to this so any understanding for my lack of knowledge would be appreaciated)
 
So.... what exactly you want ? A series of LEDs that blinks according to the pitch (magnitude) of the sound, I mean if a peaceful sound is being played then only 2 or 3 LEDs lights (say.. you got 6 LEDs for each speaker) and if aa sudden stick on a drum then all LEDs .............

Is this something you want ?
 
Try looking up LED VU Meter. There are tons of schematics out there.
 
An LM3915 is an audio level (not pitch which is frequency) indicator IC.
it can drive up to 10 LEDs with each LED showing double or half the power of the LED beside it.

Look for a circuit or kit in Google called LED Audio Level Circuit or LED VU Meter Circuit.

I designed one that has extra features that makes it fairly complicated.
 

Attachments

  • Sound Level Indicator 002.jpg
    Sound Level Indicator 002.jpg
    47.1 KB · Views: 1,307
  • Sound Level Indicator 004.jpg
    Sound Level Indicator 004.jpg
    28.4 KB · Views: 1,016
ok the lm3915 sounds like something useful and i have searched google(about 14 hrs total) for a rather simple circuit that just involves the voltage regulator, power source, resistors, and leds. Many circuits are very terrible and dont involve a current limiting resistor or dont involve the audio jack (i want to hook it up to my computer).

I will make it simple and see if someone can arrange them in a way that makes sense to me.

Parts: lm3915, resistors of some value,8 - 3v blue leds(preferrebly 4 for left speaker and 4 for right but if it makes it complicated this can be omitted), 12v wall phone charger, and audio jack. (idk if there is a transistor needed b/c of the lm3915)

I just need a simple schematic made from this, im sorry if this is a nuisance and i know there have been threads on this before but b/c I am a newbie to this i cant really modify it to my liking without understanding what the voltage regulators do. if someone could just draw me a circuit in paint or something like that with the parts i will give you 1,000 personal respect points over what you already are at.

EDIT: leds in series or parallel? audioguru you have stated that series is better but wont that drive all of the voltage through the first led and just burn em out?

also i have read every thread on here after hours of searching and none exactly fit what I am trying to do

lastly, no one post in here just saying "color organ" or "let me google it for you", if it were that easy i would have found what i wanted by now

EDIT2: i do not want a VU meter, just blink to light with fading in and out, but maybe the lm3915 does that

another 1,000 personal respect points for the pain for the 2 edits
 
Last edited:
Hi AG,
Thats a fairly neat construction. Can we have that circuit with extra features you designed?


Firstly here is the schematic by audioguru(remembered seeing it from searching quite alot):
https://www.electro-tech-online.com/attachments/sound-level-indicator-schematic-png.9135/


And secondly, here is something like what i want but without the two sets of parallel resistor, just two sets of different 4 series leds:
**broken link removed**

Hope this helps clarify what im trying to convey
 
ok the lm3915 sounds like something useful and i have searched google(about 14 hrs total) for a rather simple circuit that just involves the voltage regulator, power source, resistors, and leds.
The LM3915 has a built-in regulated adjustable voltage reference. The reference needs to have one or two resistors to set its voltage.

Many circuits are very terrible and dont involve a current limiting resistor or dont involve the audio jack (i want to hook it up to my computer).
The LM3915 has adjustable regulated current source outputs so it does its own current-limiting. Its input can be an audio jack if you want. I used a microphone with a preamp.

Parts: lm3915, resistors of some value,8 - 3v blue leds(preferrebly 4 for left speaker and 4 for right but if it makes it complicated this can be omitted), 12v wall phone charger, and audio jack. (idk if there is a transistor needed b/c of the lm3915)
The LEDs are only 3V so you should power the LM3915 from a 6V wall-wart (so that the LM3915 does not get too hot).

leds in series or parallel? audioguru you have stated that series is better but wont that drive all of the voltage through the first led and just burn em out?
The LEDs are separate. Each one is turned on at a different input level.

i do not want a VU meter, just blink to light with fading in and out, but maybe the lm3915 does that
The LM3915 is a VU meter for sound levels. It does not blink.
It can be set for a moving dot of light that shows the instantaneous sound level or it can be set for a bar of light that is a single little dot for a low level and a long lighted bar for a high level. The length of the bar is determined by how many LEDs are lighted due to the level.

I recommend adding a "peak detector circuit" (shown in the LM3915 datasheet) so that the LEDs do not turn on and off faster than your vision which makes them look like a dim blur.

Here is a simple VU meter project that i fixed:
Sound Level Meter
 

Attachments

  • sound level meter.PNG
    sound level meter.PNG
    10.6 KB · Views: 5,006
Hi AG,
Thats a fairly neat construction. Can we have that circuit with extra features you designed?
The LM3915 has a range of 30dB. I added automatic-gain-control to increase the range to 50dB so it indicates a pin dropped on the floor in the next room and it indicates the TV or stereo playing very loudly. My project has a microphone.

It has a "9V" rechargeable battery for short duration demos but usually operates from a wall-wart charger.

It has a peak detector circuit so that the peak levels are clearly shown.

Each output has two LEDs in series that look like stereo but are actually mono.

My project is here:
Sound Level Indicator
 

Attachments

  • Sound Level Indicator schematic.PNG
    Sound Level Indicator schematic.PNG
    64.3 KB · Views: 637
Last edited:
Ok now that i think about it the first vu meter that you posted two above this one is something that i would like now. But now that I have changed what i wanted there are sadly more questions to follow.

1) What do i do about the two V+, attach both to the 6V wall wart?

2) Where does the negative wire from the wall wart go to?

3) Is ground considered the negative wire of the wall wart? (I thought this because if the potential difference was 10 V, 5 V above and below zero, then if one was set to 10V then the other could be set to 0V, or ground. This may also be insane thinking b/c im only in physics II right now)

4) Isnt there more than one wire that is in the input for the audio jack, making it more complicated than just straight from capacitor to input?

5) What are the values of the R1, C1.... and is the transistor that NPN TIP31 that I keep seeing in relation to this audio sync with lights?

6) Could I make two of them to have one for each speaker or do they both run on the same channel?

7) What voltage leds should I use and i saw a post somewhere not to have blue VU meters for blinding reasons so could I have one that has the first 7 purple and last 3 red?

Sorry for the bombardment of questions I know its a pain but I just wanted to get them all out of the way. Shouldnt have changed my mind half way into it but now that I see these are not too difficult to make are feel like I must make one(buying one is just not to satisfying).
 
Your sketch would simply blink the left and right channel groups of LEDs. It is not VU meters.

1) The VU meter circuit has only a single +6V but two are shown on the schematic so that the wires are not running all over the place. Join the two +6V together.
The +6V can also power the other channel.

2) The negative wire of the 6VDC wall-wart connects to 0V (ground) on the circuit. Join together all the grounds.

3) Ground is usually 0V in a circuit. The circuit does not use a negative supply.

4) The input is in series with the input capacitor. A 0V wire (ground) is also needed at each input.

5) The link has the entire project including a detailed parts list.

6) You can make as many circuits as you want. Use two circuits for stereo or use 5 circuits for 5-channels home theater.

7) You can set the brightness of blue LEDs lower by reducing their current so that they are not blinding.
 
sound-level-meter-png.31886


So this is not a VU meter that is set to the input? (as in it doesnt only flash but lights up more at the dB get higher?) Lets say that mentioning the VU meter has made me want to change to making one of those instead now, couldnt I just do this to make it a VU meter with the audio jack input?

**broken link removed**

And you stated that the parts listed are all in the link, the link is for the microphone VU meter, are they the same parts for the picture above?

by the way thanks for your help

EDIT: oh, and i actually want the 7 purple led's with 3 red at the top now so no need to keep em dim

Actually couldnt I take that second picture shown and somehow put the same electret microphone instead of the input to the computer? (to make it more of a moveable meter)
 
Last edited:
The VU meter schematic you posted twice has its parts list in its project. The project is here: Sound Level Meter

It doesn't blink the LEDs. It lights them in a bar where the length of the bar represents the level of the sound. Loud sounds make a long bar.
If its pin 9 is disconnected from its power supply then it makes a moving dot of light.

Its 10th LED lights when the peak input voltage is +1.25V. Your MP3 player's line output might not go so high.
The circuit will not work from a microphone because the output of a microphone is too low at only 0.01V. A preamp is needed to amplify the output from a microphone up to 1.25V.

My project has a microphone and uses an opamp as a preamp. It uses another opamp as the peak detector. The LEDs use a lot of power when they are set to be bright so my 9V rechargeable battery lasts only 10 minutes for a charge.
 
Ok I found the parts list and I have gained interest in you project with the microphone. Is it possible to only have one opamp in it for simplicity's sake? If so what components would I have to remove? I feel like I could avoid a few questions of trying to make the circuit in LTspiceIV, do all i have to do is try to arrange the parts so that all of the parts recieve the correct voltage?
 
Here is the preamp and peak detector circuit of my project.
Then the VU meter circuit does not need the input transistor peak detector and its parts. The special dual opamps eliminate some parts.
 

Attachments

  • preamp and peak detector.PNG
    preamp and peak detector.PNG
    26.6 KB · Views: 621
When you say "to ground of LM3915" for the wire running on the bottom right of the thumbnail does this mean that it connects to pin 9, or the combination of pins 2,7, two more pins as in the previous schematic that I had to almost identical ones posted of?
 
Pin 9 of the LM3915 never connected to ground. It connects to the positive supply for BAR mode. Leave pin 9 disconnected for DOT mode. Pins 2, 4 and 8 connect to ground.

Here is the schematic of the preamp, peak detector and LM3915 all joined together. The two capacitors at the top should connect to the main ground.
 

Attachments

  • simple VU meter.PNG
    simple VU meter.PNG
    51.3 KB · Views: 1,534
Last question I hope and thanks for your help throughout all of this, will any standard 3mm led work for this?
 
Last question I hope and thanks for your help throughout all of this, will any standard 3mm led work for this?
I have never used little 3mm LEDs. If their max allowed current is the current set by the 820 ohm resistor or less then they are fine. The 820 ohm resistor sets the output currents at 13.5mA each.
 
Status
Not open for further replies.

New Articles From Microcontroller Tips

Back
Top