Continue to Site

Welcome to our site!

Electro Tech is an online community (with over 170,000 members) who enjoy talking about and building electronic circuits, projects and gadgets. To participate you need to register. Registration is free. Click here to register now.

  • Welcome to our site! Electro Tech is an online community (with over 170,000 members) who enjoy talking about and building electronic circuits, projects and gadgets. To participate you need to register. Registration is free. Click here to register now.

Single chime circuit

Status
Not open for further replies.

Gabe

New Member
Hi all-

This is my first post, so apologies if this is too simple or in the wrong place. Years ago I took an electronics class, but I've forgotten most of what I learned due to lack of use. Still, what I want seems like it would be simple, and I can still solder and identify components, so I figured I'd ask here.

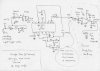
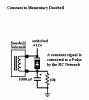
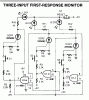
I've built a game show set like Jeopardy which is entirely relay-driven. The last piece I need is a "ding" sound when a users buzzes in. I previously solved this by using the back door solenoid of a doorbell, but that solution was quite large and problematic, because when a relay fired, it would close the doorbell circuit and keep the solenoid engaged, weakening it and eventually burning it up. I fixed it with a manual kill switch on the doorbell, but the overall solution is too big and complex to be sustainable. I'm looking for something a bit more elegant.

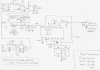
My thought is to make a simple (and small) solution that uses 12vdc to fire off a single chime sound even though the switch that fires off the chime may stay closed for a while. (Bonus points if the sound resonates and fades like a bell would :)

Also, ideally, this would output line-level audio that we could plug into a house audio system (we use this game show set at events that my company produces).

Thanks so much in advance! I wish I knew where to begin with a circuit design nowadays, but I'm 15 years removed from the last time I really designed something that did more than flash a light bulb :)

Thanks again,
Gabe
 
Look up 555 single-shot timer.
 
Thanks, that helps with the "doing something once" part of my question, but what about the actual chime generation?
 
I've used the cicuit in the attached sketch as a single chime generator for a while now.

Sorry for the 'pencil sketch' . I'm not very familiar with all these 'sim' and 'schematic capture' packages -takes me ages to try and draw a circuit using them. So I tend to stick with what I know. Paper and pencil!

**broken link removed** a small mp3 of the kind of sound it makes
 

Attachments

  • 571 chime.jpg
    571 chime.jpg
    143.3 KB · Views: 1,696
Last edited:
Oh man, this is great! So, if I leave the trigger switch closed, it will still only make the one chime? This sound is perfect, too!
 
Yes - you need to release the switch, and then close to again to make a new sound.

The CMOS 4093 IC acts as a monostable, triggered when closed to ground. Needs to be released, and re-triggered, to function again.

If this is the kind of thing you need, I ought to add a few more details.
I wouldn't really like to trust the switch connection to the outside world, to be connected directly to a CMOS input. Too easy to get a static 'zap'.

I see you are intending to use it as a line out device, so the power amp part of the circuit is superfluous.

I'll add a bipolar input buffer, to help with the CMOS ESD senstivity problem.

OK, modified circuit attached!
 

Attachments

  • 571 chime buf.jpg
    571 chime buf.jpg
    125.6 KB · Views: 740
Last edited:
Yeah, this is just about perfect, I think. I'm not sure that the bipolar input buffer is necessary, since the trigger here is actually a relay (the person "buzzes in" which is really just firing a relay. This circuit would be triggered by one of those relays as it flips from open to closed. If that's enough to avoid the sensitivity problem, then great. If you don't think it is, then that bipolar input buffer might be the way to go.

I had a few other questions on that schematic just so I'm on the same page with you. I'm starting at the far left of the drawing:

1 - Just after the trigger, there's a line with an arrow to 12v. Is that a resistor? If so, what value? I assume it is, because without a resistor, that would create a short.

2 - The very next component is a Schmitt Trigger, right? I see the 4093 - do I need three of these chips? (HEF4093BP,652 NXP Semiconductors Gates (AND / NAND / OR / NOR))

3 - Directly above the 100n cap, there's another Schmitt that doesn't appear to be connected to anything but ground. Does the other side go to something?

4 (last one!) - that funny looking cap (I think?) just after the diode that I think is labeled 10416v…I can't seem to find that part anywhere. Is that just another 100n, or is it something special?

Thanks again…this thing is going to be so cool!
 
Since the trigger is actually coming from a relay, do we need to worry about the bipolar input buffer? Probably not, but I thought I'd run it by. When the player "buzzes in" it fires a relay that locks the other players out, turns on a light in their "pod", and closes the switch that, until recently, turned on the doorbell. The human element is removed, but maybe that's not enough? If you think it would be better to have the buffer in there, I won't object.

I had a few other questions about the schematic just to make sure I'm on the same page. This list works from the far left:

1 - Just after the trigger, there's a line with an arrow to 12v. Is that a resistor? If so, what value? I assume it is, because without a resistor, that would create a short.

2 - The very next component is a Schmitt Trigger, right? I see the 4093 - do I need three of those chips? (Mouser link)

3 - Directly above the 100n cap, there's another Schmitt that doesn't appear to be connected to anything but ground. Does the other side go to something?

4 (last one!) - that funny looking cap (I think?) just after the diode that I think is labeled 10416v…I can't seem to find that part anywhere. Is that just another 100n, or is it something special?

Thanks again…this thing is going to be so cool!
 
How about a simple CD (capacitive discharge) device that would activate the solenoid in a mechanical chime (i.e., ring a bell), then turn itself off as the cap discharges? Circuits like this are used to operate switch machines (= solenoids) on model railroad layouts without burning them out.

If you wanted line-level audio as well, several ways to skin that cat. One would be to operate a relay (mechanical or solid state) along with the chime that would operate a simple electronic chime circuit that generates a line-level "ding".

Sounds like a fun project.
 
Last edited:
I've tried a couple times to reply to this, but it says it has to wait for a moderator to approve. If it doesn't show up soon, I'll try to remember my questions and re-post :)
 
Actually, I think your last drawing answered most of my questions. The pin numbers answered most of them...I assume the Schmitt with pins 7,8,9, and 14 does nothing, and you just have it there for completeness? The only remaining one that I have is about that 104 16v cap, if that is a cap. I don't think I've ever seen on drawn that way, but a search for 104 16v turns up a couple things. Is this part anything special?

One other question I have is about ordering these parts. If I check on Mouser, I see things like LM393AP and LM393P, for example. Do I care much about the letters after the 393? Both numbers mentioned are through-hole (or socket mounted, I guess). Is there some code I'm not aware of? :)

Thanks again...this is really, really great.
 
Last edited:
The only remaining one that I have is about that 104 16v cap, if that is a cap. I don't think I've ever seen on drawn that way, but a search for 104 16v turns up a couple things. Is this part anything special?

Heh; that was the hand-drawn schematic (my hat is off to the draftsman!). That's "10µ" (symbol for "micro", meaning microfarad). It's drawn funny 'cause it's an electrolytic capacitor (notice the "+", very important).

Regarding IC part #s and such, for your purposes it doesn't much matter what exact flavor you get. But you do want to make sure you get a part you can physically work with (meaning, probably not surface mount), so pay attention to the "package" type shown.
 
Last edited:
Oh right, NOW it makes sense. It just threw me for a loop because if you google for 104 16v, the first thing that comes up is a tiny ceramic cap. I think I have enough to go on now...thanks!
 
Ok, two more questions. First, coming off Pin 10 on the 571 - is that a 470K resistor? Just making sure. It kind of looks like an R.

Second - there are a couple of orphaned components, one from the 393 and the other on the 4093. I assume I need to ground these out as drawn, but do I need to do anything with Pin 7 on the 393? What about Pin 14 on the 4093 - is that going to +12v? Since that gate isn't doing anything, I'm guessing the output doesn't have to go anywhere (kind of like Pin 7 on the 393)?

I ordered all the stuff from Mouser tonight, so hopefully it'll be here by the end of the week!
 
There is a LowTech way to do the same thing.
 

Attachments

  • Constant to Momentary Doorbell.GIF
    Constant to Momentary Doorbell.GIF
    3 KB · Views: 375
Here are a few simple Gameshow circuits
 

Attachments

  • Whos First SCR.gif
    Whos First SCR.gif
    38.8 KB · Views: 312
  • firstcircuit12volts.pdf
    267.8 KB · Views: 343
  • First Response Monitor LED.gif
    First Response Monitor LED.gif
    23.7 KB · Views: 353
Ok, two more questions. First, coming off Pin 10 on the 571 - is that a 470K resistor? Just making sure. It kind of looks like an R.

Second - there are a couple of orphaned components, one from the 393 and the other on the 4093. I assume I need to ground these out as drawn, but do I need to do anything with Pin 7 on the 393? What about Pin 14 on the 4093 - is that going to +12v? Since that gate isn't doing anything, I'm guessing the output doesn't have to go anywhere (kind of like Pin 7 on the 393)?

I ordered all the stuff from Mouser tonight, so hopefully it'll be here by the end of the week!

I really must learn to use one of these drawing packages! I can see why you have the queries - not very neat! Sorry.

The '470R' resistor is 470 Ohms, not 470K. Just used to define the minimum load for the op amp output from the 571 to work into.

Yes pin 14 of the 4093 goes to 12V. My bad!!

Yes the unused gate in the 4093 has the inputs grounded. No connection to the output. Same for the unused section of the LM393. No connection to pin 7.

The 3 electrolytic capacitors are all '10uF 16v'. The remaining capaitors are either '100nF' or '22nF'.

Pins 8,9 and 15 of the 571 are not connected.
 
Last edited:
SWEET! I just breadboarded it and it works like a charm (once I got past my own mistakes).

One more question - Is it possible to have the sound decay a little quicker? If not, or if it's more than just swapping a component with a different value, then it's not a big deal.

I see you're in the UK - I'm actually building this to bring to London in a few weeks for a conference we're putting on. That means you're making the show more enjoyable for your countrymen!

Thanks again,
Gabe
 
Status
Not open for further replies.

Latest threads

Back
Top