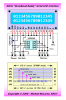
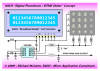
Continue to Site

Welcome to our site!

Electro Tech is an online community (with over 170,000 members) who enjoy talking about and building electronic circuits, projects and gadgets. To participate you need to register. Registration is free. Click here to register now.

  • Welcome to our site! Electro Tech is an online community (with over 170,000 members) who enjoy talking about and building electronic circuits, projects and gadgets. To participate you need to register. Registration is free. Click here to register now.

Simple Diode question....

Status
Not open for further replies.
Great, Yusim! Atomsoft, check out Tip #6, it is exactly what you are looking for!
I actually started with the version of 4x4 keypad they have here. But, doing it that way means using 8 or 9 unique values of resistors to arrive at 17 different voltages. My way rearranges the resistors and lets you use just two resistor values, 1.0K and 220 Ohms. I used Excel to work out which values gave the best overall results.
I knew I had seen a keypad done on a single ADC pin before, probably even this one. I just set out last night to figure out what it would look like and what resistor values to use.
This is a real keeper!
Happy Holidays!
kenjj

I don't quite see how your key pad would work :confused:

Pressing any one of the 4 buttons in each row with give you the same voltage as each other in the same row, the voltage would only change between rows...

unless you were to leave the 1kΩ resistors on the right and place a 220Ω between each button, then it would make sense. but otherwise it wont work
 
This time for sure! ;) I even added the switch resistances, then added them as a chart to the drawing!
kenjj
 

Attachments

  • KeyPad Using ADC.JPG
    KeyPad Using ADC.JPG
    72.1 KB · Views: 352
Hi again Jason (AtomSoft),

Remember too that if you're using an LCD (doesn't everybody? LOL) that you can retask the D4..D7 and the RS pins temporarily for use as switch matrix column or row driver lines. This would use only 3 PIC pins for 3x4 switch matrix, or 4 pins for a 4x4 matrix or a 3x4 matrix + 4 jumpers, or 5 pins for a 4x5 matrix or a 4x4 matrix + 4 jumpers.

Mike
 
Last edited:
Hi there,


It looks like it works ok to me, although i didnt examine it at length yet.
Looks like it also only allows one key to be detected if two are accidentally
pressed, which is kinda nice too.
The only questionable thing i see is what are those two 1k pullup resistors
supposed to be doing? Maybe we have to do a little calculation to determine
the voltage of the ADC for all the possibilities. So the '1' key would generate
a voltage of E=5*1220/(1220+2000), etc., and the ADC programming would have
to look for 'windows' of voltages rather than single values, but that shouldnt
be too much of a problem.
Also, 200 ohm resistors would span a little better than 220 ohm resistors.
ADDED LATER:
Actually, i found that 200 ohm resistors dont span better, but graduated column
resistors seem to span better than one fixed value. We should look for the optimum
resistor values next.
 
Last edited:
Mr Al: The idea was to arrive at a design that used the fewest possible resistor values to do the job. One criteria was for a minimum ADC integer difference of 10 between values. I started an Excel spreadsheet to play with values. The present design uses just two resistor values, 1.0K and 220 Ohm. The two 1.0K resistors in series are the top resistance in a voltage divider, which the spreadsheet showed as 2K in the formulae. The resistance values shown for each key to the left in the diagram are the lower resistance in the divider. When you calculate the voltage produced at the divider's output, you see the lowest voltage is approx. 1.9V ("1" key), and the highest is 3.55V ("D" key). My spreadsheet shows the ADC increment values between the keys as well. The smallest ADC difference is 10 increments (48.8 mV), my stated limit. This is the difference between the "#" key and the "D" key. Posting the chart here is a waste, as you don't see the formulae behind the values. Just suffice it to say that there is enough "spread" between keys to achieve good seperation and avoid overlapping readings due to manageable noise, where unmanageable noise is parking this next to an arc welder...
And, no, it hasn't been tested. I plan to make my new keypad usable with a breadboard and wire it all up and develop code in the next week. I'll be back with the results. The code will be in Atom BASIC, so you'll have to do some conversion to other compilers if you want to use it elsewhere.
Happy Holidays!
kenjj
 
Hi again,


Ok, that's cool. I was able to find values that provided a spread min of 14 counts
with 220 ohms graduated by 20 and 1.9k for the two resistors that connect to +5v,
or something like that :) That's a little bit better noise immunity, but yeah
it's not truly great yet.
I guess if noise really does become a problem we could split it into two parts
and do the two separately, requiring only one more PIC (or other uC) pin.
Two pins for 16 keys would still be pretty good i think.
 
Last edited:
That's an old technique, I'm pretty sure you can just use 3 resistors for each side of the keypad, so for a 4x4 keypad you really only need 6 resistors. Plus one resistor to 5v to make it a voltage divider.

Code:
;Fosc 16Mhz
;First commented on PicList by Dave Dilatush
;Sat, 9 Feb 2002 20:43:39 GMT                                   
;Re: [PIC]: CHALLENGE: 4x4 keyboard and LCD with 1 port = 8 bits
;
;  X-------X-------X-------X----------+--Vcc      
;  |       |       |       |          |           
;  |       |       |       |          |           
;  X-------X-------X-------X---4.7K---+           
;  |       |       |       |          |           
;  |       |       |       |          |           
;  X-------X-------X-------X---10K----+           
;  |       |       |       |          |           
;  |       |       |       |          |           
;  X-------X-------X-------X---15K----+           
;  |       |       |       |                      
;  |     1.2K    2.4K    3.6K                     
;  |       |       |       |                      
;  +-------+-------+-------+--> to PIC A/D Input  
;                          |                      
;                         22K                     
;                          |                      
;                         GND

Below was the way I did it, it needs 3 PIC pins but does not need the ADC, just a timer;
Code:
            +5v -----------------*------*------*------*-------
                                 |      |      |      |
                                 R      R      R      R
   ,------,                      |10k   |27k   |47k   |68k
   | PIC  |                      |      |      |      |
   |12c508|  270 ohm             |      |      |      |
   |      |----R---------*-------S------S------S------S-------
   |      |              |       |      |      |      |
   |      |              |       |      |      |      |
   |      |              |       |      |      |      |
   |      |----R-----*---|-------S------S------S------S-------
   |      |          |   |       |      |      |      |
   |      |          |   |       |      |      |      |
   |      |          |   |       |      |      |      |
   |      |----R-*---|---|-------S------S------S------S-------
   |      |      |   |   |
   '------'      C   C   C           12-key keypad matrix:
                 |   |   | 3.3nF
                 |   |   |                    |
                -*---*---*-              ,-S--*
                   GND                   |    |
                                      ---*----|------
                                              |
                                              |
 
Last edited:
Roman (and gang),

Seeing your Keypad drawing made me realize that I could use a variation of this RC timing method along with the Matrix driver lines on my 1-pin “Breadboard Buddy” Serial LCD Interface to realize a 1-pin 3x4, 4x4, or 4x5 Keypad interface.

That's 1 pin for the LCD display and 1 pin for the Keypad. Thank you for stimulating the old synapses once again.

Happy Holidays everyone.

Best regards, Mike

k8lh-dtmf-dialer-concept-png.36129
 

Attachments

  • K8LH 12F635 LCD Interface.PNG
    K8LH 12F635 LCD Interface.PNG
    38.4 KB · Views: 254
  • K8LH DTMF Dialer Concept.PNG
    K8LH DTMF Dialer Concept.PNG
    37.6 KB · Views: 923
Last edited:
I'm begining to think we should start a competition here to see how much functionality we can get out of an 8-pin PIC, like the 12F675. That has ADCs doesn't it? Maybe we could squeeze a full-blown DMM out of it! (Riiiight!;))
Later!
kenjj

Hi,


That's an interesting idea (competition, he he).

Yes, i believe you can do a DMM with a 12F675 and i often thought about
it myself in the past. The readout would have to be a serial LCD, but
those are a bit more expensive than the parallel ones.
The 12F675 has four AD ports possible, with another pin input and
another pin in/out and of course 2 power supply pins.


Mr RB:
I think you are right, although i havent looked at that solution yet.
Maybe i should :) as it could be useful in the future.
 
Last edited:
Not really a fair competion, with shift registers you can multiply I/O pins at will as long as the speed isn't excessively high.
 

Nicely done! I think you could eliminate the 10k resistor too since it's an exercise in simplicity, and keypads generally have 10's of ohms key resistance which is plenty to take care of the charge current of the 3n3 cap. :)
 
Not really a fair competion, with shift registers you can multiply I/O pins at will as long as the speed isn't excessively high.

Hi,

And with an analog multiplexer you can multiply the AD inputs, but then
you've just added an analog multiplexer and a shift register, if that's
what you really want to do.
Can also add another 12F675, but then that's another ic too.
 
You can easily derive the LCD 6pins from 4 PIC pins, with no other chips needed. Then that leaves 2 pins of the 12F675 left for ADC inputs, you could use one for your multimeter input and the other for all your buttons (multi-buttons to ADC).

So you can make a LCD multimeter from a 8-pin PIC quite easily.

Please show us how to drive six LCD pins from four PIC outputs...

Mike
 
Status
Not open for further replies.

Latest threads

Back
Top