Continue to Site

Welcome to our site!

Electro Tech is an online community (with over 170,000 members) who enjoy talking about and building electronic circuits, projects and gadgets. To participate you need to register. Registration is free. Click here to register now.

  • Welcome to our site! Electro Tech is an online community (with over 170,000 members) who enjoy talking about and building electronic circuits, projects and gadgets. To participate you need to register. Registration is free. Click here to register now.

Removing gel pot for lamp body repair

Jaimesix

New Member
Hi

I have these LED lamps (auxiliary off road lamps) that are a (supposed to be) good brand

Fact is the body is aluminum and it is rusting turning into white powdery corrosion on its surface

Decided to pull them apart to try blast and refinish the aluminum body

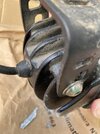
Discovered inside these lamps have this gel pot, so I am thinking about taking it off (no option if I were to want to refurbish the body) in order to do as mentioned.
Am I just use a knife and get it off? So that after painting the lamp bodies I could reapply it ?

Is this gel readily available for reapplication ?

Any experience with dealing with corroded aluminum bodies so common nowadays?

After this experience I’d rather have steel or plastic bodies as opposed to aluminum
IMG_7746.jpeg
 

Attachments

  • IMG_7748.jpeg
    IMG_7748.jpeg
    1.6 MB · Views: 86
So is the gel those white squiggles that look like they hold the lamp module to the enclosure? If so, I'd just scrape it off like you proposed, get both surfaces as clean as possible, then apply some adhesive to hold it together. I'm guessing something like silicone caulk (or even non-silicone, like what we have in the US called "Liquid Nails") should work fine. There are no electrical concerns that I can see; it's just bonding the lamps to the housing.

To get rid of the corrosion, try soaking the aluminum in vinegar.
 
I believe that white material is heatsink compound, to assist in dissipating the heat from the LEDs.
The PCB appears to screw to the housing, so an adhesive would appear to be redundant, while heat dissipation is vital with high power LEDs.

You should be able to buy the stuff in large tubes, quite cheaply, from any electronics supplier.
The white type is probably zinc oxide based, newer ones are often grey ceramic based.


To refinish the housings, I'd wire brush them then prime them with "Hammerite special metals primer".

That stuff bonds in to metals incredibly well - I once filed down some pitted metal I'd previously used it on & none of it flaked off, it filed away to nothing but stayed on the metal.

Then a coat or two of whatever colour plain or hammer finish hammerite you prefer.
 
Good call on the heatsink compound; hadn't thought of that.
It'll be easy to tell if that's what it is; if it's heatsink compound it'll be greasy and not solid. If you can wipe it off with a rag, then just get some fresh compound and re-apply it. (You could certainly do a much more thorough job than whoever assembled that unit at the factory that day!)
 
anything you coat the interface will make the LEDs hotter. if the interface was not oxidized, leave it or use CPU thermal grease. But the rest can be 2 coats. Blocking the oxygen prevents rust. Some plastics leak air more than others. Make sure to get a good thermal fit with max torque on screws.
 
Last edited:
Leave the anodized black on the back, don't paint it. Right now it is a black nano coating and the thin layer of oxide doesn't bother the thermal transfer to air. If you paint the backside, you are essentially insulating it with polymer of paint - 10s of microns thick. It makes a difference.


If it has a lot of corrosion on the heat sink fins, you can just sand them. They will not radiate as much infrared as the bare aluminum but better than a thick coat of paint.

They look like caustic corrosion or salt corrosion of the aluminum.
 
Could it be that the OP is using the strange expression "Gel Pot" as shown in the picture below?


1724627480132.png


Pot = Recess in the lamp housing

Gel = The potting compound sealing the power wires.

If that is the case then I suggest that he does not remove it, but simply disconnects the wires from the circuit board by de-soldering them.

JimB
 
I was wondering about that strange terminology myself, but I don't think that's what they were referring to; it seems to be the heatsink compound. That's my guess©®, anyhow.
 
We used to pot, actually dip Jeep Cherokee seat heater circuit boards in a rubberized clear silicone. It looked like a gel compound or firm jelly

It had better moisture retardation and I agree that no painting shud be dun over black anodized aluminum. Chrysler approved the parts after a long Qualification process ending with 2 Jeeps driving to the great white north from Winterpeg.
 
Painting the outside and lip of the case should not do any harm.

A thin layer of hard-setting paint should not affect heat dissipation much, given the overall size of the lamps. It's the only reasonable way to make them look decent without replacing them.

The inside does not look bad, that just needs cleaning & re-assembling, possibly with some silicone grease on the front seal to improve water resistance.

Considering how little of the inner lamp assembly had thermal contact with the rear case (prom the badly applied, minimal, heatsink compound), re-assembling it with a good overall layer will probably allow the LEDs to run cooler no matter what is done to the casing!


(I took ZZOs comment to refer to the inside back, where the heatsink compound would be, which I would not have expected to be painted as the inside looks OK anyway, behind the "glass" level).
 

Latest threads

New Articles From Microcontroller Tips

Back
Top