Continue to Site

Welcome to our site!

Electro Tech is an online community (with over 170,000 members) who enjoy talking about and building electronic circuits, projects and gadgets. To participate you need to register. Registration is free. Click here to register now.

  • Welcome to our site! Electro Tech is an online community (with over 170,000 members) who enjoy talking about and building electronic circuits, projects and gadgets. To participate you need to register. Registration is free. Click here to register now.

Question(s) about the Microchip dimmer

Status
Not open for further replies.

Chris in Mesa

New Member
I hope someone can help me out. I'm attempting to build my first circuit (the incandescent dimmer circuit from the microchip site):

https://www.electro-tech-online.com/custompdfs/2009/09/91094A.pdf

I was putting together a parts list and when I came to the resistors, I didn't know the wattage that I needed - only the Ohms are listed. If anyone can help me figure out the wattage of the resistors, it would help a lot.

I searched the forums and came across another dimmer design. Does anyone with experience have an opinion as to whether one schematic is “better” than the other?

https://www.electro-tech-online.com/threads/light-dimmer-controlled-by-pic.88654/

Does anyone know if I can just use a generic IR transmitter / receiver pair instead of the ones listed?

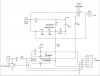
On the diagram of the receiver (see attached), there are several places (near the lower left for instance) where the lines are terminated with an arrow. Where does this connection "really" go? For example, the arrow to the left of the 47 mfd capacitor, and the arrow on the number "2" of the IR receiver [GP1UD261RK]. I’ll take an answer or a link, or an hint as to where to find that information out for myself.

One more question (for now). What do you think the jumpers are for?

So basically, I will take any help that the community can give. I have tried to do my homework before submitting.

Thanks a bunch! Chris
 

Attachments

  • IR Receiver.JPG
    IR Receiver.JPG
    68.8 KB · Views: 692
  • IR Transmitter.JPG
    IR Transmitter.JPG
    38 KB · Views: 659
Chris, either circuit will work but be careful with the Microchip circuit. It is directly connected to the AC line and uses a resistor divider and zener to drop the voltage down to 5 volts. This method needs fewer parts but can be LETHAL if you are not careful. To answer your questions about the resistors, 1/8 watt should also work for the ones not marked with a wattage but if you have 1/4 watt they will also be fine. About the "arrows" that is the normal method of indicating circuit "ground" , connect all of the arrows that do not have +5V together and connect all of the arrows that have +5V beside them together. JP1 and JP2 are there to allow you to remove them and program the circuit using ICSP (In Circuit Serial Programming). J3 of course is your ICSP header, J2 would go to your light bulb, J1 goes to AC line (110 as most of us here in the States normally call it).

I do not quite follow you on the generic transmitter/receiver pair for the IR. The transmitter is made from scratch as shown in the 2nd picture you attached. Make sure you download the source code or hex file for it, I can't remember if it is in the zip file for 91094A or not. As for the receiver for best results use the one indicated, if substituting make sure you use one for a 38 kHz carrier
 
About the "arrows" that is the normal method of indicating circuit "ground" , connect all of the arrows that do not have +5V together and connect all of the arrows that have +5V beside them together.

SHOULD HAVE BEEN

About the "arrows" that is the normal method of indicating circuit "ground" and "supply" , connect all of the arrows that do not have +5V together and connect all of the arrows that have +5V beside them together.

Mike
 
Awesome

Mike, Thanks for the help! You did answer my question about the transmitter. I was referring to the actual IR transmitting/receiving Diodes.

At the local electronics shop (Frys Electronics) I found a pair of IR transmitting and receiving LEDs. My question was "could I substitute these instead?". It looks like as long as they are 38 kHz I might be good. The only place I found the exact part number was on Mouser Electronics and they were on backorder. I didn't want to pay $7.50 "backorder shipping" for a $1.25 part ;) I did go ahead and order a 38kHz substitution pair from them anyway.

Thanks for the tip on D/L-ing the source code. I managed to hunt that down in the zip file on the Microchip site a couple of days ago.

You have been a big help, thanks for your time / knowledge!
 
Chris,

Sorry for being so late getting back to you on this. The receiver is not just a diode, it is a complete receiver and demodulator circuit contained in a 3 pin package. You will not be able to substitute just a diode for it. On the bright side, you can likely pick-up a suitable substitute at a local Radio Shack if you are in a hurry to build the project or if you ordered a diode only instead of a receiver module

Mike
 
Ah....

Thanks. I didn't realize that the IR receiver contained a demodulator built in. You likely saved me some debugging time! Can I trouble you (or the community) with another question. I thought I could figure out the capacitor voltage, but had to guess when confronted with the myriad of available options at the store. From what I can tell, all capacitors on this schematic are at +5 volts because they are already being knocked down from 110V to 5V by passing thru the two resistors and the zener diode. Did I read the schematic correctly?
 
Chris, sorry for being so long in getting back to you but my internet has been down due to a fried modem. The only one I would worry about is the 47 uf right after the zener. That one I would use at least a 50 volt cap
 
Hi mike I have seen this circuit & never went to analize that.

Oops it is using ROC function to detect the ZX.Thats a nice idea.

Have you built this how was the smoothness in the brightness?
 
Last edited:
Mike, No Sweat about taking time to get back and bummer about the modem. I ordered everything that I couldn't find at the local electronics shop. I was surprised at how small everything is. I haven't yet assembled the board (bread board) because I'm not sure how I can attach the components. I have only soldered a couple of times in my life (all within the last two weeks). So, I'm trying to either find "life size" replacement parts, or work on my soldering ;) Warning - I may post some follow up questions here, lol. Thanks again! C.
 
Hi mike I have seen this circuit & never went to analize that.

Oops it is using ROC function to detect the ZX.Thats a nice idea.

Have you built this how was the smoothness in the brightness?

Gayan,

I have not built this circuit so I can't personally comment on smoothness but it is divided into 8 steps basically increasing 12% in each step. I have however built a similar ckt using only 3 steps and from experience with that circuit would have to say that 8 steps would be much smoother.

Mike
 
Whatever you do, don't connect the programmer when the circuit is powered by AC! A blown modem will not be the only dead piece of gear. Be careful!
 
Last edited:
Some Good news..I have built both boards at got the remote to work. I haven't been able to get the dimmer board to work yet though. I'm going to rebuild it and try again. I do have one question before I start. In the docs (see here: https://www.electro-tech-online.com/custompdfs/2009/11/91094A.pdf) on page 3 it talks about adding a 330 mfd filter cap. as part of the transformerless power supply. I don't see that in the schematic though. Anyone know if this is an oversite, or is there something I don't know?
 
Chris,

Replace the 47 ufd capacitor in the schematic with the 330 ufd. This could be why the circuit doesn't work, not enough power for the devices.
 
How do I figure out the average current of a triac burst?

Hopefully someone will have pity on my poor soul and clue me in! I have been trying for days to figure out what is glossed over in an application note for this dimmer circuit: Application Note 91094A from Microchip (the link is in the first post of this thread; I'm hesitant to add any external links since several of my last posts have never made it live.) Near the bottom right of page 2, it says:


Assume that the load is a 100 Watt light bulb with a
typical filament resistance of approximately 1Ω. The
triac should be conducting 5 mA when the AC line voltage
reaches 5V. Translating this into a conduction
angle, the 5 mA hold current should have been
reached 2 degrees following the zero crossing (see
Equation 1).
EQUATION 1:
Angle = invsin(5V/(110V * 1.414))

Assuming a 60 Hz system, the minimum 5 mA hold
current should be achieved after 93 microseconds of
bias current (see Equation 2).
EQUATION 2:
Time = (1/60 hz) * (2°/360°)

So, we only need to hold the bias current of 3 mA for
approximately 100 μS to latch the triac on. If we average
the narrow pulse of current over ½ of a 60 Hz
cycle, it gives us an average current requirement for
the triac bias of less than 37.5 μA.


My problem is with the last sentance. I have a different triac with different trigger / holding currents and I can't figure out how they arrived at an "average current requirement of 37.5μA". I have a MAC4DHM from On Semiconductors with a trigger current of 1.8 mA (typ) - 5.0 mA (max) and a holding current of 1.5 mA (typ) - 15 mA (max). Hmm... I just saw that I have been working off of the MAX values, not realizing it. Anyway, I would assume that since their values of 3/5mA used in the equation are within the range of my triac, that I could the same equation, but I need to be sure. Can anyone throw an equation my way that can explain how they arrived at 37.5 μA avg? P.S., I've read every datasheet/example on triacs that I could google, but no luck.

Thanks, Chris.
 
They are delivering a pulse for 100μs, once every 8.33ms. That's 1/83.3 duty cycle, or 1.2 percent. The pulse is 3mA, so the average power drawn is 3mA*0.012 or or 36μA.

This means that 36 (or 37.5) μA needs to be delivered to the storage capacitor so it can be recharged between pulses.
 
Awesome! To be honest, it took me a minute to figure out where the 8.33 came from, but I got it: 1000(mS)/120(60hz*2) for each wave. Thanks again!
 
Status
Not open for further replies.

Latest threads

New Articles From Microcontroller Tips

Back
Top