Continue to Site

Welcome to our site!

Electro Tech is an online community (with over 170,000 members) who enjoy talking about and building electronic circuits, projects and gadgets. To participate you need to register. Registration is free. Click here to register now.

  • Welcome to our site! Electro Tech is an online community (with over 170,000 members) who enjoy talking about and building electronic circuits, projects and gadgets. To participate you need to register. Registration is free. Click here to register now.

New to Electronics-Stepper Motor, Drives, Microcontroller, Rotary Encoders

Status
Not open for further replies.

IANTVTBB6H22

New Member
Hi,

My name is Ian. I am 30 years old and this is my first post. I have a somewhat "decent" experience level with electronics but nothing too crazy. I am new to any type of microcontrollers, their code or wiring together motion control systems. I took a few electronics courses when I was @ PCT for automotive training and I have been doing car audio since age 12. So anyways, to my point:

I am trying to design an electronic control system for an automotive project. I want to be able to control the front-to-rear, hydraulic braking force bias from inside the car using an aftermarket hydraulic brake bias adjuster and a stepper motor system. I would like to use an absolute rotary encoder mounted in the car to make the adjustments and have a 24X4 LCD display that would display the current brake bias percentage.

Here are some concerns:
-Memory of Position: It would be important for the microcontroller to be able to keep the stepper motor in its current position with the vehicle being powered on or off and by my understanding the "Absolute" Rotary Encoder would be what I need. I would assume that with the use of an absolute rotary encoder and the fairly advanced ARDUINO MEGA 2560 REV 3 Microcontroller, I'd be able to code that in.

-Multiple-Complete Revolutions: Do most stepper motor drives, stepper motors and microcontrollers support, multiple, complete revolutions of the shaft? I know they can break down one complete revolution into a ton of steps but my hydraulic valve needs to be rotated completely, multiple times, is this something that I can do? I don't have the valve yet so I don't know how many turns it's adjustment knob takes from fully inward to fully outward but I would imagine in the neighborhood of 4-6.

-Stepper Motor Strength: The stepper motor I have chosen is a AUTOMATION DIRECT SureStep STP-MTRH-23079, its one of the larger on the market being a NEMA 23 frame but I can't get specs for output torque on any motors, only holding torque. I'd imagine the actual turning torque of the motor would be more or at least equal to the "holding torque". This motor is listed as 286 OZ. In. which converts to about 1.46 Ft. Lbs. I'm assuming this should be enough to turn the WILWOOD valve, but again, I don't have it on hand.

-ARDUINO MEGA 2560 REV 3, 5V Power Pin: The ARDUINO MEGA 2560 REV 3 has only (1) "5V" output pin. Is ok to wire this pin to multiple other pins like say the rotary encoder, stepper driver as well as the SunFounder Display?

-Absolute Rotary Encoder Selection & Wiring: I chose a BOURNS EMS22A50-D28-LT6 Absolute Rotary Encoder. It has 6 Pins, most rotary encoders I have seen online are either a 4 for 5 pin. In my wiring diagram I only made 4 of the 6 connections, is this ok? It is my understanding that his particular rotary encoder does not have a center shaft "press in" button option but maybe I'm wrong, either way I don't need it. Here is a little feature on the encoder and the pinout along with what pins I connected.
BOURNS - Forum Feature & Pinout-Resized.jpg


Here are the components I have chosen:
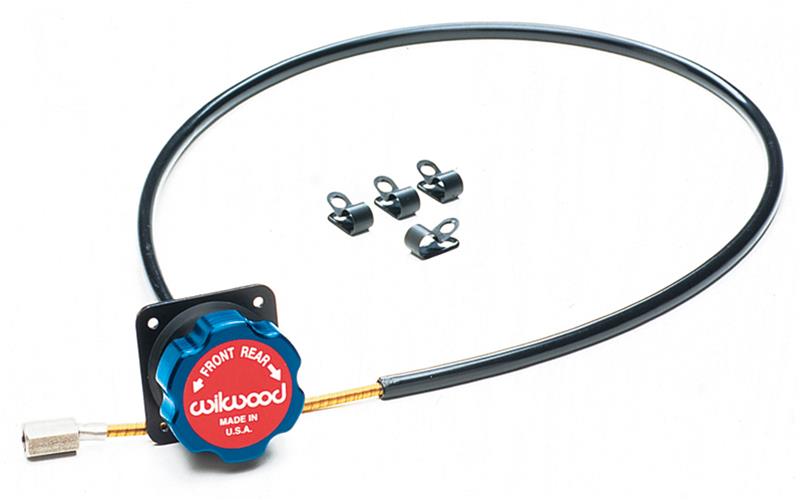
-Brake Proportioning Adjustment Valve: WILWOOD 26011179 Adjustable Brake Proportioning Valve (Rotary Thumb Screw Type)
-Microcontroller: ARDUINO MEGA 2560 REV 3
-Stepper Motor Driver: AUTOMATION DIRECT SureStep STP-DRV-4845
-Stepper Motor: AUTOMATION DIRECT SureStep STP-MTRH-23079 NEMA 23 Frame, Single Shaft, 5.6A, 286 Oz-In Holding Torque, 1.8-Degree Step Angle, 200 Steps Per Revolution, Bipolar
-Microcontroller Power Supply: Powerwerx USBbuddy 12V DC -to- 5V DC USB Power Supply
-Stepper Motor Driver Power Supply: CUI Inc. VHK-150W-Q24-S24 150W DC-to-DC Converter (9-36V Input/24V Output/6.5A Max Current)
-LCD Display: SunFounder IIC I2C TWI Serial 2004 20x4 LCD Module
-Rotary Encoder: BOURNS EMS22A50-D28-LT6 Absolute Rotary Encoder

Here is a wiring diagram and component layout I made, looking for input on if I made the right connections.
Layout & Wiring of All Components.jpg
 
You might want to look at the latest brake systems on modern cars. The servo, ABS, and master cylinder are all replaced by a single module, basically an ABS module with an integrated master cylinder. There's no need for a vacuum feed, as all the power comes from the ABS pump.

All the braking is done via the control electronics, unless that is dead, in which case the master cylinder part allows direct braking.

The point is that brake balance is electronic. You wouldn't need anything else.

You could probably use a more normal ABS system to control the brake pressure.

If you are using that control valve, that motor will have the power to drive it from one end to the other in a fraction of a second, and I can't see why you need that. I would have expected a motor and gearbox arrangement, with a much smaller motor, and cheaper drive electronics.

If you do use that motor directly, the only reason to have the high voltage supply is to get the motor to turn quickly. In a stepper motor, the windings have inductance, and each step the motor takes, the current has to reverse in one winding, and the larger the supply voltage, the faster the current reverses. However, the resistance of the windings is small, so the voltage cannot be left connected to the motor, or the current would soon get too large, which would lead to the motor burning out. Once the current has reached the maximum value, the stepper motor controller will limit the current.

The motor you've got has a winding resistance of 0.4 Ohms and a maximum current of 5.6 A. So when the motor isn't moving, and the current isn't changing, you will only get 2.24 V across each winding. With a 12 V supply, you can get the maximum current from that motor without a booster, just you won't be able to get the motor to move as fast, but I still think that it will be very quick compared to manually adjusting the valve.

The stepper motor can go round as many times as you want it to. The absolute encode will tell you the angle, but won't tell you how many times round it has gone. For that you need something like a 10-turn potentiometer, but you would have to have some way to know where the start point is.

Many systems like this will just remember their positions when they turn off. You can save the position in the Arduino and the stepper motor won't move when turned off. You can also have an end stop, and just drive the motor to that and back each time the power is turned on. Lots of stepper motor applications do that.

About the 5 V pin, you can connect lots of things to one pin, but the total current must not exceed what it can supply. I'm not sure how you are intending to power the Arduino, so I don't know what the rating would be.
 
Someone on another form said the 5V pin on the arduino can only deal with 200mA of current. Thats not alot at all, I am planning to run a wire from this pin to the "EN+" pin on the stepper motor driver and a 24X4 LCD display and the rotary encoder on the same circuit as that.
I really don't need the motor to move fast, I only need it to make say one complete revolution with and at the same speed as the rotary encoder.
As far as the rotary encoder and its correlation to multiple complete turns, I am going to count on the arduino board and the right coding to have the LCD display show a current percentage of from/rear bias. That would work right?
 
The enable pin on the stepper motor driver will take very little current. The encoder takes 20 mA max. I don't know how much current the LCD module takes, but it should be OK on the 200 mA supply, and it will probably just go dim if it tries to take too much.

You can get the Arduino board to count revolutions. You will need to store in non-volatile memory where it is for when the power goes off. You will need some way to set it to the right turn initially.
 
Re. the stepper and driver system, the "holding torque" is the motor maximum possible torque at full power; the practical load should not get too close to that.
The torque also decreases with speed.

Depending on the actual torque needed, you may be better off with a simple DC geared motor; that should be rather smaller and cheaper; a gearbox can give very high torque from a small low power motor.

Gearboxes are almost always a benefit in position control systems, allowing smaller and cheaper motors and drives while giving finer output control.

eg. The 10 RPM version of one of these would give around 8 Ft lb torque:
**broken link removed**

That could be run from something like this, with the arduino controlling it:
**broken link removed**

Or a smaller stepper plus gearbox, making it more powerful than the NEMA 23 one:


The encoder is a single-turn absolute type, not multiturn. That's fine if the rotation output you need to control is no more than 360' or you can gear down (eg. using a timing belt) the shaft rotation to the encoder, so the encoder never moves more than one full turn?

For multiple turns or higher resolution, you would need a multi-turn encoder or pot for feedback.
 
How accurate does the encoding need to be? You state you're displaying percentage bias, does this mean that a resolution of 1% is accurate enough? If so then gearing up the ouput of the stepper/ encoder combo might solve your problem. It will also increase the torque required. Could you possibly go to a home position on powerup? Trying to keep track of position in software is very unreliable.

Mike.
 
The stepper motor should always be ran at it rated plate current from zero rpm to maximum rpm.
In order to maintain the current as inductive reactance increases in rpm, the drive, using a higher voltage that the motor rated value, should attempt to keep this rated current constant.
This is what makes servo's much more efficient, if using encoder feedback for positioning (PID), the servo motor is a much better option as current varies with load and the need to retain programmed position.
Max.
 
My name is Ian. I am 30 years old and this is my first post.
Your intro sounds like a hybrid of movie/TV scenes starting a conversation at...
- a 12-step addiction program.
- entering a confessional to talk to a priest.

I'm going to use that from now on...
My name is GopherT, It's been 3-weeks since my last project. And I am addicted. ,
 
I have decided to go with a Anaheim Automation NEMA 17 Stepper Motor with a 51.06 Reduction Planetary Gearbox instead of the AutomationDirect SureStep NEMA 23. It is rated @ a 0.85A "Bipolar Current" (I believe this means 0.85A per phase). The AutomationDirect SureStep NEMA 23 had a "Current Rating" of 5.6A and a holding torque of 286 oz. in. or 1.49 ft. lbs. It was a stronger motor for sure but 5.6A is alot of current for most drivers and it was a little too big dimensions wise. The Anaheim Automation NEMA 17 Stepper Motor I have chosen has a "Rated Torque" of 278 oz. in. or 1.45 ft. lbs. & a "Max Torque" of 833 oz. in. or 4.34 ft. lbs. I'm not sure if these ratings are for the motor alone without the gearbox or not, most I have seen online are rated that way, motor only torque without gearbox so I'd assume the gearbox will add alot of torque. Even if it isn't, the rated torque of 1.45 ft. lbs. should be just about enough I'd imagine. Another plus of using a stepper motor with a planetary gearbox is that the motor con operate at a higher rpm and velocity, meaning less stress on the motor and operation that is more within the designed range.
Anaheim Automation - 17YPG - Stepper Motor with Planetary Gearbox.jpg

I have decided to add an Anaheim Automation Single Ended w/ Index - Incremental Rotary Encoder Addder. I'm not 100% sure on what this does but I'd imagine having the hardware to have the ability to give the ARDUINO motor position and speed info would be a plus.
Anaheim Automation - Single Ended With Index - Incremental Rotary Encoder Adder.jpg

Also, I have finally found an ARDUINO compatible shield that I'd like to use. It's a DFRobot DFR0105 ARDUINO Compatible "Power Shield". Since I need a microcontroller controlled, 5V power source that can handle the current required to power the stepper motors incremental rotary encoder add on for feedback, the absolute rotary encoder input/adjustment switch, the LCD display & the AutomationDirect SureStep STP-DRV-4845 Microsteping Driver, this "Power Shield" will allow the ARDUINO Mega 2560 REV 3 board to switch and manage power at much higher voltages and currents than the ARDUINO board can do alone. The ARDUINO Mega 2560 REV 3 board's only 5V power output pin is limited to 5V & 200mA but with this shield I can use the board and control voltage outputs from 1.25V-12V & currents up to 2A (3A Peak). Since I am driving a NEMA 17 stepper motor and will be using a separate stepper motor driver to manage the power to the two phases of the motor, I don't need a ARDUNIO shield designed specifically for driving motors, I just need something that can manage power and deal with the voltages and current of running all the things I need to.
DFRobot - Power Shield (Arduino Compatible) - Angle View.jpg
 
Here is the actual hydraulic, manual, brake bias adjustment valve i plan to use. It's a thumb screw adjustment type and has up to a 57% pressure reduction meaning I can easily achieve front/rear brake bias percentages between 70% Front/30% Rear or 70% Rear/30% Front (The most I'd likely set the bias to). I don't own the valve yet or have it in hand so I am uncertain of the resistance or torque required to turn the valve. I hope that the stepper motor's "Rated Torque" of 278 oz. in. or 1.45 ft. lbs. & a "Max Torque" of 833 oz. in. or 4.34 ft. lbs. will be enough. My guess is the valve takes somewhere between 0.25-1 ft. lbs.
Wilwood Brake Proportioning Valve.jpg
 
A proportional valve is like a position-seated valve so the seal is never really dependent on torque. So the torque needed to move the valve could be fairly light for a water valve (200-300 in-lbs). I have no guess how the stem is designed to insure there is no air leak in or fluid leak out. I'll be impressed if you're not adding air to the line every time the knob is turned - requiring you to bleed your breaks regularly. Or, you'll have to make your adjustments while the brakes are pressurized but that will make the knob harder to turn. Good luck.
 
I have no guess how the stem is designed to insure there is no air leak in or fluid leak out.
The adjusting screw and thread are outside the pressurized system and no part of the seal, in general hydraulic valves.
Depending how that specific valve works, it will either be pressing on a spring or moving a valve spool against a spring.

I suspect the adjusting screw can be completely removed and could be replaced by a long grub screw with the same form on the end - most likely either pointed or concave.

That could have a flexible drive coupler fitted, to connect to the gearbox output.

Edit - the knob on the valve adjuster is removable to fit a different drive device; Wilwood actually sell a bowden cable type remote adjuster that can be used with that valve (see the review comments):
 
The valve is designed to be adjusted by hand using the thumb screw knob, it is designed to be adjusted while connected to the hydraulic brake lines in a sealed, hydraulic system. The resistance to turn the valve is probably very light or at least moderate, I'm guessing 3 -to- 12 in. lbs.

This project idea is cool and hypothetical but thats just the thing, I mean how often will I REALLY need to make brake bias adjustments and is it worth $500 worth of components including a stepper motor, a driver, a power supply, a microcontroller, a microcontroller shield, a absolute rotary encoder and an LCD display? Maybe not.

It might just be easier to buy this https://www.summitracing.com/parts/wil-340-4990 and adjust the valve remotely from inside the car when I need to. *This part is technically for adjustment of balance bars on aftermarket pedal assemblies with dual master cylinders to in turn adjust brake bias. I could make it work for the hydraulic proportioning valve though with some modification/custom fitting. It wouldn't be often and I could probably live without an LCD display or any indicator of position and actual bias percentage. Like I said it's hypothetical, I wanted to learn about all these components and circuitry and design a complete system for my dream car build.
 
Last edited:
You could always split the difference;
use the bowden cable adjuster drive with a couple of timing pulleys added at the valve end, driving the optical encoder for a position display?
 
You could always split the difference;
use the bowden cable adjuster drive with a couple of timing pulleys added at the valve end, driving the optical encoder for a position display?
Ahh, not a bad idea. Use a manual adjuster valve with an extension cable but mount an optical encoder and use the ARDUINO Mega 2560 REV 3 to read it and send out display data to the LCD display making for a manual valve and adjustment but with the ability to have a digital display on the dash for bias percentage readout. Less complicated and expensive, still sufficient
 
A human with a 3" diameter knob cannot exert more than 500 inch ounces. How big is the adjustment knob?

Mike.
 
Do you plan to
A human with a 3" diameter knob cannot exert more than 500 inch ounces. How big is the adjustment knob?

Mike.
youre able to google the torque a human can exert on a knob but you can't search for a manufacturer's datasheet to get the diameter?
 
I remember that from a job I did about 40 years ago hence ounce inches, if it was more recent then it'd be kg cm.


Mike.
 
I remember that from a job I did about 40 years ago hence ounce inches, if it was more recent then it'd be kg cm.


Mike.

kg cm is an abuse of metric units. Slight improvement would be kgF*cm but N*cm would be what someone with a science or engineering degree would use. I think "kg cm" as a unit of torque might be reserved for arts majors from a second-class school.
 
Status
Not open for further replies.

Latest threads

New Articles From Microcontroller Tips

Back
Top