Electro Tech is an online community (with over 170,000 members) who enjoy talking about and building electronic circuits, projects and gadgets. To participate you need to register. Registration is free. Click here to register now.
Welcome to our site! Electro Tech is an online community (with over 170,000 members) who enjoy talking about and building electronic circuits, projects and gadgets. To participate you need to register. Registration is free. Click here to register now.
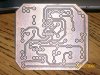
I got the laminator and .032 board from Plusar.....The first one I made came out great until I used the green trf or whatever it's called. That messed it up. So I did it again using their tranfer paper and the laminator. I opted out of the green trf and it worked great. I might try the magazine paper many use on here just to see how it works now that I have gotten my feet a little wet. Mind you the traces are only .04, so compared to some people on here, mine was a no brainer.
Thanks again to all those that helped me with the pcb design, implementation, and the positive feedback.
If the green TRF lifts the toner from the copper the toner is not well attached. Let the laminator warm up for an extra 10 minutes or so. If that does not work run in through a few more times.
Something you might try on another board ... make the center holes of the pads small. When you do that, they act almost as a center punch mark would. When you drill the holes for the pads, the drill bit can't "walk" off-center (or drift, or whatever you want to call it) and the holes are drilled in the center of the pad. I've done it this way for years and it works great for me.
Something you might try on another board ... make the center holes of the pads small. When you do that, they act almost as a center punch mark would. When you drill the holes for the pads, the drill bit can't "walk" off-center (or drift, or whatever you want to call it) and the holes are drilled in the center of the pad. I've done it this way for years and it works great for me.
Sounds good, I think someone mentioned that to me in the beginning of the pcb stage..kinda forgot. What is a good hole size to get desired center punch?
On a scale from 1 to 10, 10 being completely dark, I would say that on the fill areas its about maybe a 8 in certain places.
Where the traces are etched out....I would say a 1 or 2, so there is a significant differece.
When I turn the pcb over on the backside not holding up to light...all I see is through the board is where the traces are etched out....that's it.
Also keep in mind that I am not using the ground plane other than to make the etching process a little easier.
Think that's ok? Or no?
I ran it through the laminator about 4 times....and let it warm up for over 30 minutes so I think the laminator was hot enough. After the paper came off I used warm water to get the toner off. And the rest of the toner that didn't come off I used green pad with acetone to get it off. I had to scrub it pretty hard for awhile to get it all off. Is that normal?
Any comments greatly appreciated!
Thanks as always in Advanced!
Mark
Sounds good, I think someone mentioned that to me in the beginning of the pcb stage..kinda forgot. What is a good hole size to get desired center punch?
Great looking board!
I usually put some identification on mine, years later I might forget and not be able to find the the file, if I should need it again, because the filename escapes me.
So if you have room put Made by:
Date:
File name:
Great looking board!
I usually put some identification on mine, years later I might forget and not be able to find the the file, if I should need it again, because the filename escapes me.
So if you have room put Made by:
Date:
File name:
I like to include a version number. It is very useful if you use and programmable parts on the board. #idefs can be used to build or understand software for various versions of the board.
Eagle allows for a comment file in each project. In it I record changes and even information that I learn while building the board. What to change in the next rev to make life easier. If your PCB program does not support it you can do much the same in a text file.
{snip}
I ran it through the laminator about 4 times....and let it warm up for over 30 minutes so I think the laminator was hot enough. After the paper came off I used warm water to get the toner off. And the rest of the toner that didn't come off I used green pad with acetone to get it off. I had to scrub it pretty hard for awhile to get it all off. Is that normal?
Any comments greatly appreciated!
Thanks as always in Advanced!
Mark
Please clarify your above statement, it don't make sense to me.
After etching the toner should wipe right off with a rag soaked in acetone. Make sure the board is dry first.
I like to include a version number. It is very useful if you use and programmable parts on the board. #idefs can be used to build or understand software for various versions of the board.
Eagle allows for a comment file in each project. In it I record changes and even information that I learn while building the board. What to change in the next rev to make life easier. If your PCB program does not support it you can do much the same in a text file.
My version of version number is simple, I use a letter + number after the filename, (it actually becomes part of the filename), which I increment each time I make a revision. The exact replica is engraved on the board so there are never any doubts about its identity,
Simple and effective.
Great looking board!
I usually put some identification on mine, years later I might forget and not be able to find the the file, if I should need it again, because the filename escapes me.
So if you have room put Made by:
Date:
File name:
I like to include a version number. It is very useful if you use and programmable parts on the board. #idefs can be used to build or understand software for various versions of the board.
Eagle allows for a comment file in each project. In it I record changes and even information that I learn while building the board. What to change in the next rev to make life easier. If your PCB program does not support it you can do much the same in a text file.
Please clarify your above statement, it don't make sense to me.
After etching the toner should wipe right off with a rag soaked in acetone. Make sure the board is dry first.
Nothing to clarify....that's the truth, the whole truth, and nothing but the truth.
I put the density to 5 (can choose 1-5)
and used the cardstock feature recommended by Pulsar.
Put the tranfer paper through machine about 4 times.....and dropped it in water immediately as recommeded....about 2 or 3 minutes later the paper easily slid right off the board with the inprint clearly visible on the board...put it under water and pieces of the toner came off here and there....the rest I used the scrubby side of a sponge with acetone...and like I said it was not real easy to get off of the board....I didn't use elbow grease....but I scrubbed it off like I would be washing a dish or something to that effect. It didn't wipe right off, that's for sure. Soooo.....i dunno, what did I do wrong?
By far the most common problem is that the laminator is not hot enough. Another member had the same problem. We let the laminator warm up for 1/2 hour and it worked fine.
The 2nd cause could be finger prints or other contaminants on the PCB or face of the toner. This is less common.
{snip}
Put the tranfer paper through machine about 4 times.....and dropped it in water immediately as recommeded....about 2 or 3 minutes later the paper easily slid right off the board with the inprint clearly visible on the board...put it under water and pieces of the toner came off here and there....the rest I used the scrubby side of a sponge with acetone...and like I said it was not real easy to get off of the board....I didn't use elbow grease....but I scrubbed it off like I would be washing a dish or something to that effect. It didn't wipe right off, that's for sure. Soooo.....i dunno, what did I do wrong?
"Put the tranfer paper through machine about 4 times....."
You have to keep exact count! If you don't, how are you going to change or replicate the results the next time? I have seen post by forum members running it through their machines more times than that.
If the toner don't stick to the copper then it was not not hot enough to transfer or the copper wasn't clean. That is the problem with laminators there is no easy way to determine that the board has reached its 300°F laminating temperature.
I would not use a sponge (don't ask me why) use the tip of a rag soaked in acetone.
Sorry let me clarify: I did it exactly 4 times and turned it 180 degrees each time.
I am not sure what you mean by, "if the toner don't stick", I'm guessing that the toner is sticking too much if I have to scrub to get it off after etching. Right?
When I used the green trf paper it was hard to keep the foil straight so it had wrinkles in it when it went through the laminator and came out all messed up. So I made another one without the green trf and it came out great just like the first one before I applied the green trf.
K I will try the rag without asking any questions....LOL
I am not sure what you mean by, "if the toner don't stick", I'm guessing that the toner is sticking too much if I have to scrub to get it off after etching. Right?
Rolf and I both got the impression that you did not get the toner to stick 100% to the copper.
about 2 or 3 minutes later the paper easily slid right off the board with the inprint clearly visible on the board...put it under water and pieces of the toner came off here and there...
Regarding the green TRF.
When you run it through the laminator use your finger to pull back and out on the TRF to keep it in tension. It will be fine. It takes a try or two to get it to work.
This site uses cookies to help personalise content, tailor your experience and to keep you logged in if you register.
By continuing to use this site, you are consenting to our use of cookies.