Electro Tech is an online community (with over 170,000 members) who enjoy talking about and building electronic circuits, projects and gadgets. To participate you need to register. Registration is free. Click here to register now.
Welcome to our site! Electro Tech is an online community (with over 170,000 members) who enjoy talking about and building electronic circuits, projects and gadgets. To participate you need to register. Registration is free. Click here to register now.
Hi, I'm having some trouble with a playstation one and I need some help.
How can i convert 12V to 7.5V? I'm thinking on put it in my car... Somebody has a circuit or some thing like that for this application?
This will be very simple and take up the space the size of a quarter. use an LM317 adjustable regulator. This should be available at any radio shack store or online as it is a very common regulator.You will only need two 1/4 watt resistors and one 1uf 10 volt electrolytic capacitor. The resistor values to achive 7.54 volts are as follows R1 240 ohms @ .25 watt and 7.5 ohm @ .25watt
i have attached the data sheet for LM317 but if it doesn't go through you can get it at onsemi.com or elsewhere online the application notes will show the placement of R1 and R2 and how to use this very versatile and inexpensive reg.
It is better to use 120R for R1 instead of 220/240R since commercial type 3XX devices need double the program current (min load current) than 1XX grade devices. R2 will then calculate as 600R
Note: The minimum load current for 1XX devices will be 5mA and for 3XX devices 10mA, with the adj pin current between 50-100uA
So many people use the LM317 without actually knowing why certain values are used in a design, so I thought a bit more info to be in order.
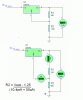
---
In practical applications a 10uF cap is fitted on the adj pin to improve transient response (and ripple rejection).
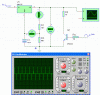
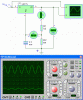
Lets look at the circuit without the cap fitted. In all tests we are switching the load at 1kHz.
Without the cap fitted we get poor transient response with large over/undershoots.
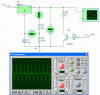
In the next diagram, we operate the 317 with a 5mA min load current and the 10uF cap. Note the improvement in the output response. (The scale on the scope is unchanged for all the tests)
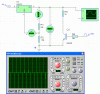
In the next diagram, we have the min load current at 10mA. See how there is an even more improvement (less over/undershoot) in the output response.
Note that we are doing these experiments without any output capacitor, cause we want to see how the device will respond on its own.
The last thing we will look at is the term "ripple rejection ratio" as quoted in the datasheet as 66dB min at a ripple frequency of 120Hz with the 10uF cap fitted.
Look at the diagram. We have a 12V supply with a 120Hz sine wave (2Vp-p) superimposed on it (like we will get from a 60Hz full wave rectifier, not the shape but the frequency). We look at the input and output on the scope. The output show a sinewave of 1mVp-p.
Taking 20(logIN/OUT) we get 20(log2/0.001) = 66dB
Looks like we (and the sim model) are spot on with the datasheet!
So this means that any ripple present on the input will be attenuated by 66dB once it reaches the output.
And that concludes our lecture for today. The next lecture will be ....
Note the values suggested for R3/4 (~1k-2k) where linear recommend this value to be between 100-300 Ohms for these devices LT1033CT to satisfy min load current conditions. **broken link removed**
Hi TheOne,
The PS1 does have R5 and R6 1K resistors to provide a minimum load current which is too low at lower output voltages but is nearly enough to make those 1/2W resistors red-hot with 24V outputs!
There are many arguments about using the proper 120 ohms resistor for an LM317 because so many circuits use a 240 ohms resistor just like the schematic on the 1st page of National's datasheet (for the lower-current "premium" LM117).
If you use a 240 ohms resistor for an LM317 regulator, and it had the max spec'd operating current of 10mA, without having another additional load I suppose its output voltage would be double what is expected plus 1.25V. The very low current project you just made and powered with this regulator is in for a big surprise!
I'm glad to see that your sim is smart enough to know that a regulator can actually regulate. I have seen many sims do really stupid things.
This site uses cookies to help personalise content, tailor your experience and to keep you logged in if you register.
By continuing to use this site, you are consenting to our use of cookies.