Continue to Site

Welcome to our site!

Electro Tech is an online community (with over 170,000 members) who enjoy talking about and building electronic circuits, projects and gadgets. To participate you need to register. Registration is free. Click here to register now.

  • Welcome to our site! Electro Tech is an online community (with over 170,000 members) who enjoy talking about and building electronic circuits, projects and gadgets. To participate you need to register. Registration is free. Click here to register now.

using PWM to dim LED NEON STRIP

MrDEB

Well-Known Member
couldn't locate this thread but here is the issue
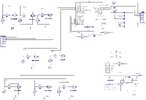
I breadboarded this circuit and it seems to work driving just an LED but I am driving a 12v led neon strip.
The circuit flashes the strip slowly to fast as per pot adjustment.
The 555 circuit works as planned with one LED (it is supposed to change the duty cycle
Thinking the two different supply voltages has something but what to do? Any suggestions?
NOTE THE 7555 IS POWERED BY THE pic
the MOSFET is logic level
 

Attachments

  • dimming circuit brd.png
    dimming circuit brd.png
    89.4 KB · Views: 375
After wiring up a board and frying a chip (accidentally shorted it out with notebook metal rings) programming the 18f4520 using the code from post #58 and all seems good. Instead of the suggested 5K pots I used 10K (all I have)
Thanks Tumbleweed.
Did some measurements with new mosfets. 12v to led strip w/4.5 on Gate it shows .230A
Lowered the gate voltage and current goes up as it should.
Tomorrow going to experiment with the other mosfets I have
 
as I understand it the Vgs(th) is where the MOSFET starts conducting. up to a max amount which is +-20v (IRFZ44NPbf)
Going to test some other MOSFETs as well. Want to see how close to the datasheet the Rds(on) is.
Youtube describes how to check for fake and real Mosfets
 
as I understand it.....

You don't.

IRFZ44NPbf is an N channel MOSFET. When the gate voltage is zero (i.e., grounded) the MOSFET won't conduct. When the gate is at the gate threshold voltage, the MOSFET starts to conduct. But when the gate voltage is near the threshold voltage, the MOSFET isn't fully on, so the drain–source resistance is at its maximum. At the gate voltage gets higher (more positive), the MOSFET is fully on, and Rds is at the minimum.

The graph below shows typical MOSFET behavior and not all datasheets include this graph (the IRFZ44N datasheet does not). At the gate threshold voltage, resistance is high. Above that voltage, it's low, and further increasing it doesn't make much difference.

Screenshot_20230804_094619_Edge.jpg
 
I have 2 0f the buck boosters from post#71 one controlling the gate voltage and one controlling the load voltage.
doing some mosfet testing. All with a 12v load LED strip Wish I did a graph. Thinking of a Mosfet tester that will detect REAL vers FAKE Mosfets (look on youtube) they turn on the Mosfet and then measure the voltage. compare to data sheets
GATE LOAD CURRENT
IRL520 1.8v .007A
3v .311A
5v .234

FDS6680AF 1.98v ,007A
3v .209
5v .244

IRFZ44NPbF 1.8v .007A
3v .237A
5v .213
 
Perhaps buying mosfets from a reputable source is easier than worrying and testing all of then.

I don't believe any of your troubles are the result of fake mosfets, rather than inappropriate choices.

Your test results don't make sense but of course I don't know what you actually did. As in the video, you should measure the voltage between gate and source, and calculate the resistance from that. At any rate, as the graph I posted shows, the resistance when the mosfet just turns on will be high, and as the gate voltage is increased beyond the threshold, the resistance will decrease. Past a certain point, the resistance is relatively constant.
 
That video measures the current incorrectly. He measures it once, with no fet in the circuit, and uses that value for each of the computations that follow.

To get the effective Rds you should measure the drain to source voltage AND current for each of the Vgs settings and compute it from that.
 
I bought the IRLZ44N from Newark. Hopefully a good supplier.
The method I used is = 2 - buck boosters, one supplying the gate voltage (increasing at 1 volt increments) and the other supplying the 12v and displaying the current measurement so yes I am measuring the current draw as well as the load voltage.
As per video, I need to retest and confirm.
 
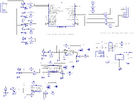
Finally got back to this project. Using Tumbleweeds suggestion of using the pic for PWM (dimming the 12v strips via a mosfet. Here is the schematic I came up with
 

Attachments

  • pic pwm schematic.jpg
    pic pwm schematic.jpg
    334.8 KB · Views: 97
Your circuit is ok but you'll have to use bit-banged PWM if those are the pins you want to use (on the PIC). Not all pins can be pwm'ed with a pic using the hardware PWM. Look up the datasheet for CCP1, CCP2, ...
 
Here is the code that I am basically going to use. I tested one port only. Plan to run the code as is then add other ports etc but only have 3 ports with dimming capabilities using the 18f2221 many thanks to Tumbleweed
// Swordfish BASIC three-channel software PWM using TMR2 and ADC inputs Device = 18F4520 Clock = 32 Include "intosc.bas" // do NOT include setdigitalio // to use PORTB for the ADC all pins must be in analog mode due to the way // these old pics map ADC inputs Dim test As PORTE.0 Dim z As Byte Include "adc.bas" Dim x As Byte // ADC pot inputs // used to set the PWM duty cycle for PWM1-PWM3 // connect pot upper lug = VDD, lower lug = GND, wiper = port IO Dim POT1 As PORTB.0, // RB0/AN12 POT2 As PORTB.1, // RB1/AN10 POT3 As PORTB.2 // RB2/AN8 // ADC channels Const CH_POT1 = 12, // AN12 CH_POT2 = 10, // AN10 CH_POT3 = 8 // AN8 // PWM outputs Dim PWM1 As PORTA.0, PWM2 As PORTA.1, PWM3 As PORTA.2 // pwm duty cycles (from ADC) 0=min, 255=max Dim pwm1_duty As Byte, pwm2_duty As Byte, pwm3_duty As Byte Dim pwm_period As Byte // pwm timer TMR2 Dim TMR2IF As PIR1.bits(1), TMR2IE As PIE1.bits(1), TMR2ON As T2CON.bits(2) // set IO pin directions and initial settings Sub InitIO() // set inputs Input(POT1) Input(POT2) Input(POT3) // set outputs (low to start) Low(PWM1) Low(PWM2) Low(PWM3) End Sub // pwm TMR2 interrupt Interrupt tmr2_isr() TMR2IF = 0 pwm_period = pwm_period + 1 If (pwm_period >= pwm1_duty) Then PWM1 = 0 Else PWM1 = 1 EndIf If (pwm_period >= pwm2_duty) Then PWM2 = 1 Else PWM2 = 0 EndIf If (pwm_period >= pwm3_duty) Then PWM3 = 1 Else PWM3 = 0 EndIf End Interrupt main: For z = 0 To 5 test = 1 DelayMS(500) test = 0 DelayMS(500) Next InitIO() // ADC setup ADCON1 = $00 // all pins set to analog mode, VREF = VDD/GND ADCON2 = ADC.FRC // ADC clock = Frc ADC.ADFM = 0 // left justify (we only use the 8 MSB's) ADC.SetAcqTime(100) // 100us delay pwm_period = 0 pwm1_duty = 0 pwm2_duty = 0 pwm3_duty = 0 // setup pwm timer TMR2 // 25KHz = 40us/bit -> 40us x 256 = 10240us period, ~10ms period (100Hz) T2CON = %00000001 // T2OUTPS<3:0>=%000 (1:1), TMR2ON=0, T2CKPS<1:0>=%01 (1:4) PR2 = 176 TMR2 = 0 TMR2IF = 0 TMR2IE = 1 TMR2ON = 1 Enable(tmr2_isr) While (true) pwm1_duty = ADC.Read(CH_POT1) >> 8 pwm2_duty = ADC.Read(CH_POT2) >> 8 pwm3_duty = ADC.Read(CH_POT3) >> 8 End While
 
You can add more PWMx outputs, but you only have 3 pots to set the duty cycles so you'll have to share them.

Add an output statement for your TEST/PORTE.0 if you want the for z loop to show anything.
 
Maybe lost, but you added z, test, and x to that code
Way back in the old days, when I was learning BASIC on a Hewlett-Packard HP-85, variable names were limited to one letter + one number. Subroutines may have been the same way.

If I was adding a quick change to a program, I got in the habit of using the variable O0 (oh-zero). I figured this was a safe name since nobody but an idiot would use it.

In the intervening years, I've become far more descriptive in my variable and subroutine names so that their purpose is readily apparent when I look at the program in the future.... or even 20 minutes from now.
 

Latest threads

New Articles From Microcontroller Tips

Back
Top