Continue to Site

Welcome to our site!

Electro Tech is an online community (with over 170,000 members) who enjoy talking about and building electronic circuits, projects and gadgets. To participate you need to register. Registration is free. Click here to register now.

  • Welcome to our site! Electro Tech is an online community (with over 170,000 members) who enjoy talking about and building electronic circuits, projects and gadgets. To participate you need to register. Registration is free. Click here to register now.

using PWM to dim LED NEON STRIP

MrDEB

Well-Known Member
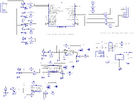
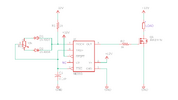
couldn't locate this thread but here is the issue
I breadboarded this circuit and it seems to work driving just an LED but I am driving a 12v led neon strip.
The circuit flashes the strip slowly to fast as per pot adjustment.
The 555 circuit works as planned with one LED (it is supposed to change the duty cycle
Thinking the two different supply voltages has something but what to do? Any suggestions?
NOTE THE 7555 IS POWERED BY THE pic
the MOSFET is logic level
 

Attachments

  • dimming circuit brd.png
    dimming circuit brd.png
    89.4 KB · Views: 369
Well after tracking down all my wires etc. then testing I get too much flicker using the PWM that Tumbleweed provided. I can adjust the pots some what for less flicker. Need to look in to a faster clock speed?
using the schematic in post#152.
Code:
{
*****************************************************************************
*  Name    : UNTITLED.BAS                                                   *
*  Author  : [select VIEW...EDITOR OPTIONS]                                 *
*  Notice  : Copyright (c) 2024 [select VIEW...EDITOR OPTIONS]              *
*          : All Rights Reserved                                            *
*  Date    : 1/5/2024                                                       *
*  Version : 1.0                                                            *
*  Notes   :                                                                *
*          :                                                                *
*****************************************************************************
}
// Swordfish BASIC three channel software PWM using TMR2 and ADC inputs
Device = 18F2221
Clock = 32

Include "intosc.bas"
// do NOT include setdigitalio
// to use PORTB for the ADC all pins must be in analog mode due to the way
// these old pics map ADC inputs

Include "adc.bas"

// ADC pot inputs
// used to set the PWM duty cycle for PWM1-PWM3
// connect pot upper lug = VDD, lower lug = GND, wiper = port IO
Dim
    POT1 As PORTB.0,    // RB0/AN12
    POT2 As PORTB.1,    // RB1/AN10
    POT3 As PORTB.2     // RB2/AN8


Dim LETTERING_1 As PORTB.3,
    LETTERING_2 As PORTB.4,
    LETTERING_3 As PORTB.5

// ADC channels
Const
    CH_POT1 = 12,       // AN12
    CH_POT2 = 10,       // AN10
    CH_POT3 = 8         // AN8
 
// PWM outputs
Dim          //non diming mosfets  FOR GLASS, LETTERING AND ICE CUBES
             // THE RED STRAW AND ICE CUBES TO HAVE DIMMING
    PWM1 As PORTA.5,   //GLASS  ----- DIMMING
    PWM2 As PORTA.6,   //ICE CUBES -- DIMMING
    PWM3 As PORTA.7    //RED STRAW -- DIMMING

// pwm duty cycles (from ADC) 0=min, 255=max
Dim
    pwm1_duty As Byte,
    pwm2_duty As Byte,
    pwm3_duty As Byte

Dim pwm_period As Byte

// pwm timer TMR2
Dim
    TMR2IF As PIR1.bits(1),
    TMR2IE As PIE1.bits(1),
    TMR2ON As T2CON.bits(2)


Dim Green_strip_0 As PORTA.0
Dim Green_strip_1 As PORTA.1
Dim Green_strip_2 As PORTA.2
Dim Green_strip_3 As PORTA.3
Dim Green_strip_4 As PORTA.4

 //LEDS ON PORTC
 Dim LED0 As PORTC.0  //USE FOR THE "GREEN STRAW INDICATORS"
 Dim LED1 As PORTC.1
 Dim LED2 As PORTC.2
 Dim LED3 As PORTC.3
 Dim LED4 As PORTC.4
// Dim LED5 As PORTC.5
// Dim LED6 As PORTC.6
 
 Dim X As Byte
 
 
// set IO pin directions and initial settings
Sub InitIO()
    // set inputs
    Input(POT1)
    Input(POT2)
    Input(POT3)
 
    // set outputs (low to start)
    Low(PWM1)
    Low(PWM2)
    Low(PWM3)
End Sub

// pwm TMR2 interrupt
Interrupt tmr2_isr()
    TMR2IF = 0  
    pwm_period = pwm_period + 1
    If (pwm_period >= pwm1_duty) Then
        PWM1 = 0
    Else
        PWM1 = 1
    EndIf
    If (pwm_period >= pwm2_duty) Then
        PWM2 = 1
    Else
        PWM2 = 0
    EndIf
    If (pwm_period >= pwm3_duty) Then
        PWM3 = 1
    Else
        PWM3 = 0
    EndIf
End Interrupt


main:
InitIO()
PORTC = %11111111    // all on for testing
//xxxxxxxxxxxxxxxxxxxxxxxxxxxxxxxxx
//GREEN STRIPS
PORTA.0 = 1
PORTA.1 = 1
PORTA.2 = 1
PORTA.3 = 1
PORTA.4 = 1
//XXXXXXXXXXXXXXXXXXXXXXXX
//LETTERING
PORTB.3 = 1
PORTB.4 = 1
PORTB.5 = 1
//SIGM LETTERS
Output(LETTERING_1)
Output(LETTERING_2)
Output(LETTERING_3)


Output(Green_strip_0)  // DRINK LEVEL
Output(Green_strip_1)
Output(Green_strip_2)
Output(Green_strip_3)
Output(Green_strip_4)
//XXXXXXXXXXXXXXXXXXXXXXXXXXXXXXXXX


//STRAW SIPPING
Output(LED0)
Output(LED1)
Output(LED2)
Output(LED3)
Output(LED4)
//Output(LED5)
//Output(PORTC.6)

// STRAW LEDS
LED0 = 0    //ALL OFF
LED2 = 0
LED3 = 0
LED4 = 0


// ADC setup
ADCON1 = $00        // all pins set to analog mode, VREF = VDD/GND
ADCON2 = ADC.FRC    // ADC clock = Frc
ADC.ADFM = 0        // left justify (we only use the 8 MSB's)
ADC.SetAcqTime(100) // 100us delay

pwm_period = 0
pwm1_duty = 0
pwm2_duty = 0
pwm3_duty = 0

// setup pwm timer TMR2
// 25KHz = 40us/bit -> 40us x 256 = 10240us period, ~10ms period (100Hz)
T2CON = %00000001   // T2OUTPS<3:0>=%000 (1:1), TMR2ON=0, T2CKPS<1:0>=%01 (1:4)
PR2 = 176
TMR2 = 0
TMR2IF = 0
TMR2IE = 1
TMR2ON = 1

Enable(tmr2_isr)
//XXXXXXXXXXXXXXXXXXXXX
//SET ALL PORTS OFF

Green_strip_0 = 0
Green_strip_1 = 0
Green_strip_2 = 0
Green_strip_3 = 0
Green_strip_4 = 0
LETTERING_1 = 0
LETTERING_2 = 0
LETTERING_3 = 0


While (true)

    pwm1_duty = ADC.Read(CH_POT1) >> 8     //porta.5  pot b.o
    pwm2_duty = ADC.Read(CH_POT2) >> 8     //porta.6   pot b.1
    pwm3_duty = ADC.Read(CH_POT3) >> 8     //porta.7    pot b.2
 
   // Green_strip_0  = 1      //for testing only porta.0
    //DelayMS(3000)
    //Green_strip_0  = 0
    PORTC = %11111111
 
    Green_strip_0  = 1
    Green_strip_1  = 1
    Green_strip_2  = 1
    Green_strip_3  = 1
    Green_strip_4  = 1
    LETTERING_1 = 1
    LETTERING_2 = 1
    LETTERING_3 = 1
   
End While
 
GOING FROM BAD TO WORSE
the PWM code in post#148 and #167 work but way too much blinking.
changing this
Code:
  If (pwm_period >= pwm3_duty) Then
        PWM3 = 1
    Else
        PWM3 = 0
    EndIf
End Interrupt
to
If (pwm_period >= pwm3_duty) Then
PWM3 = 0
Else
PWM3 = 1
EndIf
End Interrupt
SEEMED TO SLOW DOWN THE BLINKING BUT STILL TOO MUCH
decided to go back to basics but more woes.
The glass has a very short flash on then off and the ice stays on
Code:
{
*****************************************************************************
*  Name    : UNTITLED.BAS                                                   *
*  Author  : [select VIEW...EDITOR OPTIONS]                                 *
*  Notice  : Copyright (c) 2024 [select VIEW...EDITOR OPTIONS]              *
*          : All Rights Reserved                                            *
*  Date    : 3/15/2024                                                      *
*  Version : 1.0                                                            *
*  Notes   :                                                                *
*          :                                                                *
*****************************************************************************
}
{
*****************************************************************************
*  Name    : UNTITLED.BAS                                                   *
*  Author  : [select VIEW...EDITOR OPTIONS]                                 *
*  Notice  : Copyright (c) 2024 [select VIEW...EDITOR OPTIONS]              *
*          : All Rights Reserved                                            *
*  Date    : 1/5/2024                                                       *
*  Version : 1.0                                                            *
*  Notes   : SOFTWARE PWM                                                               *
*          :                                                                *
*****************************************************************************
}

 Device = 18F2221
Clock = 16

// int osc and IO pin libraries
Include "intosc.bas"
#option DIGITALIO_INIT = true       // automatically call setalldigital
Include "setdigitalio.bas"
Include "convert.bas"


Dim LETTERING_1 As PORTB.3,
    LETTERING_2 As PORTB.4,
    LETTERING_3 As PORTB.5

Dim         
   Glass As PORTA.5,   //GLASS  ----- DIMMING
   ICE   As PORTA.6,   //ICE CUBES -- DIMMING
   RED_STRAW As PORTA.7    //RED STRAW -- DIMMING

Dim Green_strip_0 As PORTA.0
Dim Green_strip_1 As PORTA.1
Dim Green_strip_2 As PORTA.2
Dim Green_strip_3 As PORTA.3
Dim Green_strip_4 As PORTA.4

 //LEDS ON PORTC
 Dim LED0 As PORTC.0  //USE FOR THE "GREEN STRAW INDICATORS"
 Dim LED1 As PORTC.1
 Dim LED2 As PORTC.2
 Dim LED3 As PORTC.3
 Dim LED4 As PORTC.4

 Dim X As Byte
//xxxxxxxxxxxxxxxxxxxxxxxxxxxxxxxxx

//GREEN STRIPS
PORTA.0 = 0
PORTA.1 = 0
PORTA.2 = 0
PORTA.3 = 0
PORTA.4 = 0

//LETTERING
PORTB.3 = 0
PORTB.4 = 0
PORTB.5 = 0
//SIGM LETTERS

// STRAW LEDS
LED0 = 0    //ALL OFF
LED2 = 0
LED3 = 0
LED4 = 0
//XXXXXXXXXXXXXXXXXXXXX
PORTB.0 = 0
PORTB.1 = 0
PORTB.2 = 0

//SET ALL PORTS OFF

Green_strip_0 = 0
Green_strip_1 = 0
Green_strip_2 = 0
Green_strip_3 = 0
Green_strip_4 = 0
PORTC = %00000000    // all on for testing

LETTERING_1 = 0
LETTERING_2 = 0
LETTERING_3 = 0
//XXXXXXXXXXXXXXXXXXXXXXXXXXX
//SET PORTS AS OUTPUTS
Output(LETTERING_1)
Output(LETTERING_2)
Output(LETTERING_3)
Output(PORTB.0)
Output(PORTB.1)
Output(PORTB.2)
Output(PORTB.3)
Output(PORTB.4)
Output(PORTB.5)


Output(Green_strip_0)  // DRINK LEVEL
Output(Green_strip_1)
Output(Green_strip_2)
Output(Green_strip_3)
Output(Green_strip_4)
//STRAW SIPPING
Output(LED0)
Output(LED1)
Output(LED2)
Output(LED3)
Output(LED4)
// ICE
Output(Glass)
Output(ICE)
Output(RED_STRAW)
//XXXXXXXXXXXXXXXXXXXXXXXXXXXX
SetAllDigital()

While (true)
    Glass = 1
    ICE = 1
    RED_STRAW = 1
  
 
    PORTC = %11111111
  
    Green_strip_0  = 1
    Green_strip_1  = 1
    Green_strip_2  = 1
    Green_strip_3  = 1
    Green_strip_4  = 1
    LETTERING_1 = 1
    LETTERING_2 = 1
    LETTERING_3 = 1
  
End While
 
No I am using the schematic in post#152
One mosfet per pic output.
Attempting to just turn on each MOSFET separately.
Using the code you provided seems to work, BUT lots of flickering and adjusting each pot separately changes the output on all three separate LED strips.
Thinking of maybe a software dimming as I did on my Christmas stars??
 
I don't know why I think of this when I read these threads?

 
Before I try and decipher what you did, back in post#150 you said this:
the code in post#146 works pretty good but will run post#148 and move/ re-lable some things, plus add 3 more mosfets if needed but not sure.

Is that true? The code in post#146 worked ok?
You can't just randomly start twiddle the PORT bits directly the the loop and still have things work.
 
post#148 and post#167 have issues with excessive blinking regardless of the pot settings (ports (B.0, B.1, B.2 ). I adjust one pot and it changes what the other PWM ports are doing.
I am going to rethink this setup.
 
Try the code from post #161, but make the following change:
FIND:
Code:
// setup pwm timer TMR2
// 25KHz = 40us/bit -> 40us x 256 = 10240us period, ~10ms period (100Hz)
T2CON = %00000001   // T2OUTPS<3:0>=%000 (1:1), TMR2ON=0, T2CKPS<1:0>=%01 (1:4)
PR2 = 176

CHANGE TO:
Code:
// setup pwm timer TMR2
// 40KHz = 25us/bit -> 25us x 256 = 6400us period, 6.4ms period (156Hz)
T2CON = %00000001   // T2OUTPS<3:0>=%000 (1:1), TMR2ON=0, T2CKPS<1:0>=%01 (1:4)
PR2 = 207

I didn't check but I think that'll still work with the ISR timing. See if that changes the flashing issue
 
It helped some, but still flickering.
I'm thinking of going the "easy way out" and purchasing some LED neon rope dimmers.
did some searching and found several schematics for dimming these ropes using a pot, a Mosfet, and a capacitor.
 

Attachments

  • led dimmer.pdf
    151.4 KB · Views: 36
disregard post #170
I used a frequency meter on my DMM and the readings on the outputs of porta.5,6,7 turn off and on but getting a frequency of 35-43hz.
after thinking about post # 170 using only a pot, a cap, and Mosfet, the example on YouTube is way out of touch. The Mosfet WILL get hot as it is never fully turned on.
I plan to build a circuit on a perf board using a 555 and the 12V supply for PWM to get a higher-frequency output for dimming the LED strips instead of using the 5V supply on the PCB as before.
If this works then will add 2 more 555 stages for 3 channels then attaching to the PCboard.
The code and added suggestions are too erratic. The strips blink, and then one channel blinks momentarily for 1/2 second. Adjusting one pot affects the other two channels.
 
Switching inputs is why I am considering a separate circuit using a 555 to generate the PWM then use the pic to control the 5v LEDs on portc and the porta outputs for controlling the dimming of the glass, ice and red straw only.
Plan to assemble the 555 circuit on a separate perfboard
 

Attachments

  • pwm circuit1.png
    pwm circuit1.png
    43.8 KB · Views: 32
Switching inputs is why I am considering a separate circuit using a 555 to generate the PWM then use the pic to control the 5v LEDs on portc and the porta outputs for controlling the dimming of the glass, ice and red straw only.
Plan to assemble the 555 circuit on a separate perfboard
You don't need a separate circuit, just debug the one you've got.

Mike.
 
...he doesn't seem to have any delays at all when switching inputs?
The ADC.Read() function has a delay built-in after the channel is selected,
and the delay is set by the call to 'ADC.SetAcqTime(100)' to provide a 100us delay

The 18F2221 has a max input-Z spec for the ADC of 2.5K, which is pretty low.
Could always try changing that AcqTime, or add a small cap to the ADC input channels.

I used a frequency meter on my DMM and the readings on the outputs of porta.5,6,7 turn off and on but getting a frequency of 35-43hz.
That doesn't sound right, but if that's the PWM freq you're getting then no wonder it's "flashing".
I don't have an 18F2221 to run it on, but let me try and check the timing.
It would help if you quit changing the 'clock' freq around and run it at 32MHz as written.
 
If it's not acquisition time then what could it be?

Mike.
Edit maybe the delay code thinks it's running at 32k but in reality it's 32M so 100uS becomes 0.1 uS
Edit 2, what does clock=32 mean? 32Hz kHz or MHz
 
Last edited:
what does clock=32 mean?
The 'clock=' statement is in MHz.

The intosc.bas module should take care of setting the CONFIG and OSCCON registers to get 32MHz, although I doubt it's actually been tested with the ancient 18F2221.

If it's not acquisition time then what could it be?
Good question...
 

Latest threads

New Articles From Microcontroller Tips

Back
Top