Continue to Site

Welcome to our site!

Electro Tech is an online community (with over 170,000 members) who enjoy talking about and building electronic circuits, projects and gadgets. To participate you need to register. Registration is free. Click here to register now.

  • Welcome to our site! Electro Tech is an online community (with over 170,000 members) who enjoy talking about and building electronic circuits, projects and gadgets. To participate you need to register. Registration is free. Click here to register now.

Need some help about UV led's

Status
Not open for further replies.

SODA

Member
Hi,

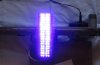
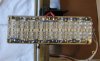
I've learned that UV tubes has a expire date. They say that after some time the UV rays start to fade.
Will this be the same for UV led's or does they last fore ever or for at least the time a normal led last.

My second question is, if you want to replace your tubes with UV led's how many do you need for pcb's up to a size of say 200mm x200mm and how far from each other do you space them.

My last question is, what foreward current would you shoose to run them on. Will 20mA be ok?

I'll appresiate any help i can get.
 
Did you have a look at the link i posted in "What kind of printer is best" thread a couple of threads down, on an article i done on making pcb's.

I have used UV leds for years now and have them attached to the carriage out of an old bubble jet printer to make a scanning system so as to keep the number of leds required to a minimum.
I also done a how to build a UV led scanner on a different forum.

I used led clusters and found it cheaper and easier than using single leds.
As the clusters come in blocks of 8 leds but have a gap between 2 blocks of 4 i needed to stack them side by side, this gives 4 leds in a row.
Each cluster is rated at 12 volt.

Here is a few photos of what i use.

Pete.
 

Attachments

  • UV Light clusters.JPG
    UV Light clusters.JPG
    2 MB · Views: 319
  • 013  Small.jpg
    013 Small.jpg
    47.8 KB · Views: 320
  • UV leds small 06.jpg
    UV leds small 06.jpg
    60.1 KB · Views: 310
  • 005 small.jpg
    005 small.jpg
    62.4 KB · Views: 307
Last edited:
SAborn

I'm not sure if those led clusters is available to me. All we have down here is led strips, but it looks like i have to place them close to each other.Do these UV led's have close angles or are they wide angle. The reason for asking this is, do it need to cover the whole pcb with the light of the UV led's. Thought, i just wonder if I'll be able to use a type of a scanner or something that work like a scanner to expose the pcb's under the UV's, or above the UV's

Thanks alot for showing me your pic's. I always enjoy pic's. One thing i'm going to try is that oil ting you talking about. That's for sure.

Thanks for your help.
 
Last edited:
The led clusters were bought off ebay, so would expect you could also get them.

Yes the leds need to be close, and the reason i have the leds mounted about 125mm above the circuit board is so each led light spot overlaps with the other next to it or you will get uneven exposure across the circuit board.

They are a standard ultra bright led with a narrow lense (15-20 degree lense i think)

The best thing you can do is get the UV light side setup good and then making boards is just so easy afterwards.

I placed another link in the "What kind of printer is best" thread you might like to look at about making a UV scanner.

If you want a ebay link to led clusters i will try to find one.
OK clusters here.........

**broken link removed**


Pete.
 
Last edited:
Nice setup SABorn, I especially like the addition of the scanner to sweep the light. I've always wondered if LED hotspots would cause a problem with exposure. You could probably do one better and make the bar spin in place =)
 
I do 100's of boards a year with this crap setup made from junk, and every board comes out perfect.
Its just a matter of getting the led light spots to overlap slightly.

Half the fun is making the scanner, and then smileing at the results you get everytime so easy.

It dont need to be pretty to work well.

Pete.
 
Form follows function, making it pretty won't help it work. Although I think I would like some kind of support on the far end just on general principals. Seeing open ended arms always bothers me. =) Mind you the arm that's anchored looks like it could be hit by a baseball bat and still stay in place, even some chintzy piece of doweling to reduce the possible leverage on the load bearing arm, the extra support could be used to hold the exposure plate in place.
 
Last edited:
No need for extra support as its solid enough, and only needs to hold the weight of the leds, your mothers chooks could roost on it and it wont move. :D

I just place the pcb on the base board with the paper artwork on top and a sheet of plain old glass on top to hold it flat...........works well for me.

Keep it simple, and it will work well, as long as the height dont change and the exposure time remains the same everything will work out everytime.

One thing i often notice is how everyone puts so much importance into how good their light box is and how much they paid for it and bla, bla bla.............
To the point it puts others off at having a go at making their own boards, as it all looks too hard and costs to much

And here i use $20.00 of leds and some discarded junk, with very good results, and more than likely make more boards than the guys with the high priced light boxes.

Its easy have a go i say.......you wont regret it.

Pete.
 
No need for extra support as its solid enough, and only needs to hold the weight of the leds, your mothers chooks could roost on it and it wont move. :D

I just place the pcb on the base board with the paper artwork on top and a sheet of plain old glass on top to hold it flat...........works well for me.

Keep it simple, and it will work well, as long as the height dont change and the exposure time remains the same everything will work out every time.

One thing i often notice is how everyone puts so much importance into how good their light box is and how much they paid for it and bla, bla bla.............
To the point it puts others off at having a go at making their own boards, as it all looks too hard and costs to much

And here i use $20.00 of leds and some discarded junk, with very good results, and more than likely make more boards than the guys with the high priced light boxes.

Its easy have a go i say.......you wont regret it.

Pete.
Another good tip to add to your very useful post is to replace normal glass with non reflective glass. It's helps alot to get rid of the glare of the uv rays. The type of glass they used to use on picture frames.
Last night when i've looked at the oil thing, i took clear lacquer spray and it seems to work just as well with no oil mess.I also use a home made light box and it work just as well as those expensive boxes you buy. I add a LM7555 timer to it and i'm very proud of it.**broken link removed**
 
I have not found the need for non reflective glass, as many has posted a benefit for.

Its good to know about clear lacquer spray works well, but cooking oil is something we all have at hand and is very cheap and works well.

Unfortunately your link is broken and dont work for me, maybe you can fix it as i would like a look.

Pete.
 
Pete, The lacquer is after all not that good because i reliesed when it became totally dry it's lost it's transparency .To get back to the UV led's. I just made some calculations and this is how it looks.
I'm going to take in overall 16 x 32 arrays with a 12R @0.25w resistor per array + 1 extra array with 8 led;s on a 1k5 @1w resistor All together it'll use 560 led's @ 53v source. Ok i know that's a lot of costs, but that is no concern to me. The 53v is a bit high but on the other hand, i'm used to work with high voltages. The pumps i work with at the pump station run on3k3vac.

So, what do you think Pete, what would be the overall size of this display. Would it be enough to expose a pcb up to 200mm x 200mm?
 
Ok i'll try to upload another one. Don't know why it didn't work in the first place because i clicked on the insert image button, strange!**broken link removed**
 
If it was me i would work to around 24 volt supply so a standard voltage reg could be used in a system to control the leds on time/passes.

Before you go too far you should do a test with 1 led to see how well it works on a scrap of board, the reason is there is some UV leds of the wrong wave length in UV light that dont work well with the circuit board. (like the ones a dentist uses)
1 single led at close range (50mm) should expose a board section in around 30-60 seconds.

What is the MCD rating of the leds you are looking at using, as mine was rather high, and from what i remember it was around 5000mcd.

Your link is still broken as i get this when i click it.............

Pete.
 

Attachments

  • notice.JPG
    notice.JPG
    24.7 KB · Views: 285
Pete, i've already notify the administrator about the problem with the uploads. Maybe you can tell me what exactly you do when you upload your pic's. While i'm online i'm able to open the pic's, but when i log out and on again it seems not to work. Where do i look for the admin. reply. I'm still new here and this forum is working completely different from others, so i'm kind of lost here

I have to log out and then visit the online store to be able to see the specks of the led's, so i'll come back tomorrow or shall i say later today because it's already 12:30AM in the morning.I decided to first wait with the led's and do as you just told me.I wasn't even aware of all these things you told me.

It's nice to talk to you, you know, you already helped me a hell of a lot and i would love to show you all my pic's, so please be patient. Maybe it'll work if i send you a PM but you first have to say if it's ok. I don't want to be a nuisance to you.
 
Last edited:
Hi Soda,

With adding photos, just scroll down below the box you type a message in and you should see a "Manage Attachments" button ...click that...then click browse ...find your file of the photo on your computer, ...then click upload.....Close the upload window.

The photo will show up in the post when its submitted.

I have no problem if you want to PM me, the reason i spend the time putting these articles together is to help people like yourself.
Send me an email address is that is easier for you.

Pete.
 

Attachments

  • manage attachments.JPG
    manage attachments.JPG
    64.7 KB · Views: 257
Hi Soda,

With adding photos, just scroll down below the box you type a message in and you should see a "Manage Attachments" button ...click that...then click browse ...find your file of the photo on your computer, ...then click upload.....Close the upload window.

The photo will show up in the post when its submitted.

I have no problem if you want to PM me, the reason i spend the time putting these articles together is to help people like yourself.
Send me an email address is that is easier for you.

Pete.

Ok Pete, this is going to be my last try. If it's not working then i send my email ad with a PM. About the oil thing, i applied it with a kitchen sponge and it was working gr8, so from now on the oil is in and the transp is out, for sure. I've red all those page i've d/loaded and came up with a plan (plan z)Ha, Ha. I still have a old scanner. I'm going to fit the led's on the part which hold the cold c tube.You said 2 rows with say 20 or 30 in each row would be ok. This means i don't have to use 560 led's.The only led's thats available to me are those with peak wave length of 410nm.If this is not ok, then i have to have a look at ebay
Thanks again for all your help, you are just a gr8 person you know... to give all this info away for free.
 

Attachments

  • EXPOSE BOX.jpg
    EXPOSE BOX.jpg
    102.8 KB · Views: 288
Last edited:
O no! to buy at ebay the only way to pay is with Pay Pal and my bank does not use it. So i just have to keep on dreaming about it.
 
Well done the picture worked.:)

I must say the tidyness of you workshop puts me to shame, mine has about 10 projects deep on the bench, and crap eveywhere. :eek:

The scanner will work if you can figure out a way to drive it slow enough and do enough passes, BUT... remember you need to have 100-150mm gap between the leds and the circuit board as to allow the led light spots to overlap evenly or you will get strips in your exposure.

The first one i built just used 2 rows of single leds, but this required more passes to get good exposure than the one with 4 rows of leds.
The 2 rows of leds was staggered so the second row was in the gap between to leds of the first row.

The whole thing is just about anything will work and its all about how you set it up and allow enough time/passes to expose the board.

I build a lot of stuff from recycled crap and its cheap and effective, plus a lot of fun re-engineering something.

The most enjoyable part is knowing my waffle on a project actually helps someone like you, i think its a sad world when you cant give something back to others free of charge.

Pete.
 
Status
Not open for further replies.

Latest threads

Back
Top